
Chrysler 200
Front Brake Pads Replacement Guide
How to change the front disc brake pads
on a 1st generation 2011-2014 Chrysler 200 sedan with photo illustrated steps.

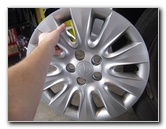
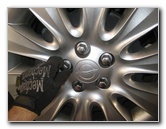
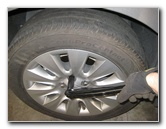
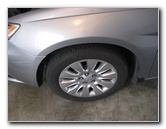 2013 Chrysler 200 Front Wheel |
 Slightly Loosen 5 Lug Nuts |
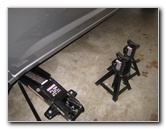
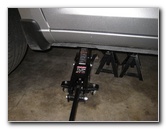 Raise Front of Vehicle |
| This
automotive maintenance tutorial was specifically written to assist
owners of the first generation (2011, 2012, 2013 & 2014) Chrysler
200 sedan in changing the front disc brake pads and lubricating the
caliper slider pins. Owners of other Chrysler, Dodge, Jeep or RAM vehicles such as the Avenger, 300, Town & Country, Challenger, Charger, Dart, Durango, Journey, Grand Caravan, Patriot, Wrangler, Grand Cherokee, Compass, 1500, 2500, 3500, C/V Tradesman and ProMaster may also find these DIY instructions to be helpful. The tools needed to complete this procedure include a lug nut wrench, a floor jack, two jack stands, a 14mm socket with a 3/8" ratcheting wrench, a "C" or "F" clamp, a packet of brake parts lubricant grease and a set of new front brake pads. A few compatible replacement sets of new front brake pads with their part numbers are as follows: Wagner QC866, Bendix D866, Akebono ACT866, ACDelco 17D1285CH, Bendix D866CT, Monroe CX866, Dura International # BP866 C, Bosch BP866 and Bosch BE866. |
||
|
|
||
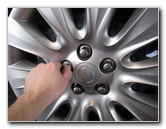 Spin Off 5 Lug Nuts |
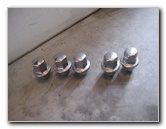 5 Lug Nuts Removed |
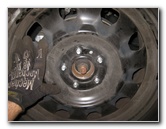
 Pull Off Hub Cap & Wheel |
| The first few steps
are to park the car on a level surface, engage the emergency / parking brake
and chock the rear wheels to prevent the vehicle from moving. Slightly loosen the 5 lug nuts on the front wheels in the counterclockwise direction with the tire iron. Raise the front of the vehicle with the floor jack and securely support it with the two jack stands. (I prefer to work on one side of the car at a time and keep three wheels on the ground for extra safety.) Spin off the 5 lug nuts and set them aside in a safe place. Pull off the plastic wheel cover or "hub cap". |
||
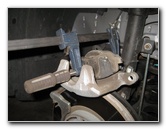
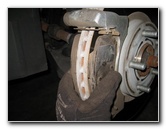
 Caliper, Bracket & Rotor |
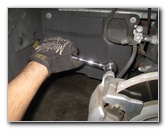
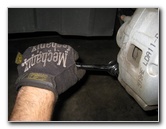
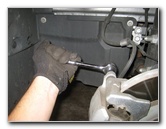 Loosen Upper 14mm Bolt |
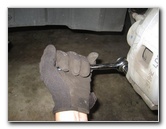 Loosen Lower 14mm Bolt |
| Remove the front
wheel to reveal the caliper, bracket, rotor and suspension. The front brake caliper is held in place to the bracket by two bolts located on the rear face of the caliper facing towards the engine bay. Loosen the upper caliper bolt by turning it clockwise (as seen from the outside of the vehicle) with the 14mm socket and 3/8" drive ratcheting wrench.Then loosen the lower 14mm caliper bolt in the clockwise direction. |
||
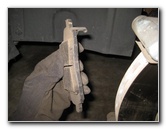
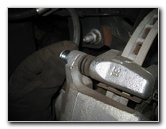
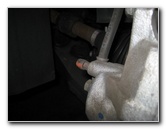
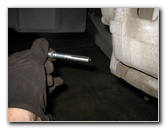 Pull Out Caliper Bolt / Pin |
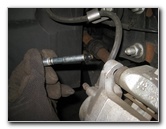 Upper Caliper Bolt / Slider Pin |
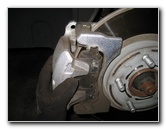
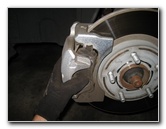 Pull Off Brake Caliper |
| Spin out the two
combination caliper bolts and caliper slider pins. Set them aside in a safe
place. Carefully lift the caliper out of the bracket and either rest it on the suspension or suspend it from the spring with a bungee cord. |
||
 Rest Caliper On Suspension |
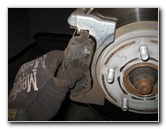
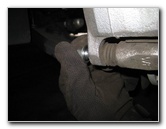
 Remove Old Outer Pad |
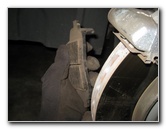
 Wear Bar - Top Inner Pad |
| Pull the old brake
pads out of the bracket and make a mental note of where the wear indicator
bar or "squeal bar" is situated on the old pads. On this 2013 Chrysler 200, the wear indicator bar was located at the top of the inner brake pad. I'd recommend buying the Wagner ThermoQuiet QC866 brake pads since they have great reviews on Amazon. I also like how they don't require any backing plates, shims or disc brake quiet gel due to the built in insulator. |
||
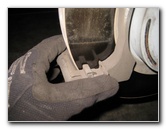 Replace Pad Abutment Clips |
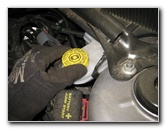
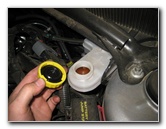 Twist Off Brake Fluid Cap |
 Attach "C" Clamp To Caliper |
| If your new set of
front brake pads included replacement brake hardware, pull the old metal pad
abutment or "anti-rattle" clips out of the top and bottom of the bracket
before installing the new ones in their place. In order for the caliper to fit over the thicker new brake pads, the caliper piston needs to be compressed backwards. Attach the "C" or "F" clamp to the caliper using the back of an old brake pad to evenly distribute the pressure across the piston. Move to the right rear area of the engine bay and twist off the yellow plastic cap on the brake fluid reservoir in the counter clockwise direction. |
||
|
|
||
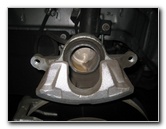
 Compress Caliper Piston |
 Replace Brake Fluid Cap |
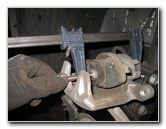
 Wear Bar - Top New Inner Pad |
| Slowly turn the "C"
or "F"
clamp handle to compress the caliper piston while repeatedly checking the
brake fluid level in the reservoir to prevent it from overflowing. Clean up any spilled brake fluid immediately since brake fluid can easily cause damage to painted surfaces. Continue compressing the piston back until it is flush with the rubber dust boot surrounding it. Try to avoid pinching or otherwise damaging the rubber dust boot. Replace the brake fluid reservoir cap as soon as possible since brake fluid is hygroscopic (absorbs moisture). Thoroughly clean off the brake rotor, caliper bracket, brake caliper assembly and the lug nut studs with brake parts cleaner spray. Do not use compressed air or blow with your mouth to clean off the brake parts since breathing in brake dust can be harmful to your health. Brake dust can be carcinogenic (cancer causing) if inhaled.
To remove the existing rotors and install new ones, remove the two bolts on the rear of the caliper bracket that attach it to the steering knuckle. Then loosen the old rotor with a rubber mallet, pull it off, and slide the new one in its place. Apply a thin layer of brake caliper grease to any area where there is metal to metal contact such as the outer lip of the caliper piston. Do not apply brake parts lubricant to the friction surface of the new pads or to the face of the rotor. |
||
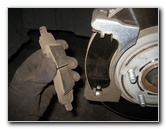
 Install New Outer Pad |
 Push Pads Flush Against Rotor |
 Lower Caliper Over Pads |
| Install the new
brake pads in to the bracket with the wear indicator bar located at the top
of the inner pad. If the new pads weren't equipped with wear indicator bars, pull the old ones off the old brake pads and install them on to the new brake pads. Push the two pads together until they are flush against the rotor. Lower the brake caliper down over the new pads and in to the bracket. If the caliper won't fit over the new pads, you may have to compress the caliper piston back a bit further. |
||
 Insert Upper Caliper Bolt |
 Re-Insert Lower Bolt / Pin |
 Tighten Upper Caliper Bolt |
| Line up the bolt
holes in the caliper with their corresponding holes in the bracket. In order for the caliper to operate smoothly, the smooth part of the caliper bolt / slider pins need to be well lubricated. Apply a thin layer of brake parts lubricant grease to the smooth parts of each combination caliper bolt and slider pin. Re-insert the two caliper bolts/pins in to their bolt holes. Spin the bolts in a few turns by hand in the counter clockwise direction (as seen from the outside of the vehicle) to prevent them from becoming cross threaded. |
||
 Tighten Lower Caliper Bolt |
 Rubber Valve Cap |
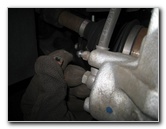 Brake Fluid Bleeder Valve |
| Tighten the two
caliper bolts by turning them in the counter clockwise direction (as seen
from the outside of the car) with the 14mm socket and ratcheting wrench to
just past hand tight or about 32 ft-lbs of torque. Make sure that the two caliper bolts are tight before moving on to the next steps. If your brake pedal previously felt soft or spongy, the brake fluid may be contaminated with water or the brake lines may contain some air bubbles. It would be best to bleed the brake lines at this time in order to flush out the old fluid and replace it with fresh DOT3 brake fluid. For more on this topic, check out my Brake Line Fluid Bleeding With An Assistant DIY Guide or alternatively the Brake Line Fluid Bleeding With A Power Bleeder Guide. The brake fluid bleeder valve is located below a rubber cap on the back side of the caliper just below the upper bolt. |
||
 Replace Front Wheel |
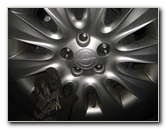 Push On Plastic Wheel Cover |
 Spin On 5 Lug Nuts |
| Replace the front
wheel and push on the plastic wheel cover with the cut out section for the
tire valve situated in the correct position. Spin on the 5 lug nuts a few turns by hand in the clockwise direction to prevent them from becoming cross threaded. |
||
 Slightly Tighten Lug Nuts |
 Lower Car From Stands |
 Torque To 100 ft-lbs |
| Slightly tighten
the lug nuts in a "criss cross" or "star" pattern with the lug nut wrench. Lower the vehicle from the two jack stands using the floor jack. Continue progressively tightening the five lug nuts in a "criss cross" or "star" pattern to about 1/4-1/3 turn past hand tight or about 100 ft-lbs of torque. It would be best to use a torque wrench or an impact wrench with a torque stick to properly tighten the lug nuts. Sit in the driver's seat and firmly press the brake pedal a few times to restore the brake line pressure. Check the brake fluid in the reservoir and verify that it is at the proper level. If it is low, pour in some fresh DOT 3 fluid. To break in your new brake pads, drive normally for the first few hundred miles while trying to avoid any hard or "panic" stops which may glaze over the new pads and cause them to be noisy and/or not perform as well. It's also a good idea to regularly check your driveway for drops of brake fluid which may indicate a leak, check the brake fluid level in the reservoir, and verify that the lug nuts are still tight after your next trip. For more, check out my other
Chrysler 200 DIY Maintenance & Repair Guides. |
||
| If you found this guide to be helpful,
please consider making a small donation by clicking on the PayPal.com
"Donate" button located to the right of this paragraph. Thank you!
(Note: I am not a registered charity. Donations are not tax deductible.) |