
Ford Edge
License Plate Light Bulbs Replacement Guide
How to replace the license plate light
bulbs on a 2007, 2008, 2009 or 2010 Ford Edge CUV with photo illustrated
instructions.

 Ford Edge License Plate |
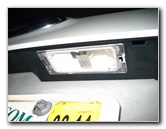
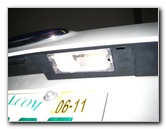 Rear License Plate Light |
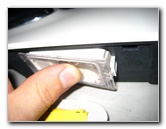
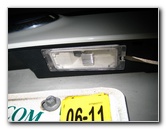 Pry Out Light Housing |
| This
automotive "how-to" guide was specifically written to assist owners
of the first generation (2007, 2008, 2009, 2010 and possibly also
the updated 2011, 2012, 2013 & 2014) Ford Edge CUV in replacing the
rear license plate light bulbs. Owners of other Ford, Lincoln or Mercury vehicles such as the Taurus, Fiesta, Fusion, Focus, Mustang, Flex, Ranger, F-150, Escape, Explorer, Expedition, MKZ, MKX, MKS, MKT, Navigator, Milan, Mariner, Mountaineer, Grand Marquis & Town Car may also find this guide to be helpful. There are two lights above the rear license plate of the 2007 to 2010 Ford Edge. Replacement bulbs for both lights are part # 168 from Sylvania and other manufacturers. If you would like to have brighter license plate lights, install some compatible 168 LED bulbs. The only tool needed to remove the license plate light bulb housing is a small flathead screwdriver or a plastic pry bar tool. It's also possible to just use your fingers, a butter knife, a coin or similar item. |
||
 Bulb Housing Out |
 1/4 Turn Counter Clockwise |
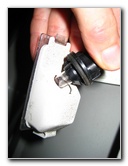 |
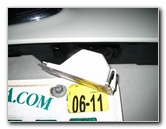
| The first step is
to pry out the license plate light bulb housing using the flathead
screwdriver.
There is a small white plastic tab on the outer side of each bulb housing facing towards the outside of the vehicle. Gently push on this tab while applying some downward pressure to remove the housing from the vehicle. |
||
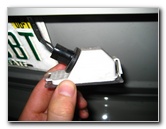
 Pull Out Bulb Socket |
 |
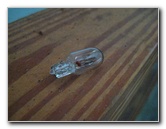 # 168 Light Bulb |
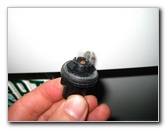
| Twist the black
light bulb socket 1/4 turn counter clockwise and pull it straight out from
the white light bulb housing.
Pull the old # 168 light bulb straight out from the socket. If it doesn't come out easily, try wiggling it while pulling on the bulb. |
||
|
|
||
 |
 Re-Insert Bulb Housing |
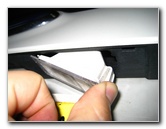 |
| Push in a new #
168 bulb into the socket, insert the bulb and socket into the white housing, and
rotate it 1/4 turn clockwise to secure it.
If necessary, you can also use any other miniature wedge base bulbs such as the 158, 2825, 194, W5W or a compatible LED unit. Insert the side of the light bulb housing closest to the center of the vehicle first and then raise up the side that has the white plastic clip. Push it into the vehicle until it clicks into place. Double check that the housing is secure before driving the vehicle. |
||
 Snap Back In Place |
 |
 |
| For more of my
related automotive how-to guides, click on the following links:
Ford Edge
Engine Oil Change Guide,
Ford Edge
Cabin Air Filter Guide,
Ford Edge Front Brake Pads Replacement Guide,
Ford
Edge Rear Brake Pads Replacement Guide,
Ford Edge Headlight Bulbs
Replacement Guide,
Ford Edge Tail Light Bulbs Replacement Guide,
Ford Edge
Door Speaker Replacement Guide,
Ford Edge Power Window Motor Replacement
Guide,
Ford Edge Key Fob Battery Replacement Guide,
Ford Edge Rear Wiper
Blade Replacement Guide,
Ford Edge Overhead Map Light Bulbs Replacement
Guide,
Ford Edge Vanity Mirror Light Bulb Replacement Guide,
Ford Edge Cargo Area Light Bulb
Replacement Guide,
Ford Edge
Fog Light Bulb Replacement Guide and Ford Edge License Plate Light Bulbs Replacement
Guide. Check out all of my
2007-2010 Ford Edge DIY Repair & Maintenance Guides. |
||
| If you found this guide to be helpful,
please consider making a small donation by clicking on the PayPal.com
"Donate" button located to the right of this paragraph. Thank you!
(Note: I am not a registered charity. Donations are not tax deductible.) |