
GM Chevrolet
Malibu Brake Lights Stay On When Pedal Up Repair Guide
How to stop the brake lights from staying on when the brake pedal is released on
a 2004 to 2007 GM Chevy Malibu.

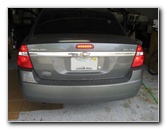 Malibu Brake Lights On |
 Brake Pedal Up - Lights On |
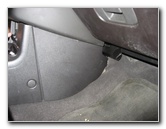 Passenger Console Kick Panel |
| This
automotive how-to guide was specifically written to assist owners of
the 2004, 2005, 2006 & 2007 GM Chevrolet Malibu in fixing the
problem where the brake lights stay on even with the brake pedal
released. Other symptoms of this problem include intermittently working cruise control, the brake pedal and tail lights work "backwards" (I.E. the brake lights turn off when the brake pedal is pushed down), the shifter interlock does not allow the car to be shifted out of park, and the brake lights illuminate immediately when the car's engine is started or the key is turned on without the driver touching the brake pedal. This issue may also occur on other General Motors vehicles such as the 2008 Chevy Malibu Classic, the 2005, 2006, 2007, 2008 and 2009 Pontiac G6, and the 2007, 2008 and 2009 Saturn Aura. No tools are needed to fix this problem. Another person may be needed to test the brake lights after completing the repair. |
||
|
|
||
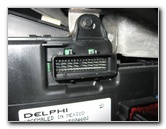
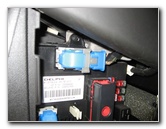
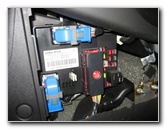 Remove Center Console Panel |
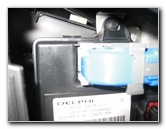 Locate Upper C2 or J2 Connector |
 "J2" BCM Connector |
| The GM technical
service bulletin or "TSB" for this problem indicates that the cause of the
issue is "terminal fretting corrosion" inside the BCM (body control module)
C2 connector. On this Malibu and many others, the "C2" connector is
actually labeled "J2".
Put simply, the metal pins on the BCM and the female receptacles inside the blue/grey J2 connector become slightly corroded and do not make a proper connection or there is a "high resistance condition" across the connection. |
||
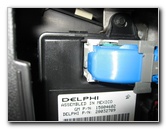
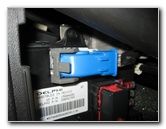 Flip Grey Clip Backwards |
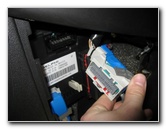 Gently Remove J2 Connector |
 Corrosion On Terminal Pins |
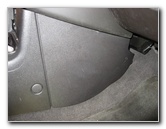
| To fix the problem,
first gently remove the passenger side center console side trim or "kick"
panel by pulling it away from the console.
Underneath the panel, you'll see two large blue connectors with grey latches and some fuses towards the front of the car. Then flip the light grey latch on the top connector labeled either "J2" or "C2" and gently pull it away from the black plastic surface of the BCM (body control module). The best way to "clean" the corrosion off the male pins and female plugs is just to re-insert the connector and remove it several times. The friction of this action will rub off the built up corrosion on the metal and help create a better connection. The TSB also mentions applying some dielectric grease to the pins with a nylon bristle brush to help prevent the problem from re-occurring in the future. |
||
|
|
||
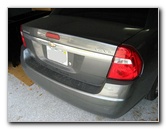 Car On - Brakes Off! |
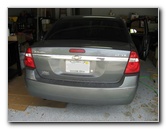 |
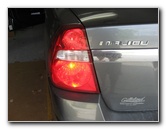
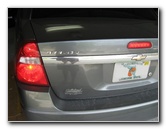 Brake Pedal Down - Lights On |
| After removing and
replacing the J2 connector a few times, we plugged it back in one last time
and decided to test if the brake lights would begin working properly. Sure enough, the Malibu started up normally in "Park" with the brake lights turned off as expected. I watched the tail lights behind the car while my friend tapped on the brakes while saying "on" and "off" to indicate what he was doing with the brake pedal. The brake lamps inside the tail lights corresponded perfectly with the on/off position of the brake pedal. We later confirmed that the cruise control was working normally once again and the shifter interlock would allow the car to be shifted out of park with just some normal pressure applied to the brake pedal. |
||
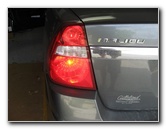 Brake Lights Working Properly |
 Body Control Module |
 Replace Console Side Trim Panel |
| To complete the
procedure, make sure that the J2 connector is securely in place and the grey
latch is in the "locked" position closer to the front of the car.
Then replace the passenger side trim or "kick" panel on the center console. If you need to change a burnt out tail light bulb the part numbers are as follows: Brake # 3057, Turn Signal # 3057, and Reverse # 921.
Update - If the ESC (electronic stability
control) and/or TCS (traction control system) indicator lights are shown on
the dashboard and your brake lights are not turning on even when you apply
heavy pressure to the brake pedal, the issue can be solved in the same
manner. It may also be helpful to apply some
dielectric grease to the pins. |
||
| For more of my
automotive repair guides or product reviews, click on the following links:
GM Chevy Malibu Oil Change Guide,
GM Chevy Malibu Headlight Bulbs Replacement Guide,
GM Chevrolet Malibu Tail Light Bulbs Replacement Guide,
GM Low Coolant Sensor Guide,
GM Key Fob Remote Control Battery Replacement Guide,
GM Front Brake Pads Replacement Guide,
How To Reattach Car Molding,
Meguiars Headlight Restoration Buffing Kit Review,
GM Power Window Tracks Lubrication Guide,
GM Power Window Switch Copper Contacts Cleaning Guide,
GM Pontiac Key Fob Battery Replacement Guide,
GM HVAC Condensate Water Drain Elbow Unclogging Guide,
Zaino Bros Show Car Polish Review,
WeatherTech FloorLiner Review,
GM Power Steering Whine Repair Guide,
GM Brake Line Fluid Bleeding Guide,
GM Front Brake Pads Replacement Guide,
GM Rear Brake Pads Replacement Guide,
How To Stop Tail Light & Headlight Condensation,
Sunforce 50012 Solar Battery Maintainer Review,
Corroded Car Battery Terminal Replacement Guide,
GM Power Window Motor & Regulator Replacement Guide,
GM Wheel Bearing Hub Assembly Replacement Guide, and
K&N Air Filter Cleaning Guide. |
||
| If you found this guide to be helpful,
please consider making a small donation by clicking on the PayPal.com
"Donate" button located to the right of this paragraph. Thank you!
(Note: I am not a registered charity. Donations are not tax deductible.) |