
Nissan Rogue
Cargo Light Bulb Replacement Guide
How to change a burnt out cargo area
light bulb in the tailgate of a 2008 to 2013 Nissan Rogue SUV with pictures.

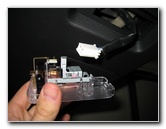
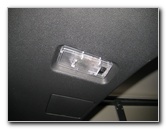 2011 Rogue Cargo Light |
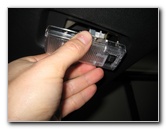
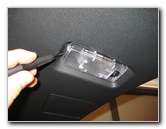 Pry Out Light Housing |
 Pull Out Housing |
| This
automotive "how-to" guide was specifically written to assist owners
of the 1st generation (2008, 2009, 2010, 2011, 2012, & 2013) Nissan
Rogue in changing a burnt out cargo area light bulb in the underside
of the rear tailgate door. Owners of other Nissan or Infiniti vehicles such as the Versa, Cube, Sentra, Altima, LEAF, Maxima, Juke, Murano, Xterra, Pathfinder, Armada, Quest, Frontier, Titan, 370Z, G37, M37, EX37, FX37, JX35, and QX56 may also find these DIY instructions to be helpful. A replacement cargo area light bulb is part # DE3175 from various manufacturers such as Sylvania, GE, Eiko, Putco, and PIAA. You can also use a brighter DE3175 LED bulb. The only tool needed to change the bulb is a small flathead screwdriver used to pry out the light housing. |
||
|
|
||
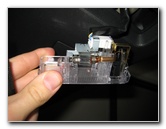
 Press Release Button |
 Disconnect Power Plug |
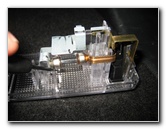 Pry Out Old Bulb |
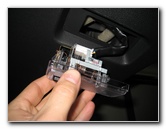
| Insert the blade of
the small flathead screwdriver in between the left (passenger side) edge of
the light housing and the underside of the tailgate. Gently pry out the light housing. Press the release button on the power connector before sliding it straight out of the socket. |
||
|
|
||
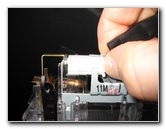
 Old DE3175 Bulb Removed |
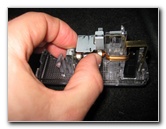 Push In New Bulb |
 Slide In Power Connector |
| Carefully pull out
the old "festoon" style bulb from between the two electrical contacts. Insert the new DE3175 bulb and make sure that it is securely held by the two metal contacts. If you are installing an LED bulb and it doesn't work at first, try flipping it around 180 degrees in the socket. |
||
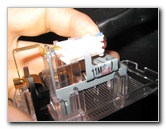
 Re-Insert Power Wire |
 Re-Insert Light Housing |
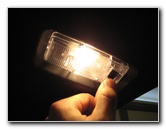 Flip Switch - Test Bulb |
| Slide the power
connector straight in to the socket on the light housing. Insert the right (driver side) of the housing in first and then gently snap the other side in place. Test the new light bulb by flipping the rocker switch to the "On" position. For more,
check out my other
Nissan
Rogue Repair & Maintenance Guides. |
||
| If you found this guide to be helpful,
please consider making a small donation by clicking on the PayPal.com
"Donate" button located to the right of this paragraph. Thank you!
(Note: I am not a registered charity. Donations are not tax deductible.) |