
Toyota
4Runner Cabin Air Filter Replacement Guide
How to clean or replace the HVAC system's
cabin air filter element in a 4th generation 2003-2009 Toyota 4Runner.

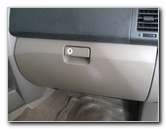
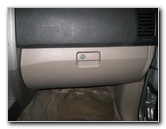 4Runner SUV Glove Box |
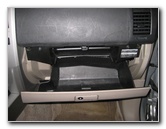 Open Glove Box |
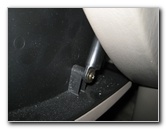 Glove Box Damper Arm |
| This
automotive "how-to" guide was specifically written to assist owners
of the 4th generation (2003, 2004, 2005, 2006, 2007, 2008 & 2009) Toyota 4Runner SUV in cleaning or replacing the
A/C system's cabin air filter element. Owners of other similar Toyota vehicles such as the FJ Cruiser, Hilux, Tacoma, Fortuner, Land Cruiser, and Lexus GX may also find this guide to be helpful. A few of the new aftermarket cabin air filter elements that are compatible with the 2003-2009 Toyota 4Runner include the following with their respective part numbers: TYC 800005P, Fram CF9846A, Wix 24875, Denso 453-1013, EPAuto CP846, Mahle LA 477 and K&N VF2002.The only tool needed to access the cabin air filter element is a standard sized Phillips head screwdriver. A wet/dry shop vacuum is also helpful if you just want to clean the old filter. |
||
|
|
||
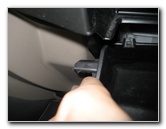
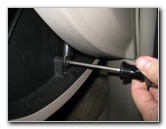 Remove Phillips Head Screw |
 Pull Off Damper Arm |
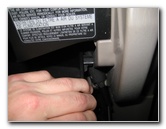 Pull Sides Of Box Inwards |
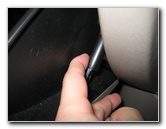
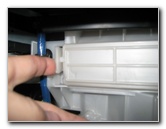
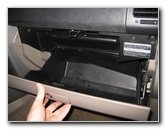
| The first steps are
to get into the front passenger seat of your 4Runner, open the glove box,
and empty it out.
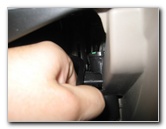
Then locate the black plastic damper arm on the right side of the glove box. Use a standard Phillips head screwdriver to remove the one screw and gently pop off the damper arm. To release the two black plastic stoppers that keep the glove box in place, pull the left and right side walls of the glove box towards the center until the stops are clear. Gently lower the glove box down to the passenger floor mat. |
||
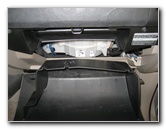 Glove Box Lowered Down |
 Filter Cover & Blower Motor |
 Release Filter Cover Clips |
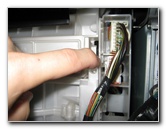
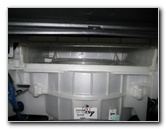
| With the glove box
out of the way, you'll be able to see the white plastic blower motor housing
and the rectangular cabin air filter access cover.
To release the cabin air filter element tray, push the release tabs on the left and right side inwards before pulling the filter tray out towards the rear of the vehicle. |
||
|
|
||
 |
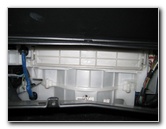
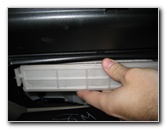
 Pull Out Filter Tray |
 Pop Filter Out of Tray |
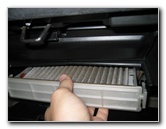
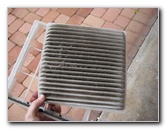
| If the old cabin
air filter element isn't too dirty, you can just tap out the large debris
and use a shop vacuum to remove any dust before re-installing it. If the old filter element is very dark and clogged with leaves, dirt, dust, hair, insects and other debris, it should be replaced with a new one. I recommend buying the TYC 800005P cabin air filter since it has excellent reviews on Amazon. If you've had a problem with your A/C system smelling moldy or musty, try using the Fram CF9846A "Fresh Breeze" filter which has Arm & Hammer baking soda and carbon in it to help absorb odors. Insert the cleaned or new cabin air filter into the tray with the pleats facing upward. If the new element has an "Air Flow" direction arrow, make sure it is facing down towards the filter tray's plastic grates. |
||
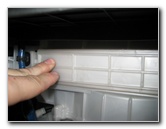
 Filter Tray Removed |
 Slide New Filter & Tray In |
 Push Until Cover Clicks |
| Slide the cabin air filter tray back into the blower motor housing and push on the rectangular cover until the fastener clip on each side snaps into place. | ||
 Snap Other Clip In Place |
 Pull Plastic Stoppers In |
 Re-Insert Side Stops |
| Raise the glove box up towards the dash board and pull the two sides inwards until the black plastic stopper pegs can be re-inserted in place. | ||
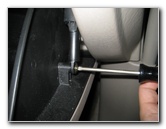 Re-Attach Damper Arm |
 Close Glove Box |
 |
| Then pop the glove
box damper arm back on to the peg located on the right side and replace the
single Phillips head screw to secure it in place.
Close and open the glove box to check that it operates smoothly. For more, check out my 2003-2009 Toyota 4Runner 4.0L 1GR-FE V6 Engine Oil Change Guide.
Please take a look at all of my
2003-2009 Toyota 4Runner DIY Repair & Maintenance Guides. |
||
| If you found this guide to be helpful,
please consider making a small donation by clicking on the PayPal.com
"Donate" button located to the right of this paragraph. Thank you!
(Note: I am not a registered charity. Donations are not tax deductible.) |