
VW Tiguan 12V
Automotive Battery Replacement Guide
How to change a dead 12 volt car battery
in a 1st generation 2009-2017 Volkswagen Tiguan including part numbers.

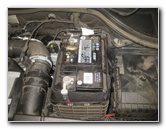
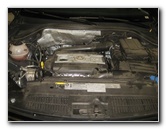 2016 Tiguan 2.0L TSI Engine |
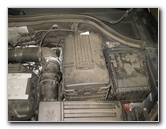 Black Plastic Battery Box |
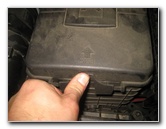 Push In Release Tab |
| This
automotive maintenance tutorial was specifically written to assist
owners of the first generation (2009, 2010, 2011, 2012, 2013, 2014,
2015, 2016 and 2017) Volkswagen Tiguan SUV with the 2.0 liter TSI
turbocharged inline four cylinder engine in changing a dead or weak
12 volt automotive battery. Owners of other VW or Audi vehicles such as the Jetta, Passat, CC, Atlas, Touareg, Golf, Beetle, A3, S3, RS 3, A4, S4, A5, A6, S6, A7, S7, RS 7, A8, Q3, Q5, TT and Q7 may also find these DIY instructions to be helpful.' The OEM battery in this 2016 VW Tiguan was part number Exide 5K0 915 105 D (also known as 5K0-915-105-D or 5K0915105D). A few other compatible replacement Group Size H5 or H6 batteries with their part numbers are as follows: Odyssey PC1200MJT, ACDelco 47AGM, Exide L348C and EverStart MAXX-H5, AGM H6 or MAXX-H6 (Walmart). The tools needed to remove and replace the battery include a 10mm socket with a 1/4" drive ratchet, a 13mm socket with a long extension bar and a 3/8" drive ratchet. Attention: Many modern Volkswagen Group (VW, Audi, Porsche, Seat, Skoda, etc.) vehicles may be equipped with a battery management control module as part of the ECU (electronic control unit). The use of a VCDS, VAGCOM or another VW specific OBDII scanner (also known as an OBD2 scan tool) will be needed to "recode", "reprogram", "register" or perform the "adaptations" for the new battery including inputting the new serial number into the ECU. The coding procedure will reset the battery monitoring and management control module so that the system will charge it at the proper specifications (voltage and amperage). Two Volkswagen / Audi specific OBDII scanners that may work are the Ancel VD500 and the Foxwell NT510. Please be sure to check the list of supported vehicles and model years before purchasing a scan tool. I'd recommend the more advanced Foxwell unit since it specifically mentions "register a new battery after replacing" as one of the features. |
||
|
|
||
|
A few of the most common symptoms of a weak or "dead" 12 volt car battery
include slow starting, a slow cranking starter motor, headlights that dim
when the vehicle is stopped or become brighter when accelerating and hearing
only a faint clicking noise when you are attempting to start the car. Most automotive batteries only last about 3 to 5 years depending on your climate and driving conditions. If your battery is over 3 years old, I would recommend replacing it as well having your alternator and starter tested at an auto parts store. You could also use a digital multimeter to test the battery voltage and the alternator's charging voltage. |
||
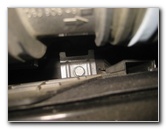
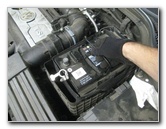
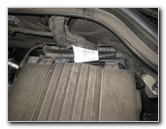
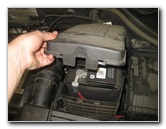 Lift Up Battery Cover |
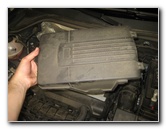 Two Plastic Tabs - Rear |
 Battery Cover Removed |
|
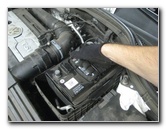
The first two steps are to open the hood and
move to the right (driver) side of the engine bay. The rectangular shaped black plastic battery box is located just behind the engine air filter box and to the left of the electrical fuse box. Push in the plastic tab at the front edge of the battery box cover (near the arrow ---> and "Push" marked on the top) to release the retaining clip. Gently lift the front edge of the battery box cover and pull it out towards yourself. There are two plastic tabs on the rear edge of the cover that are inserted into two slots on the back side of the battery box. Set the battery box cover aside in a safe place. |
||
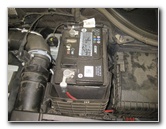
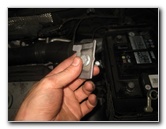
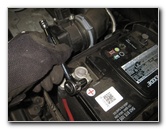
 Loosen Negative Terminal |
 Pull Off "-" Terminal |
 Cover & Tuck Away |
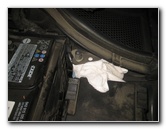
| Then loosen the nut
on the negative "-" terminal (attached to the black wire) by turning it in
the counterclockwise direction with a 10mm socket and 1/4" drive ratchet. Pull the negative terminal off the "-" battery post, wrap it in a small towel and tuck it away on the side of the battery box to help prevent accidental electrical contact. |
||
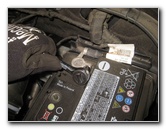
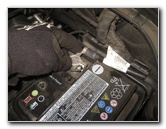
 Loosen Positive Terminal |
 Pull Off "+" Terminal |
 Tuck Away "+" Terminal |
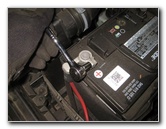
| Then loosen the
10mm nut on the positive terminal by turning it in the counterclockwise
direction. Pull the positive terminal off the "+" battery post and tuck it away on the side of the battery box. |
||
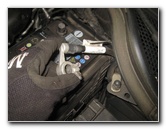
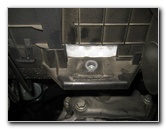
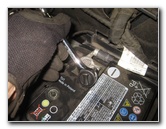
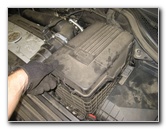
 Hold Down Clamp |
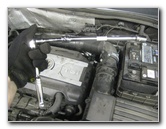 13mm & Extension Bars |
 Loosen Counterclockwise |
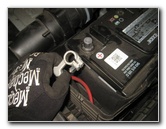
| Look on the left
side of the battery box and locate the silver metal hold down clamp. It is held in place by a single bolt. Attach the 13mm socket to a long extension bar and a 3/8" drive ratchet. Loosen the bolt by turning it in the counterclockwise direction. |
||
 Hold Down Bar Removed |
 Lift Out Old Battery |
 Old Battery Removed |
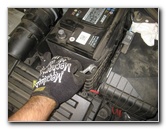
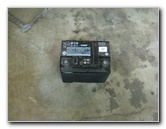
| Remove the battery
hold down clamp and the 13mm bolt from the left side of the battery box. Set the clamp and bolt aside in a safe place. Lift up the handle on the top of the old battery. Carefully lift the old battery out of the engine bay and gently rest it on the ground. Avoid dropping or tipping over the old battery to prevent from having battery acid leak out. |
||
|
|
||
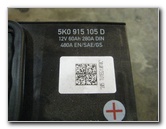 VW Part # 5K0 915 105 D |
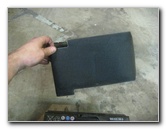 Battery Heat Shield |
 Lower In New Battery |
| Pull the heat
shield box off the old battery for re-installation later on the new battery. Be sure to bring the old battery with you to the auto parts store, the dealership or Walmart to prevent from having to pay a "core" deposit, "recycling" or "disposal" fee. The OEM battery in this 2016 VW Tiguan was Exide part number 5K0 915 105 D (also known as 5K0-915-105-D or 5K0915105D). Orientate the new battery with the positive "+" post closer to the front of the SUV and the negative "-" post near the windshield. Slide the heat shield box over the new battery. Carefully lower the new battery into the engine bay. |
||
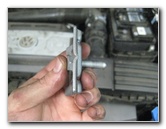
 Battery Hold Down Clamp |
 Left Side of Battery Tray |
 Spin In 13mm Bolt |
| Replace the battery
hold down clamp on to the bottom left edge of the battery box. Spin in the 13mm bolt a few turns by hand in the clockwise direction to prevent it from becoming cross threaded. |
||
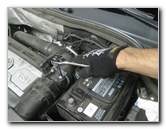
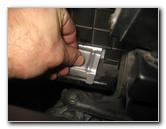
 Tighten Bolt Clockwise |
 Push On Positive Terminal |
 Tighten Terminal Nut |
| Tighten the bolt on
the hold down clamp in the clockwise direction with the 13mm socket,
extension bar and 3/8" drive ratchet until it is snug. Check to make sure the new battery is securely in place. If the new battery can be moved, rocked or slid around the tray, tighten the 13mm bolt an extra turn or two. If you've had a problem with corrosion (white or blue powder) building up on the terminals or battery posts, consider installing some felt anti-corrosion washers on to the posts. Push the positive (red cable) terminal over the "+" battery post. Tighten the 10mm terminal nut in the clockwise direction until it is snug. Try to avoid over tightening the terminal nut to prevent from cracking or damaging the battery post. |
||
 Push On Negative Terminal |
 Tighten "-" Terminal |
 New Battery Installed |
| Then push the
negative terminal on to the "-" battery post. Tighten the terminal nut by turning it in the clockwise direction with the 10mm socket and a 1/4" drive ratchet until it is snug. |
||
 Line Up Two Plastic Tabs |
 Lower Front of Cover |
 Push Down - Secure Clip |
| Lower the black
plastic battery box cover back into place. Line up the two plastic tabs on the rear edge of the cover with their corresponding slots on the lower part of the box. Re-insert the two tabs into their slots. Lower the front part of the cover and push on it to secure the retaining clip. Double check that the battery box cover is securely in place. To test the new battery, start the engine and flash the high beam headlights. Be sure to adjust the time on the clock and program your favorite radio station presets before you start driving. Also, don't forget to record the 12V battery change in your SUV's service records. For more, please check out my other
2009-2017 VW Tiguan DIY Repair & Maintenance Guides. |
||
| If you found this guide to be helpful,
please consider making a small donation by clicking on the PayPal.com
"Donate" button located to the right of this paragraph. Thank you!
(Note: I am not a registered charity. Donations are not tax deductible.) |