
Nissan Maxima
Tail Light Bulbs Replacement Guide
How to change a burnt out brake, rear
turn signal or reverse light bulb in a 4th generation 1995 to 1999 Maxima.
By Paul B. Michaels Author & Photographer Auto Mechanic Since 1989 |
||
Author & Photographer: Paul B. Michaels - Automotive Mechanic Since 1989 |
||
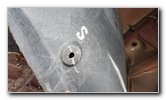
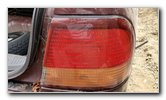 1998 Nissan Maxima |
 Tail Light Housing |
 Remove Fastener |
| I specifically
wrote this automotive
maintenance tutorial to assist owners of the 4th
generation (1995, 1996, 1997, 1998 and 1999) Nissan Maxima in changing a
burnt out brake, rear turn signal, reverse and side marker bulb in the tail
light housings. Owners of other Nissan vehicles such as the Sentra, Altima, Pathfinder, Murano, Armada, titan, Frontier, Note, Rogue, Versa, Juke, Leaf and NV200 may also find these DIY instructions to be helpful. The compatible replacement light bulb part numbers are as follows: Brake # 1157, Rear Turn Signal # 1156, Reverse # 921 and Side Marker # 194. I recommend that you double check your owner's manual and the OEM light bulb part numbers in your vehicle before purchasing new bulbs. The tools that I used to complete this procedure include a pop rivet removal tool or a flat head screwdriver. The first two steps are to open the trunk and move to the side of the car with the burnt out bulb. Locate the two black plastic pop rivet fasteners that secure the carpet cargo area liner in place to the rear corner of the trunk. Your Maxima might have two anchors for the cargo area net. Pry out the pop rivet fasteners or pry out the center of the cargo area net hooks to release them. Remove the two fasteners and set them aside in a safe place. |
||
|
|
||
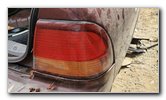
 Rear of Light Housing |
 Pop Rivet Hole |
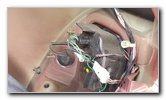 Access Bulb Sockets |
| Gently pull back
the grey carpet trunk liner panel. Once the trunk liner is out of the way, you'll have easy access to the brake, rear turn signal and side marker bulb sockets. |
||
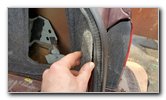
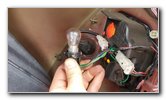 1/4 Turn Counterclockwise |
 Bulb Socket Removed |
 Reverse Bulb Housing |
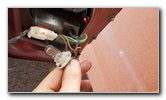
| The socket at the
top of the housing contains the brake light bulb. Rotate the bulb socket 1/4 turn in the counterclockwise before pulling it straight out of the housing. The brake and rear turn signal bulbs are "bayonet" style bulbs that need to be pushed down before rotating the bulb to remove them from the socket. Gently push the brake light bulb down into the socket and rotate it 1/4 turn in the counterclockwise direction before pulling it straight out. Push a new number 1157 light bulb down into the socket and rotate it 1/4 turn in the clockwise direction to secure it into place. If you would like to have brighter brake lights, install some compatible replacement 1157 LED bulbs. The rear turn signal light bulb is located at the bottom of the housing. Rotate the bulb socket 1/4 turn in the counterclockwise direction before pulling it straight out. Push the old turn signal bulb down into the socket and rotate it 1/4 turn in the counterclockwise direction before pulling it straight out. Push a new number 1156 light bulb down into the socket and rotate it 1/4 turn in the clockwise direction to secure it into place. If you would like to have brighter rear turn signal lights, install some 1156 LED bulbs. The small side marker bulb socket is located at the bottom outer corner of the tail light housing. Rotate the socket 1/4 turn in the counterclockwise direction before pulling it straight out. Pull the old miniature wedge base light bulb straight out of the socket. Push a new number 194 light bulb straight into the socket. You could also upgrade the bulb to a brighter 194 LED bulb. Re-insert the socket into the housing and rotate it 1/4 turn in the clockwise direction to secure it in place. The reverse (or "back-up") light and inner parking lights are located in a separate housing attached to the trunk lid. The black plastic cover over the back of the trunk lid light housing is secured in place by a single Phillips head screwdriver. To save time, I just slightly loosened the Phillips head screw in the counterclockwise direction and rotate the cover down and out of the way. |
||
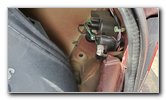
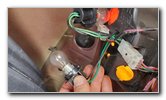
 Reverse Bulb Socket |
 Install New Light Bulb |
 Light Bulbs Replaced |
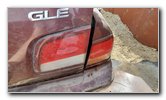
| The lower socket
contains the reverse light bulb.
The upper socket (closer to the GLE in the picture above), contains the inner parking light. Rotate the small grey bulb socket 1/4 turn in the counterclockwise direction and pull it straight out of the housing. Pull the old miniature wedge base reverse light bulb straight out of the socket. Push a new number 921 light bulb straight down into the socket. If you would like to have brighter reverse lights for extra safety, install some compatible replacement 921 LED bulbs. To test the new light bulbs, have an assistant step on the brake pedal, activate the hazard signals and shift the transmission into "Reverse". Be sure to write down the bulb change in your vehicle's service records. Please
take a look at all of the
Nissan Maxima DIY Repair & Maintenance Guides. |
||
| If you found this guide to be helpful,
please consider making a small donation by clicking on the PayPal.com
"Donate" button located to the right of this paragraph. Thank you!
(Note: I am not a registered charity. Donations are not tax deductible.) |
