
Honda Pilot
PCV Valve Replacement Guide
How to check or change the PCV valve in a
1st generation 2003 to 2008 Honda Pilot with the VTEC 3.5L V6 engine.

By Paul B. Michaels Author & Photographer Auto Mechanic Since 1989 |
||
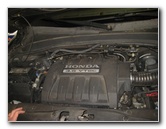 2006 Pilot VTEC 3.5L V6 |
 Front Left of Engine |
 By Orange Dipstick Handle |
| This
automotive maintenance tutorial was specifically written to assist
owners of the first generation (2003, 2004, 2005, 2006, 2007 and
2008) Honda Pilot SUV in checking or changing the PCV (positive
crankcase ventilation) valve located on the VTEC 3.5 liter V6
engine. Owners of other Honda or Acura vehicles such as the Accord, Civic, Crosstour, CR-V, CR-Z, Fit, Insight, Odyssey, Pilot, Ridgeline, ILX, TSX, TLX, TL, RLX, RDX, NSX and MDX may also find these DIY instructions to be helpful. A few compatible replacement PCV valves with their part numbers include the following: Standard Motor Products V384 (OEM - recommended), Beck Arnley 045-0358, Airtex 6P1243 and OES W0133-1709800-OES. The tools required to remove the old PCV valve and install the new one include a 10mm socket and a 1/4" drive ratchet. |
||
|
|
||
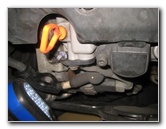
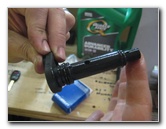
 Bolt On PCV Valve |
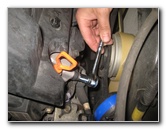 Loosen Counterclockwise |
 Pull Out Old PCV Valve |
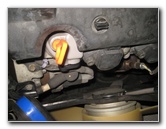
| The PCV valve is
located on the front left (passenger) side of the engine.
It is situated just below the orange plastic oil level dipstick handle and to the left of the spark plug ignition coil. Loosen the single bolt holding the PCV valve in place by turning it counterclockwise with a 10mm socket and a 1/4" drive ratchet. Carefully spin out the 10mm bolt by hand to prevent from having it drop down in to the engine bay. |
||
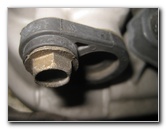
 10mm Bolt Removed |
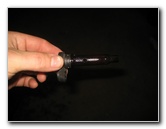 Check Old PCV Valve |
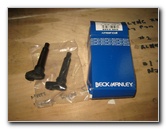 New Beck Arnley Valve |
| Set the 10mm bolt
aside in a safe place. Test the old PCV valve by shaking it vigorously. If the old valve makes a healthy sounding rattle sound, it should still be in usable condition. Since new valves are so inexpensive, I recommend just changing it about every 30,000 to 60,000 miles for preventative maintenance. I chose to buy the Beck Arnley 045-0358 PCV valve. Please see the updated information below before purchasing a PCV. Update - I now recommend buying the Standard Motor Products V384 PCV valve since it is the same as the OEM part that was installed at the factory by Honda. This Beck Arnley PCV valve became gummed up with sticky oil sludge after 50,000 miles which caused the oil pressure in the crankcase to build up and led to an oil leak from the rear main seal. I've had the Standard Motor Products PCV valve installed on my 2006 Acura MDX with zero issues. The oil leak on this 2006 Honda Pilot seems to have slowed down and possibly stopped after changing the clogged Beck Arnley PCV valve. It doesn't seem like any of the seals and gaskets were "blown out" or permanently damaged by this failed PCV valve. |
||
|
|
||
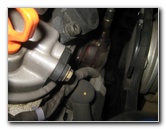
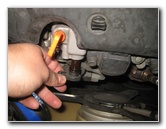
 Lubricate Rubber O-Rings |
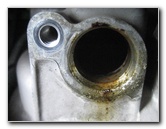 Hole For PCV Valve |
 Slide In New Valve |
| Apply a small
amount of new oil to the rubber o-rings on the new PCV valve. Lubricating the rubber o-rings will help the new PCV valve form a better seal, prevent oil leaks and also make it easier to remove during the next replacement. Clean the area around the PCV valve port (installation hole) in the engine. Make sure that the old rubber o-rings from the old valve are not stuck inside the port. Slide the new PCV valve in to the port until it is flush with the engine. |
||
 Spin In 10mm Bolt |
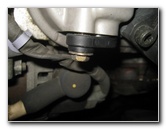 10mm Bolt Replaced |
 Tighten Clockwise |
| Spin in the 10mm
bolt a few turns by hand in the clockwise direction to prevent it from
becoming cross threaded. Tighten the bolt in the clockwise direction with the 10mm socket and a 1/4" drive ratchet until it is snug. Try to avoid over tightening the bolt to prevent from cracking the plastic mounting bracket on the new PCV valve. Be sure to record the PCV valve replacement in your SUV's service records. Update - If you have an oil leak from the rear main seal, it could be due to a clogged PCV valve. This Beck Arnley 045-0358 PCV valve became clogged after 50,000 miles which caused the oil to begin leaking out of the rear main seal or "gasket". I recommend checking and replacing the PCV valve before you spend time and money replacing the engine's rear main seal. For more, check out all of my
2003-2008 Honda Pilot DIY Repair & Maintenance Guides. |
||
| If you found this guide to be helpful,
please consider making a small donation by clicking on the PayPal.com
"Donate" button located to the right of this paragraph. Thank you!
(Note: I am not a registered charity. Donations are not tax deductible.) |