
Toyota Corolla 12V Battery
Replacement Guide
How to diagnose and change a dead 12 volt
car battery in the engine bay of a 2009 to 2013 Toyota Corolla sedan.

By Paul B. Michaels Author & Photographer Auto Mechanic Since 1989 |
||
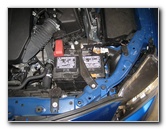 2010 Corolla 12V Battery |
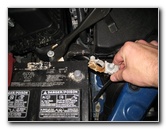
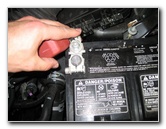
 Loosen 10mm Bolt |
 10mm Bolt Removed |
| This
automotive tutorial was specifically written to assist owners of the
tenth generation (2009, 2010, 2011, 2012 & 2013) Toyota Corolla
sedan in diagnosing a dead 12V car battery and replacing it with a
new one. Owners of other similar Toyota, Lexus or Scion vehicles such as the Yaris, Matrix, Camry, Allion, Premio, Auris, IS 250, tC, xB, xD, and iQ may also find these DIY instructions to be helpful. A few compatible Group Size 35 replacement batteries with their part numbers are as follows: Optima 8020-164 35, EverStart MAXX-35N, Optima Redtop # RED35 (SKU: 524229), Duralast Gold 35-DLG, and Valucraft 35-VL. The only tools needed to replace the battery are a 10mm socket and a 1/4" drive ratchet or a 10mm wrench. |
||
|
|
||
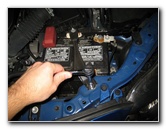
 Rotate Bracket Off Battery |
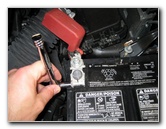
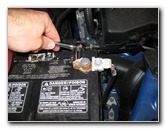 Loosen "-" Negative Cable |
 Pry Open Terminal Clamp |
| Some of the
possible symptoms of a weak or dead 12V battery include a slow cranking
starter motor (especially in cold weather), a clicking sound when you turn
the ignition key, having to jump start the car, dim headlights,
malfunctioning power door locks or other electronic accessories, wiggling or
tightening the terminals does not help, and if the battery is more than 2-3
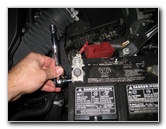
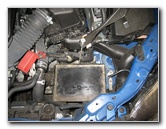
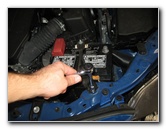
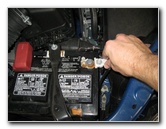
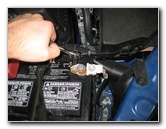
years old (especially in very hot or cold climates). When in doubt, have your battery, alternator and electrical system checked at an auto parts store that offers free testing such as Auto Zone, Advance Auto Parts, Pep Boys and O'Reilly. The first few steps to replacing the battery are to make sure the vehicle's ignition switch is off, remove the keys, and take off any metal jewelry on your hands or wrists. Then pop open the hood and locate the single bolt at the front of the engine bay that secures the black metal battery "hold down" bar in place. Remove the bolt by turning it counter clockwise with a 10mm socket and ratcheting wrench. Set the bolt aside in a safe place. Carefully lift the bracket up off the top of the battery and swing it back towards the fuse panel and air filter box. Be careful to avoid touching the metal bar to the exposed "-" (negative) terminal. Disconnect the black negative terminal first by loosening the bolt on the terminal in the counter clockwise direction with the 10mm socket and ratcheting wrench. Only loosen the clamp a few turns so that the bolt does not come out of the terminal. Pull the "-" terminal straight off the battery post and tuck it down on the side of the battery. You may choose to wrap the terminal in a clean rag or cover it with a rubber glove for extra safety. If you have trouble removing the terminal try wiggling it and/or carefully pry open the clamp with a flathead screwdriver. |
||
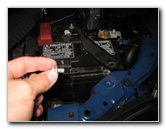
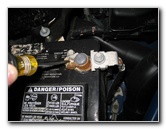
 Disconnect "-" Terminal |
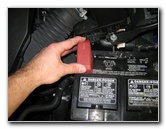
 Pull Off "+" Terminal Cover |
 Turn Counter Clockwise |
| Then lift off the
red plastic cover over the "+" (positive) battery terminal. Loosen the bolt on the terminal clamp by rotating it counter clockwise with the 10mm socket and ratcheting wrench. |
||
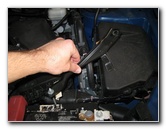
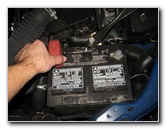
 Lift Off Positive Wire |
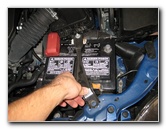
 Group 35 # 28800-AA010 |
 Tray & Hold Down Clamp |
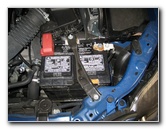
| Lift the positive
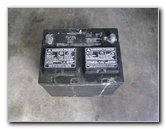
terminal straight off the battery post and move it to the side. Pull the old battery straight out of the engine bay and off the black plastic tray. The battery weighs about 30-40 pounds, so you may need help to remove it, especially if it does not have a built in carrying handle. The OEM 12V battery in this 2010 Toyota Corolla S was a "Group Size 35" type and part number 28800-AA010. Clean any blue or white corrosion powder from the old terminals with a wire or plastic bristle brush. Use a wet/dry shop vacuum to clean out any corroded lead dust from the battery tray or surrounding engine bay parts. |
||
|
|
||
 Lower In New Battery |
 Replace "+" Terminal First |
 Tighten 10mm Bolt |
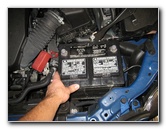
| Gently lower the
new battery down in to the engine bay and on to the black plastic tray with
the terminals situated closer to the rear of the vehicle. If you've had a problem with corrosion (blue or white powder) building up on the terminals or battery posts, consider installing some felt anti-corrosion washers over the battery posts. Replace the red "+" (positive" terminal first by pushing it straight down on to the post on the left which should be marked with a "+" symbol. Double check that you have the correct terminal before installing the terminal. Tighten the terminal by turning the clamp's bolt clockwise with the 10mm socket and ratcheting wrench. |
||
 Replace Red Plastic Cover |
 Position Battery Hold Down |
 Tighten Hold Down Bar Bolt |
| Push the red
plastic cover back on to the positive terminal before moving on to the next
steps. Carefully swing the black metal "hold down" bracket over the new battery and line up the bolt hole at the front end with the hole in the car's frame. Insert the 10mm bolt and tighten it by turning it clockwise to just past hand tight. |
||
 Replace Negative Terminal |
 Tighten 10mm Terminal Bolt |
 New 12V Battery Installed |
| Replace the
negative terminal last by pushing it straight down on to the post marked
with a "-" symbol and tightening the 10mm clamp bolt in the clockwise
direction to just past hand tight. Double check that both of the terminals are tight. If the new battery and your starter motor are working properly, the car's engine should fire up immediately when you turn the ignition key. Be sure to record the battery change in your vehicle's service records. For more, check out my other Corolla DIY tutorials at the links below - |
||
| If you found this guide to be helpful,
please consider making a small donation by clicking on the PayPal.com
"Donate" button located to the right of this paragraph. Thank you!
(Note: I am not a registered charity. Donations are not tax deductible.) |