
Toyota
Corolla Alternator Replacement Guide
How to change a failing alternator on the
2ZR-FE 1.8L I4 engine in a 2009, 2010, 2011, 2012 and 2013 Toyota Corolla.

By Paul B. Michaels Author & Photographer Auto Mechanic Since 1989 |
||
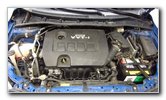
 2010 Toyota Corolla S |
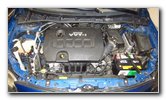
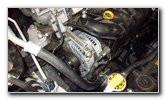
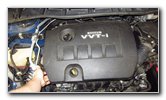 Pull Off Plastic Cover |
 Engine Cover Removed |
| This automotive
maintenance tutorial was specifically written to assist owners
of the 10th generation (2009, 2010, 2011, 2012, & 2013) Toyota Corolla
in changing a weak, failing or faulty alternator on the 2ZR-FE 1.8 liter
inline four cylinder engine. Owners of other Toyota, Lexus or Scion vehicles such as the Yaris, Matrix, Prius, Camry, RAV4, Sienna, Tacoma, Tundra, FJ Cruiser, Venza, Highlander, Avalon, Sequoia, Land Cruiser, Allion, Premio, Auris, IS 250, ES 350, GS 350, tC, xB, xD, iQ and FR-S may also find these DIY instructions to be helpful. The most common symptoms of a failing alternator include headlights that dim or flicker, a whining or growling sound, difficulty starting the engine (even with a new or good 12V battery), slow power windows, a burning rubber smell, an electrical burning smell, stalling, a weak or dead 12 volt car battery, rough idling and a battery warning icon on the gauge cluster. The OEM (original equipment manufacturer) alternator in this 2010 Corolla S was part number Toyota 27060-0T041 also known as Denso TN104210-5491. A few other compatible replacement aftermarket alternators with their part numbers include the following: TYC 2-11577, Remy 12897, Denso 210-0731 and Denso 210-0699. The tools needed to complete this procedure include a 10mm socket, a 1/4" drive ratchet, a 12mm socket, a 14mm socket and a 3/8" drive ratchet. The first two steps are to open the hood and then pull off the plastic engine cover. Set the cover aside in a safe place. |
||
|
|
||
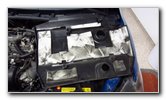
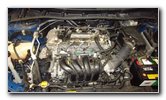 2ZR-FE 1.8L I4 Engine |
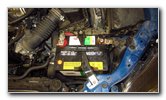 12V Automotive Battery |
 Loosen Negative Terminal |
| Move to the right
(driver) side of the engine bay. Loosen the nut on the negative "-" terminal nut by turning it in the counterclockwise direction with the 10mm socket and a 1/4" drive ratchet. |
||
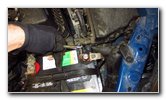
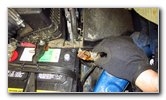 Pull Off Negative Terminal |
 Cover & Tuck Away |
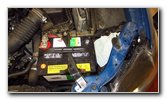
 Original OEM Alternator |
| Pull the negative
terminal off the "-" battery post. Wrap the terminal in a small towel and tuck it away on the right side of the battery to help prevent accidental electrical contact.
|
||
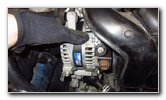
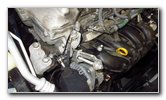
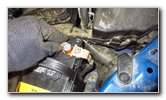
 Tensioner Bolt 12mm |
 Mark Position - Sharpie |
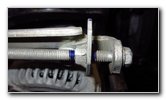 Belt Tension Bolt Marked |
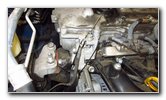
| Move to the left
(passenger) side of the engine bay and locate the alternator. I chose to use a blue Sharpie marker to mark the current position of the belt tensioner bolt. |
||
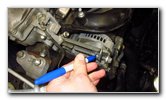
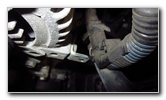
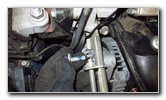
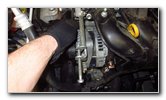
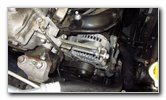
 12mm Below Tensioner |
 Loosen Top 12mm Bolt |
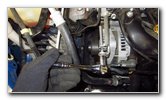 Loosen 12mm Tensioner |
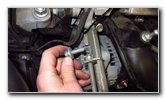
| Loosen the belt
adjustment lock bolt located just below the long tensioner bolt by turning
it in the counterclockwise direction with the 12mm socket and a 3/8" drive
ratchet. Loosen the long belt tensioner bolt by turning it in the counterclockwise direction with a 12mm socket and a 3/8" drive ratchet. |
||
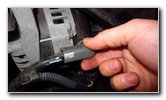
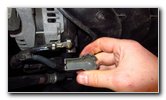
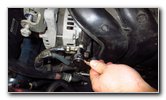
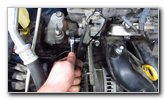
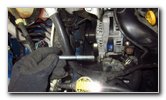
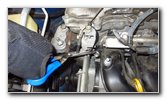
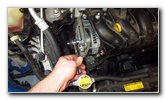
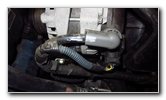 B+ Terminal & Regulator |
 Push In Release Tab |
 Unplug Voltage Regulator |
| Push in the release
tab on the black plastic electrical connector for the alternator's voltage
regulator which leads back to the ECU (engine control unit) also known as
the ECM (engine control module). Hold in the release tab and pull the regulator plug off the front of the alternator. |
||
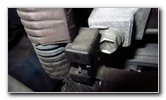
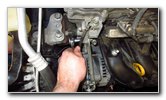
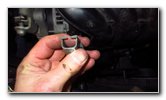
 Slide Off Plastic Cover |
 Plastic Cover Removed |
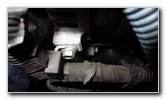 B+ Output Terminal |
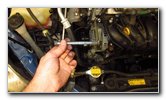
| Gently slide the
grey plastic cover off the B+ output terminal ring connector.
Set the B+ output terminal cover aside in a safe place. |
||
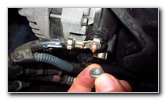
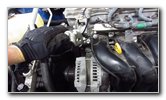
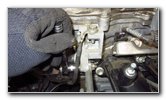
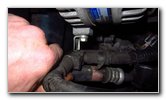
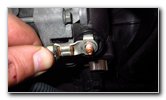
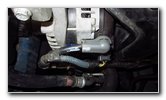
 Wire Harness Bracket |
 Detach Plastic Connector |
 Loosen Counterclockwise |
| Locate the wire
harness retaining clip on the front bottom part of the alternator. Gently pull the small black plastic tab on the retaining clip out towards the right (driver) side of the car. Slide the black plastic wire harness retaining clip off the metal mounting bracket. Loosen the nut on the B+ output terminal by turning it in the counterclockwise direction with the 10mm socket and a 1/4" drive ratchet. |
||
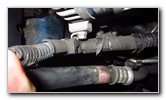
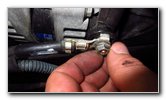
 10mm Nut Removed |
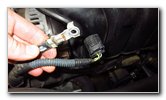 B+ Output Cable |
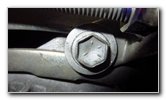
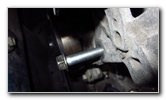
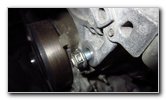
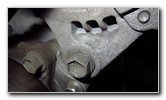 Bottom 14mm Bolt |
| Set the 10mm nut
aside in a safe place. Locate the larger 14mm "pivot" bolt on the bottom of the alternator. The bottom 14mm bolt is marked with a red arrow in Picture # 27. |
||
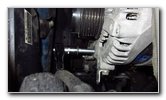
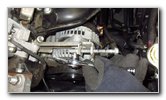
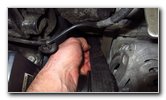
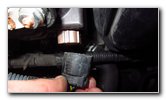
 Loosen Bottom Bolt |
 Spin Out Tension Bolt |
 Pivot Back Alternator |
| Loosen the bottom
bolt by turning it in the counterclockwise direction with a 14mm socket and
a 3/8" drive ratchet. Once the bottom 14mm pivot bolt and the top 12mm adjustment lock bolt have been loosened, spin out the long 12mm tensioner bolt. Carefully push on the alternator to pivot it back towards the rear of the car. This will release the tension on the serpentine accessory belt. |
||
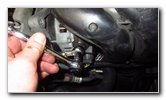
 Cable Tie - Hold Belt |
 Loosening Bottom 14mm |
 Remove Top 12mm Bolt |
| Use a cable tie
(also known as a "zip" tie) to secure the serpentine accessory belt to the
engine. If the serpentine belt comes off the other pulleys or you are replacing the belt, check out my 2009-2013 Toyota Corolla Serpentine Belt Replacement Guide for a belt routing diagram. Remove the short 12mm adjuster lock bolt by spinning it out by hand in the counterclockwise direction. |
||
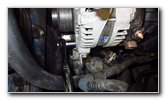
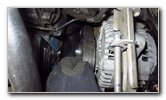
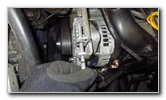
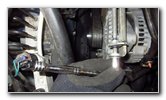
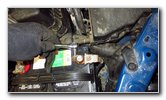
 Long Bottom Bolt |
 Loosen Rear Bracket Bolt |
 Lift Up Tensioner Bracket |
| Remove the long
14mm pivot bolt at the bottom of the alternator and set it aside in a safe
place. Loosen the 12mm bolt on the rear of the tension adjustment bracket. Swing the tension adjustment bracket up and away from the alternator. Slightly tighten the rear 12mm bolt on the tension adjustment bracket to keep it in the raised position and out of the way. |
||
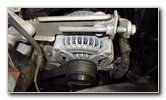
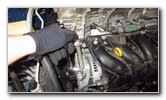
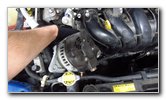 Remove Old Alternator |
 Old Alternator Removed |
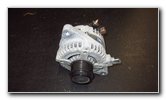 OEM Denso Unit |
| Carefully pull the
old alternator off the engine. You might need to pivot the alternator back and forth a few times or wiggle it from side to side to loosen the mounting "ears" from the bracket on the engine. |
||
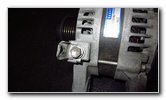 Wire Harness Bracket |
 Remove 10mm Bolt |
 Bracket Removed |
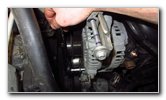
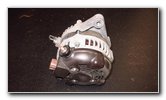
| The OEM alternator
(generator) in this 2010 Corolla S was part number
Toyota 27060-0T041 also known as
Denso TN104210-5491. Please be sure to use the Amazon Part Finder website to verify the correct replacement alternator for your vehicle since it may vary depending on the model year, trim level and whether it was built in North America or Japan. The new or remanufactured alternator that you purchase probably won't be equipped with the small metal bracket for securing the wire harness in place. Remove the bracket by turning the 10mm bolt in the counterclockwise direction. Install the bracket on to the new alternator by tightening the bolt in the clockwise direction until it is snug. |
||
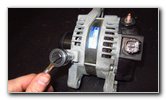
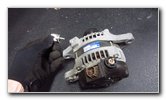
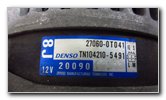 OEM Part Number |
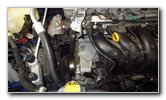 Alternator Mount |
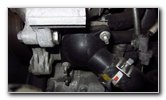 Thermostat Housing |
| If you need to
replace the thermostat for the cooling system, you'll have easy access to
the housing with the alternator removed. The black plastic thermostat housing is held in place by two 10mm nuts. Warning - If you remove the thermostat housing, the coolant will leak out. Check out my 2009-2013 Toyota Corolla Coolant Change Guide for more information. |
||
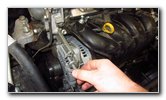
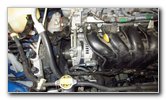
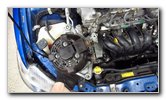 Lower In New Alternator |
 Mounting Ear & Bracket |
 Tilt Back Alternator |
| Carefully lower the
new alternator down into the engine bay. Line up the mounting brackets or "ears" on the bottom of the alternator with the mount on the engine. Push the alternator into place over the mounting point on the engine. Make sure the bolt holes in the mounting ears on the alternator are lined up with the bolt hole in the bracket on the engine. |
||
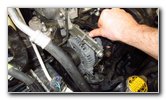
 Insert Long Bottom Bolt |
 Bottom Bolt Installed |
 Loosen Rear Bracket Bolt |
| Insert the long
bolt back into place at the bottom of the alternator. I chose to place a small amount of Loctite Blue (medium strength - removable with hand tools) to all of the bolts on the alternator to help prevent them from possibly vibrating loose. Loosen the bolt on the rear of the tensioner bracket. Lower the tensioner bracket down towards the top of the new alternator. |
||
 Insert Front 12mm Bolt |
 Tighten Rear 12mm Bolt |
 Slightly Tighten 14mm Bolt |
| Insert the tension
adjustment lock bolt through the tensioner bracket and into the top of the
new alternator. Slightly tighten the large 14mm bolt. Do not tighten the bolt all the way since you still need to adjust the belt tension. |
||
 Leave 14mm Slightly Out |
 Cut Zip / Cable Tie |
 Re-Install Belt On Pulley |
| Carefully cut the
cable tie that secures the belt to the top of the engine. Lower the serpentine belt over the alternator pulley. |
||
 Pivot Alternator Forward |
 Spin In Front 12mm |
 Spin In Tensioner Bolt |
| Firmly pull on the
top of the alternator to pivot it forward and place some tension on the
belt. Spin in the front long 12mm tensioner bolt in the clockwise direction. |
||
 Tighten To Blue Marks |
 Check Belt Tension |
 Tighten Pivot Bolt |
| Continue tightening
the long 12mm tensioner bolt until you reach the marks that you added
earlier with the Sharpie marker. Check the tension on the serpentine belt by grabbing it at the middle of the longest run from the alternator down to the crankshaft. Try twisting the belt until it is about 90 degrees (perpendicular) to the other section of the belt laying flat on the pulleys. If you can easily twist the belt past 90 degrees, the belt is too loose. If you can barely twist the belt and there is no way you can reach 90 degrees, the belt is too tight. The tension is correct when you can just barely twist the belt to 90 degrees (perpendicular) to the rest of the belt. Another method for checking the tension is to hold a ruler against the longest run of the belt and pull the belt down away from the ruler. The correct tension setting is when the belt can only be pulled about 1/2" (0.50 inch) or about 13mm away from the ruler. Once you are satisfied with the belt tension, tighten the 14mm pivot bolt at the bottom of the alternator. If you have a torque wrench, the service manual specification for the 14mm pivot bolt is 32 lb-ft of torque. |
||
 Tighten Adjuster Lock Bolt |
 Double Check Rear 12mm |
 Push On Wire Harness |
| Tighten the 12mm
adjustment lock bolt in the clockwise direction to 14 lb-ft of
torque. Make sure that the rear 12mm bolt on the tensioner bracket is tightened to 14 lb-ft of torque as well. Push the wire harness plastic retainer over the metal bracket on the front of the alternator. The retaining clip should "click" securely into place. Double check that the harness can not be pulled off the metal bracket. |
||
 Wire Harness Secured |
 B+ Output Ring Terminal |
 10mm Nut Secure Cable |
| Double check that
the 10mm bolt that secures the wire harness bracket to the alternator is
tight. Push the ring terminal at the end of the B+ output cable to the mounting post on the front of the alternator. Spin on the 10mm nut and tighten it in the clockwise direction with the 10mm socket and a 1/4" drive ratchet until it snug. |
||
 Push On Regulator Plug |
 Tighten B+ Nut |
 Plastic B+ Cover |
| Push the electrical
connector for the regulator on to the alternator. You should hear or feel the connector "click" securely into place. |
||
 Slide On Plastic Cover |
 Plastic Cover Secured |
 New Alternator Installed |
| Slide the gray
plastic cover over the B+ output terminal. Double check that all of the bolts and electrical connections are securely in place. |
||
 Double Check Tension |
 Push On "-" Terminal |
 Tighten Nut Clockwise |
| Double check that
the serpentine belt has the proper amount of tension. Carefully push the negative terminal on to the "-" battery post. Tighten the terminal nut in the clockwise direction with the 10mm socket and a 1/4" drive ratchet until it is snug. Try to avoid over tightening the terminal nut to prevent from cracking the battery post which could lead to an acid leak. |
||
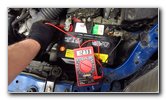 Multimeter - Engine Off |
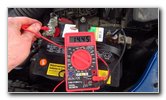 Test - Engine Running |
 Push On Plastic Cover |
|
Start the engine and listen closely for any strange noises. If you do hear any strange sounds, immediately turn off the ignition and double check your work. The best way to test your new alternator is with a digital multimeter tool. If your 12V battery is fully charged it should have a voltage of about 12.60V or higher with the engine turned off. My brand new Interstate battery had a reading of 12.73 volts. Start the engine and carefully check the voltage on the battery terminals again. If the new alternator is working properly, the voltage should have a reading of at least over 13 volts to just over 14 volts. If the alternator is outputting 15 volts or higher, there might be a problem with the voltage regulator. My new alternator had a reading of 14.45 volts. If you hear a "chirp, chirp, chirp" sound from the belt, it might be too loose. If the engine has a rough idle, idles at a lower RPM or you hear a loud screeching sound when you start the engine, the belt is probably too tight and should be loosened. To adjust the tension, loosen the lower 14mm bolt and loosen the 12mm tension adjustment lock bolt. Then either turn the long 12mm tensioner bolt in the clockwise direction to tighten the belt or in the counterclockwise direction to loosen the belt. Be sure to write down the procedure in your vehicle's service records. Please check out my other Corolla DIY tutorials at the links below - 2009-2013 Toyota Corolla Repair & Maintenance Guides |
||
| If you found this guide to be helpful,
please consider making a small donation by clicking on the PayPal.com
"Donate" button located to the right of this paragraph. Thank you!
(Note: I am not a registered charity. Donations are not tax deductible.) |