
Toyota
Corolla Brake Fluid Change Guide
How to replace the brake fluid in a 2009,
2010, 2011, 2012 and 2013 Toyota Corolla by bleeding the brake lines.

By Paul B. Michaels Author & Photographer Auto Mechanic Since 1989 |
||
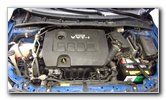 2010 Corolla 1.8L I4 |
 Right (Driver) Side |
 Pull Off Weatherstripping |
| This automotive
maintenance tutorial was specifically written to assist owners
of the 10th generation (2009, 2010, 2011, 2012, & 2013) Toyota Corolla
in changing the brake fluid by opening the bleeder valves at each wheel and
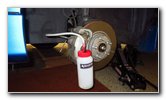
flushing out the old fluid. The brake fluid should be replaced at least every three years since it is hygroscopic (absorbs moisture from the air) and will gradually become contaminated. This will lead to reduced braking performance, a lower boiling point and possibly brake failure if the fluid boils during repeated hard braking. If the brake pedal feels very soft or spongy, the lines may also contain a few small air bubbles. Owners of other Toyota, Lexus or Scion vehicles such as the Yaris, Matrix, Prius, Camry, RAV4, Sienna, Tacoma, Tundra, FJ Cruiser, Venza, Highlander, Avalon, Sequoia, Land Cruiser, Allion, Premio, Auris, IS 250, ES 350, GS 350, tC, xB, xD, iQ and FR-S may also find these DIY instructions to be helpful. The tenth generation Corolla requires DOT 3 brake fluid. I chose to buy a large 1 quart (32 ounces) bottle of Lucas DOT 3 synthetic brake fluid since it has excellent reviews on Amazon. I used the entire one quart (32 oz.) bottle to thoroughly flush out the brake lines. If you choose to purchase smaller 12 oz. bottles, make sure you buy at least two (24 oz.) or three (32 oz.) bottles to fully remove most of the old brake fluid from the system. This is especially important if the fluid in your master reservoir looks very dark or cloudy. If you prefer to use the genuine OEM brake fluid, the part number is Toyota 00475-1BF03 (also known as part # 004751BF03). The tools needed to complete this procedure include a floor jack, two jack stands, a small automotive funnel, an 8mm wrench, a 10mm wrench and an Allstar Performance Bleeder Bottle. I prefer using the Allstar ALL11017 one-person bleeder bottle since it makes this procedure extremely easy. It features a one way check valve to prevent air from entering the brake lines and a strong magnet for holding it in place to the rotor or drum. (You could instead use an assistant to pump the brake pedal for you as you open and close the bleeder valves but this is a long and tiring process.)
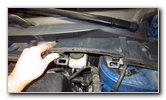
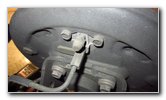
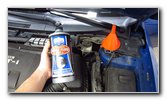
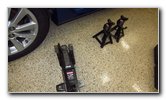
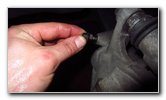
The first few steps are to drive the vehicle on to a level surface, shift the transmission into "Park" and turn off the ignition. Engage the emergency / parking brake (so that the rear drum brakes are applied) and place wheel chocks on both sides of the front tires to prevent the vehicle from moving. Open the hood and move to the right (driver) side of the engine bay. Gently pull the end of the rubber weatherstripping off the mounting peg on the black plastic cowl. |
||
|
|
||
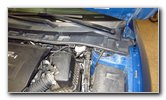
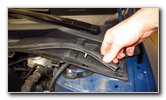
 Rubber Seal Detached |
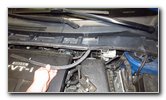
 Push In Release Tabs |
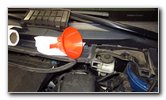
 Master Reservoir |
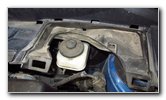
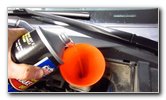
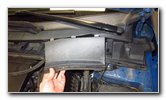
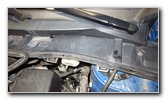
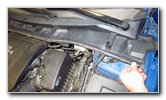
| Then gently pull
out the white plastic pop rivet friction fasteners until the rubber seal can
be lifted off the cowl. Set the weatherstrip aside on the left side of the cowl. Push in the two release tabs on the front of the brake fluid reservoir access panel. Pull off the cover and set it aside in a safe place. |
||
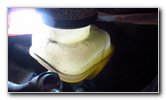
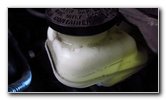
 Pull Off Reservoir Cap |
 Check Old Brake Fluid |
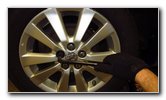
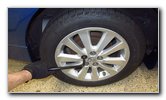 Slightly Loosen Lug Nuts |
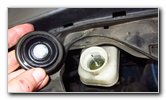
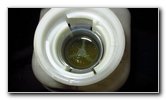
| Gently pull off the
rubber and plastic cap from the brake fluid reservoir tank. Inspect the old brake fluid inside the reservoir bottle. The fluid in my reservoir looked relatively good even after 10 years and 95,000 miles. I bought the car used from Hertz Car Rental in 2012 with 32,000 miles on it, but I doubt their service department changed the brake fluid. So I just proceeded with bleeding the brake lines.
If the old fluid in the reservoir looks very dark, cloudy or full of large pieces of debris, the old fluid should be removed. Use a pair of needle nose pliers to very gently pull the plastic mesh debris filter screen out of the reservoir bottle. Clean out most of the old fluid by absorbing it with a small towel or remove it with a turkey baster, an automotive fluid pump or a large syringe. Do NOT allow the very bottom of the reservoir near the openings to the master cylinder to run dry! Although it is important to remove any large debris or most of the contaminated fluid from the reservoir, you also do not want to introduce a large amount of air into the master cylinder which could become trapped in the ABS (anti-lock braking system) module. Avoid getting brake fluid on the vehicle since it can quickly damage painted surfaces. Replace the filter screen. Fill the reservoir with new brake fluid and gently tap on the bottle to help release any air bubbles. If your brake pedal feels very soft, spongy and sinks to the floor when you have completed the entire bleeding procedure, you may need to use an OBDII Scanner (also known as an OBD2 scan tool) that specifically has an ABS bleeding function to remove any air from the ABS module. As long as you prevent the master reservoir from being completely emptied out, you should not have a problem with air being introduced into the master cylinder or the ABS module. The bleeding order for the Corolla (as it is for most vehicles) is to start at the wheel furthest from the master reservoir and work your way towards it. So you will start with the right (passenger side) rear and then continue to the left (driver side) rear, right (passenger) front and finally the left (driver) front. Slightly loosen the five lug nuts on the right (passenger) rear wheel by turning them about 1/4 to 1/2 turn in the counterclockwise direction with the tire iron. |
||
 Raise Rear of Vehicle |
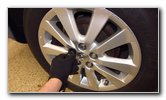 Spin Off 5 Lug Nuts |
 Set Aside Lug Nuts |
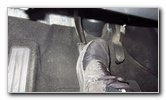
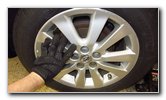
| Please make sure
that the emergency / parking brake is engaged and the front tires are
chocked on both sides to prevent the car from moving. Carefully raise the rear of the car and securely support it with at least two jack stands. Do not solely rely on the floor jack to support the vehicle. I prefer to only work on one corner of the car at a time to keep three tires on the ground for extra safety. Spin off the five lug nuts and set them aside in a safe place. |
||
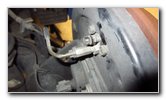
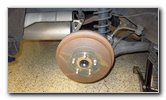 Right (Passenger) Rear |
 Brake Fluid Line & Valve |
 Pull Off Rubber Cap |
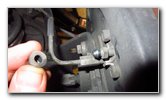
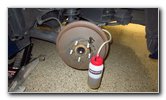
| Carefully pull off
the rear wheel and tire to reveal the drum brake and suspension. Locate the metal brake line and the brake fluid bleeder valve on the back side of the drum brake assembly. Gently pull off the rubber cap from the bleeder nipple. Set the cap aside in a safe place. |
||
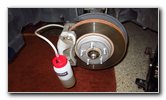
 One-Man Bleeder Bottle |
 Magnet - Bottle On Drum |
 Push Tube Over Nipple |
|
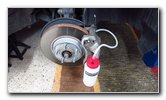
If you purchased a one-person bleeder bottle, push the rubber hose over the bleeder nipple. If you have the Allstar Performance Bleeder Bottle, make sure that the other side of the hose is secured to the red spout which is attached to the one way check valve on the underside of the bleeder bottle's cap. Double check that the red cap is tightly secured to the bottle. The black plastic nipple on the cap is the vent valve that allows air to escape as you pump the brake pedal and force old brake fluid into the bottle. Warning - Brake fluid is very corrosive and can easily damage paint. Avoid getting brake fluid on your wheels or painted body panels. If you do get brake fluid on the car, immediately wash it off with soap and plenty of water from a garden hose. |
||
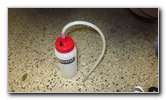
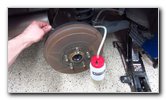
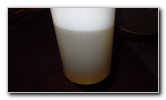
 New DOT 3 Brake Fluid |
 Top Off Reservoir Bottle |
 Loosely Replace Cap |
| Top off the
reservoir with new DOT 3 brake fluid to just above the "MAX" line. Loosely place the cap on the top of the reservoir to protect the new fluid from the open air. |
||
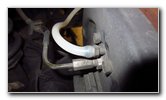
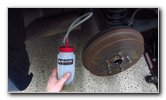
 Open Bleeder Valve |
 Slowly Pump Pedal |
 Check Brake Fluid Level |
| The rear drum brake
bleeder valves (at least on this 2010 Corolla S) require a 10mm wrench. Carefully open the bleeder valve by turning the valve in the clockwise direction (as seen from the outside of the vehicle). Move to the driver's seat and slowly pump the brake pedal several times. Check the level in the reservoir and re-fill it to just above the "MAX" (maximum) line. Repeat the process several times until you see clean fluid in the tube. Make sure that the level in the reservoir does NOT go below the "MIN" (minimum) line. If you are doing this process with an assistant pumping the brake pedal for you, here is the procedure: 1. Have the assistant place their foot on the brake pedal. 2. Open the bleeder valve. 3. Tell the assistant to push down and HOLD the brake pedal. 4. Close the bleeder valve and let the assistant know they can release the brake pedal. 5. Repeat the process. |
||
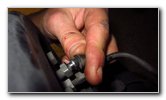
 Close Bleeder Valve |
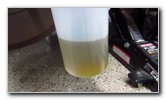 Old Dirty Brake Fluid |
 Detach Bleeder Bottle |
| Once you see clean
looking brake fluid in the tube, you can close the bleeder valve. Close the bleeder valve by turning it in the counterclockwise direction (as seen when viewed from the outside of the car) with the 10mm wrench until it is snug. The service manual specification for tightening the bleeder valves is 74 lb-in (pound-inch) or about 6.167 lb-ft (pound-foot) of torque. Avoid over tightening the valve to prevent from breaking it. If you don't have a small torque wrench with measurements in lb-in, just tighten the valve to a tiny fraction of a turn past finger tight with your small 10mm wrench. Carefully detach the tube from the bleeder valve. Avoid splashing any brake fluid on the painted surfaces or your wheel. |
||
 Replace Rubber Cap |
 Valve Cap Secured |
 Push On Rear Wheel |
| Double check that
the bleeder valve is tight. Push the rubber cap over the nipple. Replace the rear wheel and spin on the five lug nuts a few turns by hand in the clockwise direction to make sure they don't become cross threaded. |
||
 Tighten Lug Nuts |
 Lower Car - Torque Lug |
 Left (Driver Side) Rear |
| Slightly tighten
the lug nuts in the clockwise direction in a criss-cross or a star pattern
with the lug nut wrench. Carefully lower the vehicle from the jack stands by using the floor jack. Continue tightening the lug nuts in a criss-cross or star pattern until they are snug. It would be best to use a torque wrench to tighten the lug nuts to the owner's manual specification of 76 lb-ft (103 Nm). Move all of your tools to the left (driver) side rear corner of the vehicle. Repeat the process to bleed the brake line. |
||
 Right (Passenger) Front |
 Bleeding Front Right |
 Dark & Dirty Brake Fluid |
| The front bleeder
valves require an 8mm wrench. Next, bleed the brake line at the front right (passenger) corner. Finally, bleed the brake line at the front left (driver side) corner which is the caliper closest to the reservoir. |
||
 Left (Driver) Front |
 Bleeding Front Driver |
 Cloudy Old Fluid |
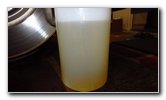
| I tried to use
about 1/4th of the new quart sized bottle of brake fluid for each corner of
the vehicle which is about 8 ounces. The first few pumps of the brake pedal for each corner of the car looked the darkest and dirtiest. The final pump or two looked almost like brand new brake fluid indicating that the hose and caliper were thoroughly flushed out. |
||
 Fill Reservoir To "MAX" |
 Replace Valve Cap |
 Replace Plastic Cover |
| Replace the brake
bleeder valve cap on the front driver side caliper, push on the wheel and
replace the lug nuts. Lower the car from the jack stands and the floor jack. Once you have completed bleeding the brake lines at all four wheels, fill the brake fluid reservoir to the "MAX" line. Push on the reservoir cap and make sure it is securely attached. Replace the plastic cover on to the cowl near the windshield and wiper arms. |
||
 Reservoir Cover Secured |
 Replace Rubber Strip |
 Brake Fluid Change Done! |
| Replace the rubber
weatherstripping. Sit in the driver's seat and firmly push down the brake pedal a few times to restore the brake line pressure. Make sure that the emergency / parking brake is still engaged and the tires are securely chocked. Start the engine and push on the brake pedal several times to make sure it feels firm. If the brake pedal quickly sinks to the floor or it feels very soft or spongy, there may still be air bubbles in the system. You will need to repeat the process and if necessary have the vehicle towed to a professional mechanic. If the brake pedal feels normal, take the vehicle for a very short and careful test drive. Keep your hand on the emergency brake lever just in case the hydraulic braking system does not work properly. It would be a good idea to check your driveway, parking spot or garage floor for drops of fresh brake fluid which might indicate a leak from the reservoir or the bleeder valves. Check the level in the reservoir after your first test drive and a few times during the next week or two. If necessary, re-fill the reservoir to the "MAX" line. Be sure to write down the fluid change in your vehicle's service records. There is no brake fluid service interval listed in the owner's manual, but most manufacturers and mechanics recommend replacing it about every three years for most drivers. If you do any demanding activities such as autocross racing or towing, it should be changed more frequently. Please check out my other Corolla DIY tutorials at the links below - 2009-2013 Toyota Corolla Repair & Maintenance Guides |
||
| If you found this guide to be helpful,
please consider making a small donation by clicking on the PayPal.com
"Donate" button located to the right of this paragraph. Thank you!
(Note: I am not a registered charity. Donations are not tax deductible.) |