
Toyota
Corolla Oil Pressure Switch Replacement Guide
How to change the oil pressure sensor on
the 2ZR-FE 1.8L I4 engine in a 2009 to 2014 Toyota Corolla sedan.

By Paul B. Michaels Author & Photographer Auto Mechanic Since 1989 |
||
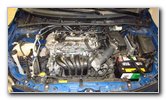 2010 Corolla 2ZR-FE |
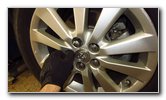
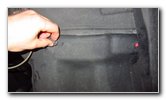
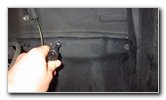
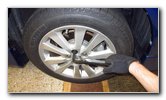
 Front Passenger Tire |
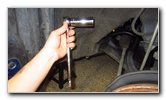
 Slightly Loosen Lug Nuts |
| This automotive
maintenance tutorial was specifically written to assist owners of the 10th
generation (2009, 2010, 2011, 2012 and 2013) Toyota Corolla
in changing a failing or faulty oil pressure switch (also known as an oil
pressure sensor, sender or sending unit) on the 2ZR-FE 1.8 liter inline four
cylinder engine. Owners of other Toyota, Lexus or Scion vehicles such as the Yaris, Matrix, Prius, Camry, RAV4, Sienna, Tacoma, Tundra, FJ Cruiser, Venza, Highlander, Avalon, Sequoia, Land Cruiser, Allion, Premio, Auris, IS 250, ES 350, GS 350, tC, xB, xD, iQ and FR-S may also find these DIY instructions to be helpful. The most common symptom of a failing or faulty oil pressure switch is the low oil pressure warning light being illuminated on the gauge cluster. The "oil can" warning light might be steady or it may be flashing. If you have an OBDII Scanner (also known as an OBD2 scan tool), some of the oil pressure switch related DTC (diagnostic trouble codes) you might see include P0520, P0521, P0522, P0523 and P0524. If you see the low oil pressure warning light turn on or flash, pull over in a safe place and immediately turn off the engine. Allow the oil to drain back down to the oil pan for at least five to ten minutes. Then check the oil level on the yellow plastic handled dipstick. If the oil level is somewhere in between the two dots on the tip of the dipstick that indicate "F" (Full) and "L" (Low), the oil pressure switch may have failed and is not reporting the oil pressure to the ECM (electronic control module). If the level is below the "L" (Low) dimple, you may have an oil leak or an oil consumption problem (burning oil). Filling the engine with oil until the level on the dipstick reaches the "F" (Full) line, should cause the low oil pressure warning light to turn off if the sensor is still working properly. The genuine OEM part number for the oil pressure switch is Toyota 83530-0E010 (made by Denso and also known as part # 835300E010). I recommend buying the OEM Toyota unit, but here are a few compatible replacement aftermarket oil pressure switches with their part numbers: Beck Arnley 201-1649, Standard Motor Products PS305T and Formula Auto Parts OPS11. The tools needed to complete this procedure include a lug nut wrench, a floor jack, two jack stands, a flat head screwdriver, a 10mm socket with a 1/4" drive ratchet, a 24mm socket with a 1/2" drive ratchet and a tube of Loctite Blue (medium). The first few steps are to drive the car on to a level surface, shift the transmission into "Park" and turn off the ignition. Engage the emergency / parking brake and place wheel chocks on both sides of the rear tires to help prevent the vehicle from moving. Slightly loosen the five lug nuts on the front passenger wheel by turning them about 1/4 to 1/2 turn in the counterclockwise direction with the tire iron. |
||
|
|
||
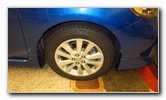
 Raise Front of Vehicle |
 Spin Off Five Lug Nuts |
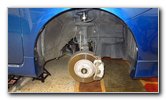 Front Wheel Removed |
| Carefully raise the
front of the car and securely support it with at least two
jack stands under the frame rail. Please do not solely rely on the floor jack to support the vehicle! Spin off the five lug nuts and set them aside in a safe place. Carefully pull off the front passenger side wheel and tire. Some home mechanics choose to place the wheel under the frame rail as a backup support device just in case the jack stands and floor jack fail. |
||
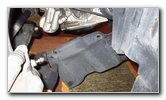
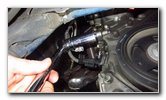
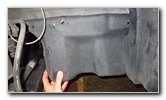
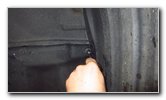
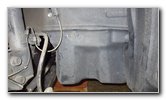 Plastic Engine Shield |
 Pry Out Center Button |
 Plastic Fastener Removed |
| The lower part of
the black plastic engine shield or "splash guard" is held in place by two
metal screws and a plastic pop rivet fastener. Pry out the small round "button" in the center of the plastic fastener with the flat head screwdriver. Then pry out the base of the pop rivet. |
||
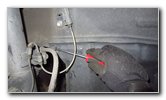
 Loosen Counterclockwise |
 Loosen Second Screw |
 2 Screws & 1 Pop Rivet |
| Loosen the two
black metal screws by turning them in the counterclockwise direction with a
10mm socket and a 1/4" drive ratchet. Set the two screws aside with the plastic pop rivet. |
||
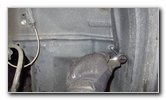
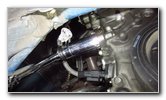
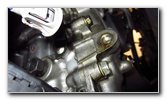
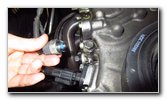
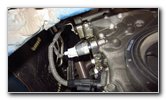
 Lower Splash Guard |
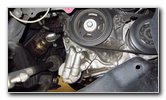 Rear of 1.8L I4 Engine |
 Crankshaft Position Sensor |
| Gently lower the
engine shield towards the ground.
You don't need to fully remove the plastic shield to access the switch. Locate the black plastic crankshaft position sensor on the rear of the engine. The silver metal and gray plastic oil pressure switch is situated just above the crankshaft position sensor. |
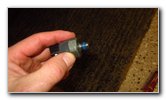
||
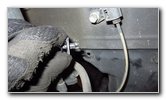
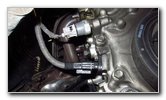
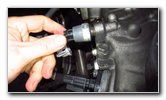
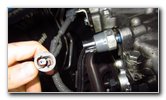
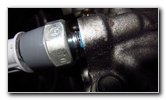
 Oil Pressure Sensor |
 Push In Release Tab |
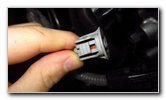 Pull Off Power Plug |
| Gently pinch the
release tab on the electrical connector before pulling it straight off the
base of the old sensor. Try to avoid using excessive force to prevent from cracking the plastic connector. This is especially important if you are working in a very cold climate or the vehicle is over ten years old since the plastic might be brittle from thousands of heat cycles. |
||
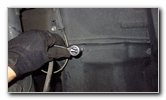
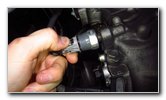
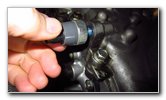
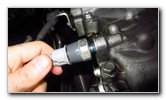
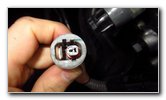 Electrical Connector |
 Attach 24mm Socket |
 Loosen Counterclockwise |
| Inspect the
electrical connector for any damage or frayed wire insulation. To protect your garage floor, place some newspaper or cardboard below the engine to catch any oil that might leak out when you remove the old switch. Clean off any large debris from around the switch with a paper towel to help prevent it from entering the port. Take a moment to examine how the old sensor is not flush with the rear of the engine. On my 2010 Corolla, the 24mm hex part of the old sensor was situated about 1/4" away from the engine with about 3 to 4 rings of threads showing. Attach the 24mm socket to a 1/2" drive ratchet. You could also use a large 24mm wrench. Carefully loosen the old switch by turning it in the counterclockwise direction. |
||
 Spin Out Old Sensor |
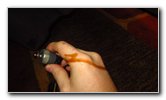 Some Oil Leaked Out |
 Clean Sensor Port |
| Spin out the old
sensor the rest of the way by hand.
A small amount of oil might leak out from the port (opening) in the rear of the engine. Clean the area around the opening with a paper towel. |
||
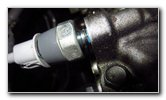
 Old Sensor Removed |
 Apply Threadlocker |
 Loctite Blue On Threads |
| Make sure that the
threads on the new sensor are not oily or greasy. If they are dirty, clean
them off with a paper towel lightly moistened with rubbing alcohol to
prepare the threads for the threadlocker compound. I only had the older version of Loctite 242 Blue (medium - removable with hand tools) to apply to the new sensor. If you need to buy threadlocking compound, I recommend purchasing the newer Loctite 243 blue version which has improved oil tolerance and a higher temperature range. Apply a small amount of Loctite Blue to the threads on the new sensor. Avoid getting Loctite on the tip of the sensor or in the hole on the end. |
||
 Line Up New Sensor |
 Spin In Clockwise |
 Tighten With Socket |
|
Line up the new sensor with the opening in the rear of the engine. Carefully spin in the new sensor by hand in the clockwise direction to make sure it doesn't become cross threaded. If you have a very sensitive and reliable torque wrench, the specification in the service manual for tightening the oil pressure switch is 11 lb-ft (or 15 N-m). Otherwise, just tighten the sensor until it is snug. The new sensor will not be flush with the rear of the engine! Once the sensor has been properly tightened, there should still be about 3 to 4 of the threads showing between the engine and the 24mm hex part of the sensor. My sensor was about 1/4" away from the rear of the engine. I would rather have the new switch be slightly loose and discover a slow oil leak than to risk cracking the engine block or damaging the threads. So please be sure to not over tighten the sensor! |
||
 Tapered Thread 1/4" Gap |
 Electrical Connector |
 Push On Power Plug |
| Push the electrical
connector on to the base of the new sensor. You should hear or feel the power plug "click" securely into place. |
||
 New Sensor Installed |
 Dry For One Hour!!! |
 Start Engine Check Leaks |
| The service manual
specifies that the Toyota 1344 threadlocker adhesive used at the factory
should be allowed to dry for at least one hour before running the engine.
The Loctite 242 threadlocker has a "set time" of just 20 minutes, but I allowed it to set for just over an hour. Loctite 242 will be fully cured in 24 hours. Do not start the engine until the threadlocker has had at least an hour to dry. Carefully start the engine and check the new oil pressure switch for any oil leaks. Avoid placing your fingers or hands in the engine bay near the switch while the engine is running since the crankshaft pulley and serpentine belt will be spinning just in front of the switch. If you do see an oil leak, turn off the engine. You may need to allow the Loctite to dry longer, clean the threads better or tighten the sensor a bit more. |
||
 Raise Splash Guard |
 Spin In Screws |
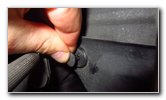 Re-Insert Pop Rivet |
| If you don't see a
leak, raise the plastic engine shield. Spin in the two metal screws a turn or two by hand to support the splash guard. Re-insert the plastic pop rivet. |
||
 Push In Button - Secure |
 |
 Tighten Clockwise |
| Push in the small
round button in the center of the pop rivet to secure the plastic fastener
in place. Tighten the two 10mm screws in the clockwise direction until they are snug. |
||
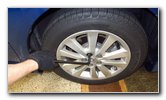
 Replace Wheel & Tire |
 Spin On Five Lug Nuts |
 Slightly Tighten Lug Nuts |
| Carefully push the
wheel back into place over the lug studs. Spin on the five lug nuts a few turns by hand in the clockwise direction to prevent them from becoming cross threaded. Slightly tighten the lug nuts with the tire iron in a criss-cross of star pattern. |
||
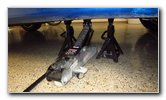
 Lower Car From Stands |
 Torque Lug Nuts |
 Sensor Change Complete! |
| Carefully lower the
vehicle from the jack stands by using the floor jack. Continue tightening the lug nuts in a criss-cross or star pattern with the lug nut wrench until they are snug. It would be best to use a torque wrench to tighten the lug nuts to the owner's manual specification of 76 lb-ft of torque. Please check out my other Corolla DIY tutorials at the links below - 2009-2013 Toyota Corolla Repair & Maintenance Guides |
||
| If you found this guide to be helpful,
please consider making a small donation by clicking on the PayPal.com
"Donate" button located to the right of this paragraph. Thank you!
(Note: I am not a registered charity. Donations are not tax deductible.) |