
Toyota
4Runner PCV Valve Replacement Guide
How to check or change the PCV valve in a
5th generation 2010-2016 Toyota 4Runner with the 1GR-FE 4.0L V6 motor.

By Paul B. Michaels Author & Photographer Auto Mechanic Since 1989 |
||
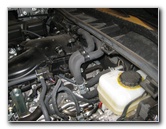
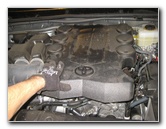
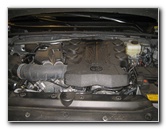 2015 4Runner 1GR-FE 4.0L V6 |
 Right (Driver) Side of Engine |
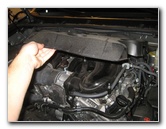 Lift Front of Engine Cover |
| This
automotive maintenance tutorial was specifically written to assist
owners of the fifth generation (2010, 2011, 2012, 2013, 2014, 2015 &
2016) Toyota 4Runner SUV in checking or changing the PCV (positive
crankcase ventilation) valve in the 1GR-FE 4.0 liter V6 engine. Owners of other Toyota, Lexus or Scion vehicles such as the Yaris, Corolla, Matrix, Prius, Camry, RAV4, Sienna, Tacoma, Tundra, FJ Cruiser, Venza, Highlander, Avalon, Sequoia, Land Cruiser, IS 250, ES 350, GS 350, tC, xB, xD, iQ and FR-S may also find these DIY instructions to be helpful. A few compatible replacement PCV valves with their part numbers include the following: Toyota 12204-31030, Purolator PV1090, Wells PCV141, Airtex 6P1019, Standard Motor Products # V408 and PTC PCV2389. The tools needed to complete this procedure include a deep well 19mm socket, a 1/2" drive ratchet and possibly also a wobble angle extension bar and/or a universal swivel joint for better leverage. |
||
|
|
||
 "C" Shaped Socket |
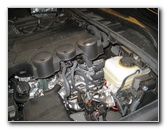
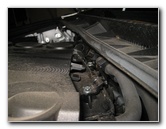
 PCV Valve - Right Rear Corner |
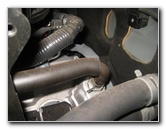 Rubber Hose On PCV |
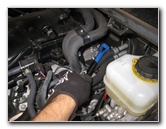
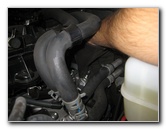
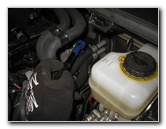
| The first step is
to open the hood. Then gently lift the front edge of the plastic engine cover. Pull the engine cover forward to disengage the two "C" shaped sockets on the back edge of the cover from the mounting bar. Set the plastic engine cover aside in a safe place. The PCV valve is located on the right rear corner of the engine (the driver side). It has a black rubber hose attached to the top of it and it points up and slightly towards the steering wheel close to the firewall. |
||
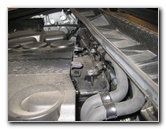
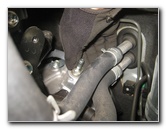
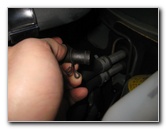 Pull Off Rubber Hose |
 Silver Metal PCV Valve |
 Loosen Counterclockwise |
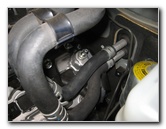
| Pull the rubber
hose straight off the top of the old PCV valve. I didn't have a deep well 19mm socket, so I just used a regular 19mm socket secured to the tip of a 1/2" drive ratcheting wrench with some painter's tape. I highly recommend that you buy the correct type of socket. It was difficult to loosen the old PCV valve with a regular 19mm socket just barely attached to the mount on the ratcheting wrench. |
||
|
|
||
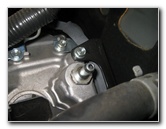
 Spin Out Old PCV Valve |
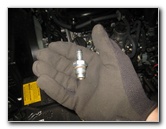 PCV Valve Removed |
 PCV Valve Socket |
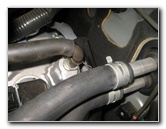
| Loosen the PCV
valve by turning it counterclockwise with a deep well 19mm socket attached
to a 1/2" drive ratcheting wrench.
You might need to use a wobble extension or a universal swivel joint to get a better grip. Once the PCV valve has been loosened a few turns, detach the socket and spin it out the rest of the way by hand to prevent from dropping it down in to the engine bay. Vigorously shake the old PCV valve to check its condition. If the old valve makes a healthy sounding "rattle" sound, the old valve is most likely still good and can be re-installed. If the old valve doesn't rattle or at all or sounds like it is gummed up with residue, it should be replaced with a new valve. I recommend buying the genuine OEM Toyota 12204-31030 (also known as part number 1220431030) PCV valve. |
||
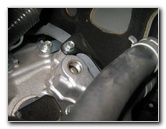
 Spin In New PCV Valve |
 Tighten 19mm Clockwise |
 New PCV Installed |
| Spin in the new PCV
valve by hand a few turns in the clockwise direction to prevent it from
becoming cross threaded. Tighten the new valve with the deep well 19mm socket and 1/2" drive ratcheting wrench to just past hand tight or approximately 20 ft-lbs of torque if you have a torque wrench. |
||
 Push On Rubber Line |
 Engine Cover Mount |
 Push On Engine Cover |
| Double check that
the new PCV valve is tight. Push the rubber hose back in to place over the nipple on the end of the new PCV valve. Line up the two "C" sockets on the rear edge of the plastic engine cover with the mounting bar on the back side of the engine. Push the engine cover back in to place. Start the engine and listen closely for any strange sounds that might indicate a loose PCV valve or a disconnected vacuum line. Be sure to record the PCV valve change in your SUV's service records. For more,
check out my other
2010-2016 Toyota 4Runner DIY Repair & Maintenance Guides. |
||
| If you found this guide to be helpful,
please consider making a small donation by clicking on the PayPal.com
"Donate" button located to the right of this paragraph. Thank you!
(Note: I am not a registered charity. Donations are not tax deductible.) |