
Nissan Versa PCV Valve
Replacement Guide
How to change the positive crankcase
ventilation valve in a 2nd generation 2012 to 2019 Nissan Versa 1.6L.

By Paul B. Michaels Author & Photographer Auto Mechanic Since 1989 |
||
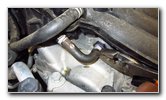
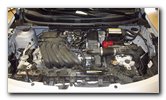 2019 Versa 1.6L I4 |
 Left (Passenger) Side |
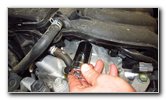
 PCV Valve Location |
| This automotive
maintenance tutorial was specifically written to assist owners of the second
generation 2012, 2013, 2014, 2015, 2016, 2017, 2018 and 2019 Nissan Versa
sedan in cleaning or changing the positive crankcase ventilation (PCV) valve
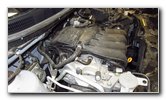
in the HR16DE 1.6 liter inline four cylinder engine. Owners of other Nissan vehicle such as the Sentra, Altima, Maxima, Murano, Rogue, Note, Leaf, Juke, Kicks, Latio, Almera, Sunny, Qashqai, NV200, Pathfinder, Frontier and X-Trail may also find these DIY instructions to be helpful. A few of the symptoms of a failing, faulty or clogged PCV valve include the following: rough idle, stalling, hesitation, misfiring, poor acceleration, higher oil consumption, smoke coming out of the exhaust pipe, an oily engine air filter, fouled spark plugs and possibly a CEL (check engine light) or SES (service engine soon) warning on the gauge cluster. The OEM (original equipment manufacturer) PCV valve part number is Standard Motor Products V502. (It is also known as Nissan part # 149301KC1A, 14930-1KC1A, 118105H71A or 68048205AB.) The tools needed to remove and replace the valve include a pair of pliers and a 23mm socket with a 1/2" drive ratchet or you could instead use an adjustable crescent wrench. The first two steps are to open the hood and then move to the left (passenger) side of the engine bay. The PCV valve is attached to the middle left of the valve cover just below the black plastic intake manifold. |
||
|
|
||
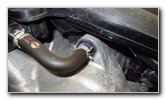
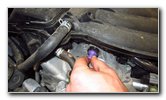
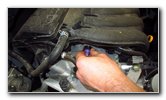
 Release Hose Clamp |
 Pull Off Rubber Hose |
 Loosen Counterclockwise |
| Use the pliers to
carefully pinch together the two tabs on the metal hose clamp that secures
the black rubber hose to the "nipple" on the old valve. Slide the hose clamp back off the old PCV valve. Carefully pull the black rubber hose straight off the old valve. Use the 23mm socket to loosen the old valve by turning it in the counterclockwise direction. I was able to loosen the old valve by just turning the 23mm socket with my fingers. If the old valve is very tight, attach the 1/2" drive ratchet and loosen it in the counterclockwise direction. |
||
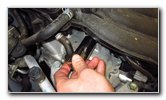
 Spin Out Old PCV Valve |
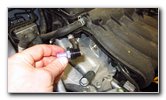 Old Valve Removed |
 Shake To Check Condition |
| Spin out the old
valve and remove it from the port (opening) in the side of the engine. Inspect the old valve for any sludge, oily deposits or debris. To check the condition of the old part, vigorously shake it back and forth. If the valve is still working properly, you should hear a healthy sounding rattle noise. If you'd like to try cleaning the old part before purchasing a new one, spray it with some carburetor cleaner and allow it to air dry. |
||
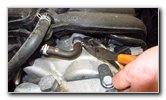
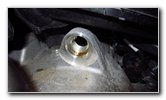 Inspect Valve Port, Clean |
 Spin In New Valve |
 Tighten By Hand |
| Check the port for
any debris or sludge and clean it if necessary. Carefully spin in the new valve a few turns by hand in the clockwise direction to help prevent it from becoming cross threaded. The torque specification in the service manual for tightening the PCV valve is only 22 pound-inches or just 1.83 lb-ft. If necessary, use the 23mm socket to tighten the new valve until it is snug. Avoid using the 1/2" drive ratchet to tighten the valve since it could easily lead to over tightening which may cause the plastic valve to break or damage the threads. |
||
 Secure Hose Clamp |
 PCV Valve Installed |
 Test New PCV Valve |
| Double check that
the valve is properly tightened before moving on to the next steps. Slide the rubber hose all the way over the valve's nipple. Use the pliers to squeeze together the two tabs on the metal hose clamp. Slide the clamp towards the PCV valve to secure the hose in place. To test the new valve, start the engine and listen closely for any strange sounds. If do you hear a weird noise, immediately turn off the ignition and double check your work. If you have an OBD2 scan tool, the most common DTC (diagnostic trouble codes) that might indicate a problem with the PCV valve include P0171 (system too lean - bank 1) and P0174 (system too lean - bank 2). Use the scanner to clear the codes and take the car for a short and careful test drive to see if any of the symptoms re-occur. Be sure to write down the procedure in your vehicle's service records. Please
check out all of my
2012-2019 Nissan Versa DIY Repair & Maintenance Guides. |
||
| If you found this guide to be helpful,
please consider making a small donation by clicking on the PayPal.com
"Donate" button located to the right of this paragraph. Thank you!
(Note: I am not a registered charity. Donations are not tax deductible.) |