
Toyota Corolla Engine
Serpentine Accessory Belt Replacement Guide
How to change the serpentine accessory
belt on the 2ZR-FE 1.8L I4 engine in an 11th generation 2014 to 2018 Toyota
Corolla.

By Paul B. Michaels Author & Photographer Auto Mechanic Since 1989 |
||
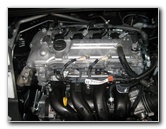
 2014 Corolla 2ZR-FE |
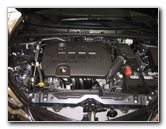
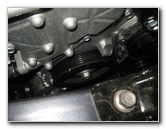
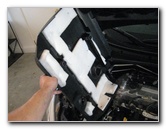
 Pull Off Plastic Cover |
 Engine Cover Removed |
| This
automotive maintenance tutorial was specifically written to assist
owners of the eleventh generation (2014, 2015, 2016, 2017 and 2018)
Toyota Corolla in changing the serpentine accessory belt on the
2ZR-FE 1.8 liter inline four cylinder engine. Owners of other Toyota, Lexus or Scion vehicles such as the Yaris, Matrix, Prius, Camry, RAV4, Sienna, Tacoma, Tundra, FJ Cruiser, Venza, Highlander, Avalon, Sequoia, Land Cruiser, IS 250, ES 350, GS 350, tC, xB, xD, iQ and FR-S may also find these DIY instructions to be helpful. A few compatible replacement belts with their part numbers are as follows: Bando 6PK1220 or Bando 6PK1230, Dayco 5060485, Toyota 90916-02679 (Japan Built), Toyota # 90916-A2016 (North America Built). The tools needed to complete this procedure include a 12mm socket, a 14mm socket and a 3/8" drive ratchet. |
||
|
|
||
Please verify the correct replacement part number for your Toyota Corolla by contacting a dealership, an auto parts store or by using the Amazon Part Finder website. The correct part number will vary depending on whether your Corolla was built in North America or Japan. It also may vary depending on the model year, trim level and if it is equipped with air conditioning. |
||
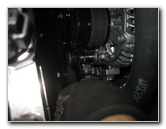
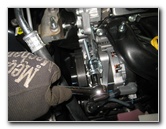
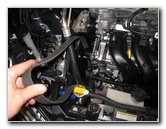
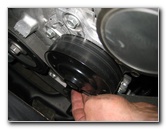
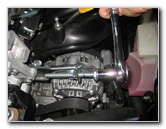
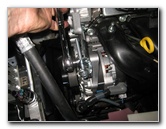
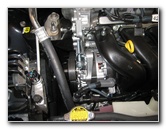 Left Side of Engine |
 Alternator & Belt Tensioner |
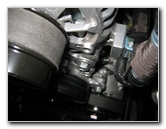 Bolt - Bottom of Alternator |
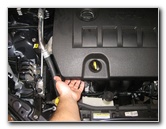
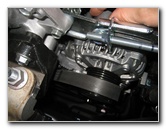
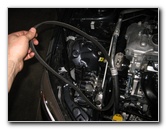
| The first two steps
are to open the hood and gently pull off the plastic engine cover. Set the engine cover aside in a safe place. If the car has been driven recently, I'd recommend letting the engine cool off for at least an hour or two. The serpentine accessory belt is located on the left side of the engine. To release the old belt, you'll need to loosen three bolts. One bolt is located at the bottom of the alternator. The second bolt is the tensioner bracket set bolt which is mounted with the bolt head facing toward the left side of the car. The 3rd and final bolt is the long bolt that tensions the belt by slowly rotating the alternator forwards towards the front of the car. |
||
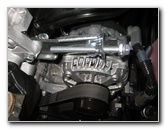
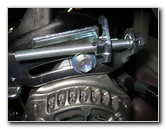
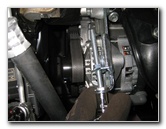
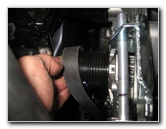
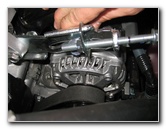
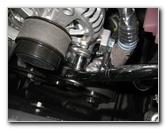
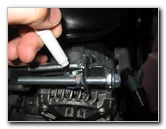 Mark Tensioner Bolt Position |
 14mm Bolt - Bottom of Alternator |
 Loosen Counterclockwise |
| I'd recommend
making a mark on the long tensioner bolt with a marker pen so that you will
remember the approximate position. Loosen the bolt at the bottom of the alternator by turning it counterclockwise with a 14mm socket and a 3/8" drive ratchet. |
||
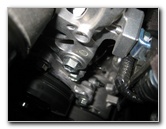
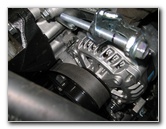
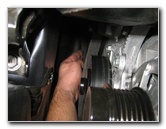
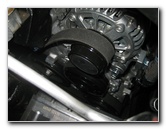
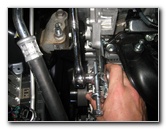
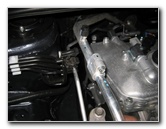
 Loosen Lower Alternator Bolt |
 Belt Tension Bracket |
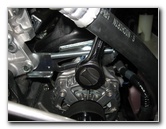 Loosen 12mm Bolt |
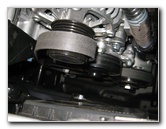
| Then loosen the
short tensioner bracket set bolt (which also acts as the top alternator
mounting bolt) by turning it counterclockwise with a 12mm socket and 3/8"
ratchet. The top alternator bolt / tensioner bracket set bolt is mounted with the bolt head facing towards the left side of the vehicle. |
||
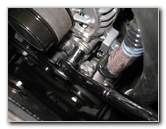
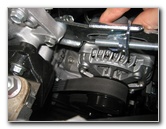
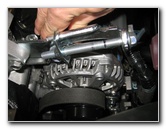
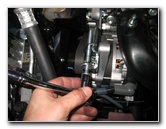
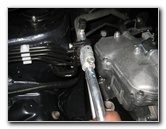
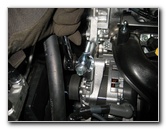 Loosen Bracket Set Bolt |
 Loosen Long Tension Bolt |
 Turn Counterclockwise |
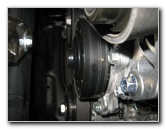
| Finally, loosen the
long belt tensioner bolt at the top of the bracket by turning it
counterclockwise. Continue loosening the long bolt until you can rotate the alternator backwards towards the rear of the car. |
||
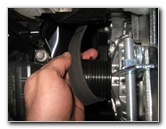
 Old Belt Loose |
 Slide Alternator Back |
 Slip Belt Off Pulley |
| Once you have loosened the long tensioner bolt enough, you should be able to slip the old serpentine accessory belt off the top of the alternator pulley. | ||
 |
 |
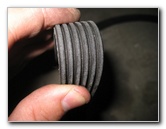
 Remove Old Belt |
| Before you pull the
old belt off all the pulleys, take a moment to study how the belt is routed.
A good rule of thumb to remember is that the ribbed side of the belt goes around ribbed pulleys and the smooth side of the belt goes against smooth pulleys. |
||
 Lift Belt Out of Engine Bay |
 Old Belt Removed |
 Check For Cracks & Splits |
| Pull the old belt
off all of the pulleys and lift it out of the engine bay. Inspect the old belt. If the old belt doesn't have any major cracks, chunks missing or fraying, you may want to save it for future use. |
||
|
|
||
 Examine & Check Pulleys |
 Crankshaft Pulley - Bottom |
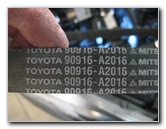 Toyota 90916-A2016 |
| To view a belt
routing diagram for the 2ZR-FE 1.8L I4 engine, click on the link below. It
opens in a new browser window. 2009-2013 Toyota Corolla 2ZR-FE 1.8L I4 Serpentine Accessory Belt Routing Diagram |
||
 Lower In New Belt |
 Wrap Around Crankshaft |
 Water Pump Pulley |
| Carefully lower the
new belt down in the left side of the engine bay. Start by wrapping the ribbed side of the belt around the large crankshaft pulley. Then wrap the ribbed side of the belt around the A/C (air conditioning) compress pulley. Route the smooth side of the new belt against the back side of the water pump pulley. |
||
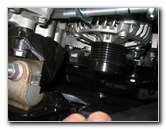
 Pull Over Alternator Pulley |
 New Belt Installed |
 Rotate Alternator Forward |
| Then pull the top
part of the new belt over the ribbed alternator pulley. Firmly pull the alternator forward until it rotates towards the front of the car and places some tension on the new belt. Double check that the new belt is routed properly before moving on to the next steps. |
||
 Tension On New Belt |
 Slightly Tighten Set Bolt |
 Tighten Tensioner Bolt |
| Slightly tighten
the top alternator bolt (tensioner bracket set bolt) with the 12mm socket
and 3/8" drive ratchet just enough to keep the alternator from
sliding backwards. Tighten the long bolt in the clockwise direction to tension the new belt. |
||
 Tensioning New Belt |
 Tighten 12mm Set Bolt |
 Tighten Lower Alternator Bolt |
| Repeatedly check
the tension on the new belt by trying to twist it at the longest stretch
between the crankshaft and the alternator. The correct tension level is when the new belt can only be twisted to about 90 degrees. If the belt can be twisted past 90 degrees, the tensioner bolt needs to be tightened a few more turns. If the belt can not be twisted to 90 degrees, it might be too tight. Once you believe that the new belt has the correct amount of tension, you can tighten the 14mm bolt at the bottom of the alternator. Then tighten the top 12mm alternator bolt in the clockwise direction until it is snug. |
||
 Fuel Rail & Bracket |
 Snap A/C Line In Socket |
 Line Up Plastic Engine Cover |
| If the silver metal A/C refrigerant tube at the top left of the engine popped out of its mounting bracket while you were installing the new belt, push it back into place. | ||
 Mounting Pegs - Top of Engine |
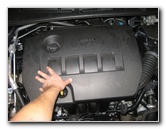 Push On Engine Cover |
 Serpentine Belt Replaced |
| Start the engine
and listen closely for any sounds that might indicate a problem. If the belt starts screeching immediately and the sound is constant, turn off the engine immediately. This sound indicates that the new belt might be too tight. So instead of the belt spinning, the crankshaft pulley is just rubbing against it in place. If the new belt repeatedly makes a "chirp, chirp, chirp" sound that doesn't stop, it might be too loose. The belt might also make a quick screech when the engine starts and then it becomes quiet. To fix a loose belt, slightly loosen the bottom 14mm alternator bolt, the top 12mm alternator bolt. Then tighten the long tensioner bolt in the clockwise direction a few more turns. Check the tension again by trying to twist the longest stretch of the belt in between the alternator and the crankshaft. If the belt can only be turned to about 90 degrees perpendicular to the rest of the belt, that should be the correct tension. Once the engine is quiet and seems to be running smoothly, you can replace the plastic engine cover. Line up the rubber friction fasteners on the bottom of the plastic engine cover with the metal mounting pegs on the top of the engine. Push the engine cover down in to place. Be sure to record the serpentine accessory belt change in your car's service records. For more, check out my other
2014-2018 Toyota Corolla DIY Repair & Maintenance Guides. |
||
| If you found this guide to be helpful,
please consider making a small donation by clicking on the PayPal.com
"Donate" button located to the right of this paragraph. Thank you!
(Note: I am not a registered charity. Donations are not tax deductible.) |