
Kia Soul
Camshaft Position Sensors Replacement Guide
How to change a faulty camshaft position
sensor in the Nu 2.0L GDI I4 engine in a 2014 to 2019 Kia Soul.

By Paul B. Michaels Author & Photographer Auto Mechanic Since 1989 |
||
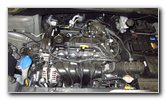
 2019 Soul Nu 2.0L GDI |
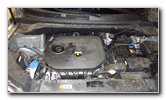
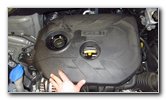
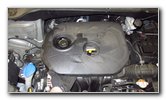 Pull Off Engine Cover |
 Release Rear of Cover |
| This automotive
maintenance tutorial was specifically written to assist owners of the 2nd
generation (2014, 2015, 2016, 2017, 2018 & 2019 model years) Kia Soul in
checking or changing the two camshaft position sensors on the Nu 2.0 liter
GDI inline four cylinder engine. (The procedure should be the same or very
similar for the Gamma 1.6L GDI I4 engine or the Gamma 1.6L T-GDI
turbocharged engine.) Some of the symptoms of a failing or faulty camshaft position sensor include the following: rough idling, stalling, loss of power, reduced fuel economy (lower MPG), slow acceleration, difficulty starting, jerking, surging and a CEL / SES (check engine light / service engine soon) warning light on the dashboard. Owners of other Kia, Hyundai or Genesis vehicles such as the Niro, Sportage, Sedona, Telluride, Sorento, Rio, Forte, Optima, K900, Cadenza, Stinger, Tucson, Santa Fe, Kona, Palisade, Elantra, Sonata, Accent, Veloster, Ioniq, Nexo, Venue, G70, G80 and G90 may also find these DIY instructions to be helpful. The OEM (original equipment manufacturer) Kia / Hyundai camshaft position sensor part number is 39350-2E200. The tools needed to complete this procedure include a 10mm socket with a 1/4" drive ratchet. The first two steps are to open the hood and pull off the black plastic engine cover. There are four rubber friction fasteners on the underside of the cover. Gently pull up the front edge to release the front two fasteners and then lift the rear edge to release the two other fasteners. |
||
|
|
||
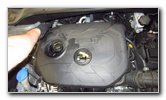
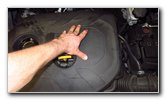
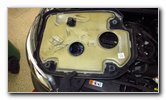 Engine Cover Removed |
 Top of Engine Exposed |
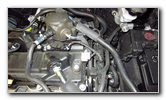 Right (Driver) Side |
| Set the plastic
cover aside in a safe place. The two camshaft position sensors are located on the top right (driver) side of the engine. They are close to the 12V automotive battery and the brake fluid reservoir. |
||
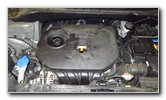
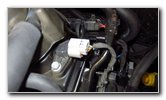 Rear Camshaft Sensor |
 Front Camshaft Sensor |
 Two Camshaft Sensors |
| For this guide,
I'll be replacing the front sensor located closer to the front bumper of the
car.
In Picture # 9 in the row above, I'm pointing to the two camshaft sensors on the top of the engine. |
||
 Replacing Front Sensor |
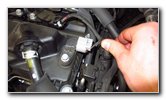
 Push In Release Tab |
 Power Plug Removed |
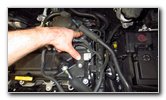
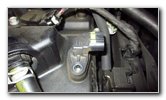
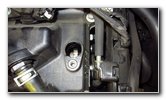
| Push down the release tab on the grey plastic electrical connector before sliding it straight off the base of the old camshaft position sensor. | ||
 Loosen Counterclockwise |
 Set Aside Bolt |
 Sensor Bolt Removed |
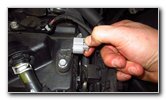
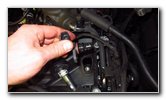
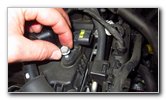
| Loosen the bolt on
the top of the sensor by turning it in the counterclockwise direction with a
10mm socket and a 1/4" drive ratchet. Set the bolt aside in a safe place. Gently loosen the old sensor by rotating it back and forth a few times to make sure it isn't stuck or "frozen" in the top of the engine. |
||
|
|
||
 Pull Out Old Sensor |
 Inspect Old Sensor |
 OEM # 39350-2E200 |
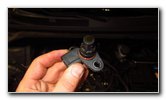
| Inspect all sides
of the old sensor for any damage or oily sludge. The OEM sensor part number in this 2019 Soul was Hyundai / Kia 39350-2E200. |
||
 Empty Sensor Port |
 Lower In New Sensor |
 Spin In Bolt By Hand |
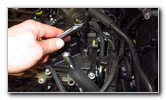
| Make sure that the
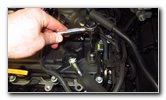
red rubber o-ring gasket from the old sensor is not still attached to the
engine. Lower the new sensor into the port. Line up the bolt hole in the sensor with the corresponding bolt hole in the top of the engine. Spin in the silver metal bolt a few turns by hand in the clockwise direction to help prevent it from becoming cross threaded. |
||
 Tighten Bolt Clockwise |
 Electrical Connector |
 Power Plug Replaced |
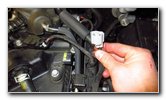
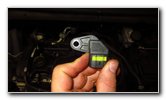
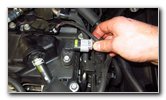
| Tighten the bolt in
the clockwise direction with the 10mm socket and a 1/4" drive ratchet until
it is snug. Try to avoid over tightening the bolt to prevent from cracking the plastic sensor housing. Slide the power plug straight on to the base of the new sensor. You should hear or feel the electrical connector "click" securely into place. |
||
 Lower Engine Cover |
 Push To Secure Fasteners |
 Camshaft Sensor Replaced |
| Line up the four
rubber friction fasteners on the underside of the plastic cover with the
four metal pegs on the top of the engine. Firmly push down on the cover to secure the four fasteners. If you have an OBDII scanner (also known as an OBD2 scan tool), check for any camshaft position sensor related DTC (diagnostic trouble codes) such as P0340, P0341, P0342, P0343 and P0344. Clear the error codes with the OBDII scanner, turn off the ignition and then start the engine. If the new sensor was the cause of your engine's problem, the SES / CEL (service engine soon / check engine light) should stay off. Be sure to write down the sensor change in your vehicle's service records. For more, please check out all of my
2014-2019 Kia Soul DIY Repair & Maintenance Guides. |
||
| If you found this guide to be helpful,
please consider making a small donation by clicking on the PayPal.com
"Donate" button located to the right of this paragraph. Thank you!
(Note: I am not a registered charity. Donations are not tax deductible.) |