
Kia Soul Tail
Light Bulbs Replacement Guide
How to change a burnt out brake, rear
turn signal, reverse, parking or side marker light bulb in a 2014 to 2019 Kia
Soul.

By Paul B. Michaels Author & Photographer Auto Mechanic Since 1989 |
||
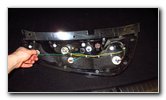
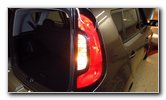
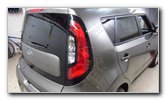 2019 Kia Soul Tail Lights |
 Open Tailgate |
 Light Housing Screws |
| This automotive
maintenance tutorial was specifically written to assist owners of the 2nd
generation (2014, 2015, 2016, 2017, 2018 & 2019 model years) Kia Soul in
changing a burnt out brake (stop lamp), rear turn signal (indicator),
reverse (back up), parking or rear side marker bulb in the tail light
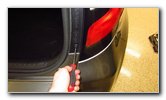
housings. Owners of other Kia, Hyundai or Genesis vehicles such as the Niro, Sportage, Sedona, Telluride, Sorento, Rio, Forte, Optima, K900, Cadenza, Stinger, Tucson, Santa Fe, Kona, Palisade, Elantra, Sonata, Accent, Veloster, Ioniq, Nexo, Venue, G70, G80 and G90 may also find these DIY instructions to be helpful. The compatible replacement light bulb part numbers are as follows: Brake # 2357, Rear Turn Signal # 1156A (or 1156NA), Reverse # 921 (or W16W), Parking Light # 2825 (or W5W) and Rear Side Marker # 2825 (or W5W). If you would like to have brighter tail lights, choose 2357 LED, 1156A LED, 921 LED and 2825 LED light bulbs. The tools needed to complete this procedure include a standard Phillips head screwdriver and a plastic pry bar tool. The first two steps are to open the tailgate door for the cargo area and then move to the tail light housing that contains the burnt out bulb. |
||
|
|
||
 Loosen Counterclockwise |
 Remove Second Screw |
 Removing 3rd Screw |
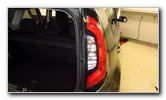
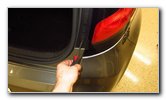
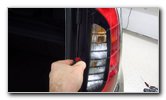
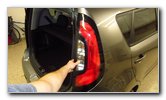
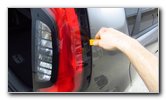
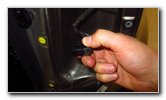
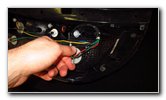
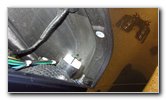
| Locate the four
black metal screws along the inner edge of the tail light housing that were
previously covered by the tailgate door. Remove the screws by turning them in the counterclockwise direction with the Phillips head screwdriver. |
||
 Remove 4th Screw - Top |
 Four Screws Removed |
 Pull Off Tail Light Housing |
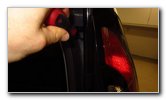
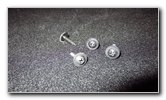
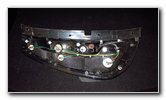
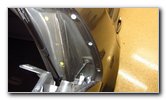
| Set the four screws
aside in a safe place. Try to pull the tail light housing straight off the rear corner of the vehicle. The tail light housing is still held in place to the rear of the vehicle by three metal pegs or "spikes" that are inserted into plastic grommets. So you may have difficulty just pulling it off with out first loosening these friction fasteners. |
||
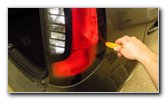 Pry Along Outer Edge |
 Loosen Friction Fasteners |
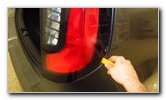 Gently Pry - Plastic Tool |
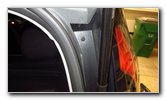
| Insert the blade of
a small plastic pry bar tool in between the front outer edge of the tail
light housing and the rear quarter panel of the vehicle. Gently pry to loosen the friction fasteners. Do not use excessive force to prevent from cracking the plastic lens cover. You may need to re-insert the tool in several locations to fully release the three friction fasteners. If you are in a cold climate, I recommend performing this procedure in a warm garage and use a space heater to warm up the tail light housing to help reduce the risk of cracking the plastic housing. |
||
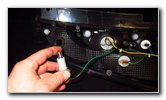
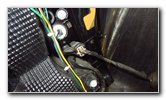 Electrical Connector |
 Disconnect Power Plug |
 Light Housing Separated |
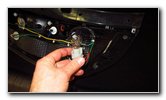
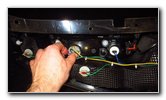
| Once the friction
fasteners have been loosened, pull the tail light housing straight off the
rear corner of the vehicle. Push in the release tab on the black plastic electrical connector before sliding it straight out of its socket. Set the tail light housing down on a soft surface such as on the cargo area's carpet to prevent from scratching the plastic lens cover. |
||
 1/4 Turn Counterclockwise |
 Brake Light Bulb Socket |
 Push Down - 1/4 Turn CC |
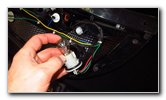
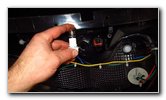
| The brake light
bulb is located at the bottom of the light housing. Rotate the large grey plastic bulb socket 1/4 turn in the counterclockwise direction before pulling it straight out of the housing. Push the old bulb down into the socket and rotate it 1/4 turn in the counterclockwise direction before pulling it straight out of the socket. |
||
 Install New Light Bulb |
 1/4 Turn Counterclockwise |
 Reverse Bulb Socket |
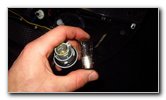
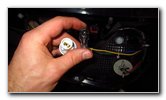
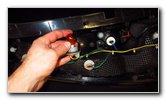
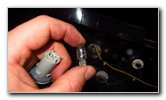
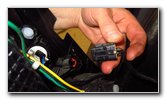
| Push a new bayonet
style number 2357 light bulb
down into the socket and rotate it 1/4 turn in the clockwise direction. If you would like to have brighter brake lights, install some compatible replacement 2357 LED bulbs. Re-insert the bulb socket into the housing and rotate it 1/4 turn in the clockwise direction to secure it into place. The reverse light bulb socket is located just above the brake light bulb. Rotate the smaller grey / white bulb socket 1/4 turn in the counterclockwise direction before pulling it straight out. |
||
|
|
||
 Pull Out Old Light Bulb |
 Install New Reverse Bulb |
 Rear Turn Signal Bulb |
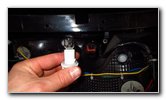
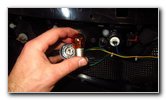
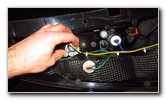
| Pull the old light
bulb straight out of the socket. Push a new number 921 miniature wedge base light bulb straight into the socket. Or install a brighter 921 LED bulb. Re-insert the bulb socket into the housing and rotate it 1/4 turn in the clockwise direction to secure it into place. The rear turn signal light bulb is located above the reverse bulb and closer to the top of the housing. |
||
 Push Down & 1/4 Turn CC |
 Install New Light Bulb |
 1/4 Turn Clockwise - Lock |
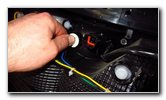
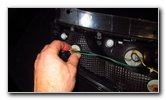
| Rotate the grey
plastic turn signal bulb socket 1/4 turn in the counterclockwise direction
before pulling it straight out of the housing. Push the old bulb down into the socket and rotate it 1/4 turn in the counterclockwise direction before pulling it straight out. Push a new bayonet style amber colored number 1156A (also known as 1156NA) light bulb down into the socket and rotate it 1/4 turn in the clockwise direction to secure it into place. For brighter rear turn signals, install some compatible replacement 1156A LED bulbs. Re-insert the turn signal bulb socket into the housing and rotate it 1/4 turn in the clockwise direction to lock it into place. |
||
 1/4 Turn Counterclockwise |
 Parking / Side Marker |
 Pull Out Old Light Bulb |
| The parking and
side marker light bulbs are located at the outer edge and top corner of the
housing. The procedure for replacing either of them is the same. Rotate the small bulb socket 1/4 turn in the counterclockwise direction before pulling it straight out of the housing. Pull the old light bulb straight out of the socket. |
||
 Push In New Light Bulb |
 1/4 Turn Clockwise - Lock |
 Push On Power Plug |
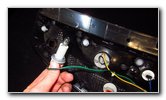
| Push a new
miniature wedge base number 2825
bulb straight into the socket. If you would like to have brighter parking and rear side marker lights, install some 2825 LED bulbs. Re-insert the bulb socket into the housing and rotate it 1/4 turn in the clockwise direction to secure it into place. Hold the tail light housing near the rear corner of the vehicle and push the electrical connector back into its socket. The power plug should "click" securely into place. |
||
 Line Up Pegs & Grommets |
 Spikes & Plastic Holes |
 Push On Tail Light Housing |
| Line up the three
pegs or "spikes" on the back side of the tail light housing with their
corresponding white plastic grommets on the rear corner of the vehicle. Carefully slide the tail light housing back into place. |
||
 Tighten Clockwise |
 Four Screws Secured |
 Test New Light Bulbs |
| Replace the four
screws by tightening them in the clockwise direction with the Phillips head
screwdriver until they are snug. Try to avoid over tightening the screws to prevent from cracking the plastic inner edge of the housing. To test the new bulbs, have an assistant step on the brake pedal, activate the hazard signals, turn on the headlights or parking lights and place the transmission into reverse. Tip - If you installed any LED bulbs and they don't work, try removing them from the socket, rotating them 180 degrees and pushing them back into the socket. Some LED bulbs are polarized and will only work when the "+" positive and "-" negative electrical contacts are in the correct orientation. Be sure to write down the bulb change in your vehicle's service records. For more, please check out all of my
2014-2019 Kia Soul DIY Repair & Maintenance Guides. |
||
| If you found this guide to be helpful,
please consider making a small donation by clicking on the PayPal.com
"Donate" button located to the right of this paragraph. Thank you!
(Note: I am not a registered charity. Donations are not tax deductible.) |