
Kia Soul
Tailgate Lift Support Struts Replacement Guide
How to change weak tailgate door lift
support struts on a 2nd generation 2014 to 2019 Kia Soul with the part numbers.

By Paul B. Michaels Author & Photographer Auto Mechanic Since 1989 |
||
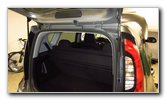 2019 Soul Tailgate Door |
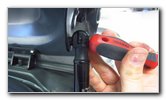
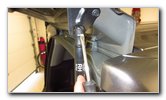 Pry Out Retaining Clip |
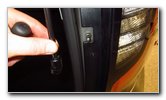
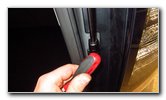
 Pry Out Bottom Clip |
| This automotive
maintenance tutorial was specifically written to assist owners of the 2nd
generation (2014, 2015, 2016, 2017, 2018 & 2019 model years) Kia Soul in
changing weak, failing or faulty tailgate cargo area door lift support
struts (also known as dampers, springs, gas charged shocks, lift cylinders
or prop rods). Owners of other Kia, Hyundai or Genesis vehicles such as the Niro, Sportage, Sedona, Telluride, Sorento, Rio, Forte, Optima, K900, Cadenza, Stinger, Tucson, Santa Fe, Kona, Palisade, Elantra, Sonata, Accent, Veloster, Ioniq, Nexo, Venue, G70, G80 and G90 may also find these DIY instructions to be helpful. The OEM (original equipment manufacturer) Kia / Hyundai part numbers are as follows: Driver Side # 81770-B2000 and Passenger Side # 81780-B2000. A compatible replacement set of aftermarket struts are the Lift Supports Depot # PM3630. The only tool needed to complete this procedure is a small flat head screwdriver or a plastic pry bar tool. The first two steps are to open the tailgate and then place a soft object in between the tailgate door and the hood of the vehicle. I chose to wedge a large rolled up towel behind the strut on the other side of the vehicle to temporarily support the tailgate while I changed the first strut. You could also have an assistant hold up the tailgate door for you. Insert the blade of the screwdriver or plastic pry bar tool into the notch between the metal "C" shaped retaining clip and the end of the strut. Gently pry out the retaining clip to move it to the "Released" position. You could fully remove the "C" clip or just leave it slightly out. Repeat the process to release the "C" clip on the other side of the strut. |
||
|
|
||
 Pull Socket Off Ball Mount |
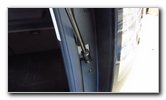
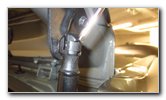 Disconnect Top of Strut |
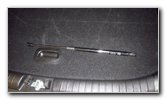 Old Strut Removed |
| Carefully pull the sockets at the ends of the strut off their ball mounts on the vehicle. | ||
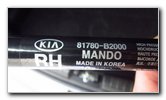 Right Side OEM Part |
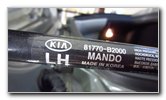 Left Side OEM Part # |
 Install New Strut |
| To install the new
strut, make sure that the "C" shaped metal retaining clips are in the out
and "Released" position. Orientate the new strut with the thinner metal bar at the bottom near the cargo area and the thicker gas charged shock situated close to the roof of the vehicle. Firmly push the sockets on to their ball shaped mounts. Make sure that the ball joints are fully seated together. |
||
 Push In Retaining Clip |
 Secure Bottom "C" Clip |
 Test New Tailgate Struts |
| Use the back side
of the screwdriver to firmly push in the "C" shaped metal retaining clips
into the "Locked" position. Double check that the top and bottom of the new strut is securely attached to the vehicle. To test the new struts, open and close the tailgate a few times. If the new struts are working properly, the tailgate should lift up by itself in a slow and controlled manner and remain in the fully raised position by itself. Be sure to write down the strut change in your vehicle's service records. For more, please check out all of my
2014-2019 Kia Soul DIY Repair & Maintenance Guides. |
||
| If you found this guide to be helpful,
please consider making a small donation by clicking on the PayPal.com
"Donate" button located to the right of this paragraph. Thank you!
(Note: I am not a registered charity. Donations are not tax deductible.) |