
Mitsubishi
Outlander Rear Turn Signal Light Bulb Replacement Guide
How to change a burnt out rear turn
signal tail light bulb in a 3rd generation 2014 to 2021 Mitsubishi Outlander.

By Paul B. Michaels Author & Photographer Auto Mechanic Since 1989 |
||
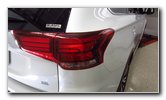 2020 Outlander Tail Lights |
 Open Tailgate Door |
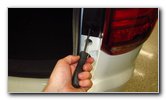
 Loosen Counterclockwise |
| This automotive
maintenance tutorial was specifically written to assist owners of the third
generation (2014, 2015, 2016, 2017, 2018, 2019, 2020 & 2021) Mitsubishi
Outlander SUV in changing a burnt out rear turn signal light bulb located in
the tail light housings. Owners of other Mitsubishi vehicles such as the Outlander Sport, Eclipse Cross, Mirage, Mirage G4, Lancer, ASX, Montero Sport, Pajero, Xpander, Strada and RVR may also find these DIY instructions to be helpful. The compatible replacement rear turn signal light bulb part number is WY21W (also known as 7440A or 7440NA). If you'd like to have brighter rear turn signal lights that will also last much longer before burning out like the traditional incandescent bulbs, install some WY21W LED units. The tools needed to access and replace the bulbs include a standard Phillips head screwdriver and a plastic pry bar tool. The first two steps are to open the tailgate door for the cargo area and move to the side of the vehicle with the burnt out light bulb. Locate the two metal Phillips head screws situated on the black plastic inner edge of the tail light housing. |
||
|
|
||
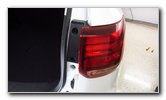
 Remove Top Screw |
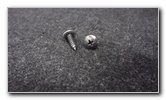 2 Phillips Head Screws |
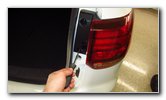
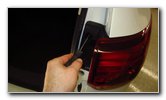
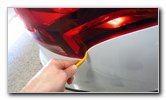 Pry Along Outer Edge |
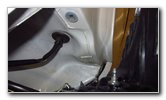
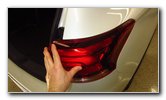
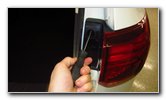
| Loosen the two
screws by turning them in the counterclockwise direction with the Phillips
head screwdriver. Set the two screws aside in a safe place. The tail light housing is still held in place by two friction fasteners near the front outer edge. There is a plastic slot attached to the button head of a plastic pop rivet and also a metal peg or "spike" inserted into a plastic grommet. To loosen the friction fasteners, try very gently pulling the tail light housing straight off the rear corner of the SUV. If you have trouble removing the light housing, try gently wiggling the housing back and forth. As a last resort, very carefully and very gently use a small plastic pry bar tool inserted in between the outer edge of the tail light housing and the metal body panel to loosen the friction fasteners. Do NOT use excessive force to prevent from cracking the plastic outer edge of the tail light housing. If you are working on a very cold day, it would be best to move the car into a warm garage and use a space heater to carefully heat up the area. Cold plastic is much more likely to crack or chip compared to warm plastic. |
||
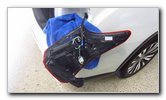 Pull Off Tail Light Housing |
 1/4 Turn Counterclockwise |
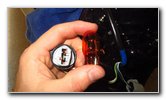
 Rear Turn Signal Socket |
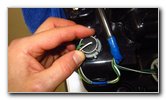
| To protect the tail
light lens from being scratched, place a towel on the bumper. Turn over the tail light housing and rest it on the bumper to access the bulb sockets. On this 2020 Outlander, the brake and parking lights are LED bulbs that should last the lifetime of the vehicle. Rotate the gray plastic bulb socket 1/4 turn in the counterclockwise direction before pulling it straight out of the housing. |
||
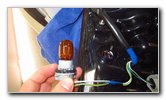
 Pull Out Old Light Bulb |
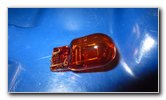 Old Light Bulb Removed |
 Push In New Light Bulb |
| Carefully pull the
old light bulb straight out of the socket. If you have trouble removing the old light bulb due to corrosion (rust) or debris such as sand, put on a pair of protective gloves and try gently wiggling the bulb back and forth before pulling it straight out of the socket. The OEM (original equipment manufacturer) rear turn signal light bulb in this 2020 Outlander was a Stanley WY21W. If necessary, you should also be able to use the similar 7440A or 7440NA (natural amber) bulbs. Push a new WY21W bulb straight into the socket. If you'd like to have brighter rear turn signal lights, install some compatible WY21W LED units. |
||
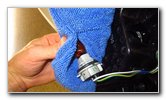 Clean New Light Bulb |
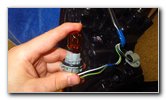
 1/4 Turn Clockwise |
 Line Up Slot & Button |
| If you are
installing a traditional incandescent bulb, wipe off any grease, oil or dirt
with a clean microfiber cloth or a paper towel. Any grease or oil left on the new incandescent bulb may cause hot spots which could cause the bulb to fail prematurely. If you are installing an LED bulb, I recommend testing it before re-installing the socket by turning on the turn signal or activating the hazard lights. If the new LED bulb doesn't work, try removing it from the socket, rotating it 180 degrees and pushing it back into the socket before testing it again. Some LED bulbs are "polarized" and will only work when the "+" positive and "-" negative electrical contacts are in the correct orientation. To replace the tail light housing, line up the slot with the pop rivet button head and the metal peg with the plastic grommet on the rear corner of the SUV. |
||
 Line Up Peg & Grommet |
 Push On Light Housing |
 Replace Two Screws |
| Slide the tail
light housing back into place and secure the friction fasteners. Replace the two screws by turning them in the clockwise direction with the Phillips head screwdriver until they are snug. |
||
 Tighten Clockwise |
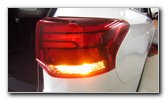 Test New Turn Signal |
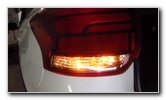 New Bulbs Working |
| Try to avoid over
tightening the two screws to prevent from cracking the black plastic inner
edge of the tail light housing. To test the new rear turn signal light bulbs, activate the hazard signals. Be sure to record the bulb change in your SUV's service records. Please check out all of the
2014-2021 Mitsubishi Outlander DIY Repair & Maintenance Guides. |
||
| If you found this guide to be helpful,
please consider making a small donation by clicking on the PayPal.com
"Donate" button located to the right of this paragraph. Thank you!
(Note: I am not a registered charity. Donations are not tax deductible.) |