
Mitsubishi
Outlander Tailgate Lift Struts Replacement Guide
How to change failing tailgate door
support struts on a third generation 2014 to 2021 Mitsubishi Outlander.

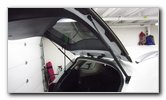
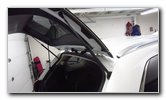 2020 Outlander Tailgate |
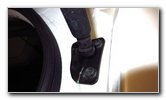 Bottom of Support Strut |
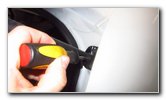 Insert Screwdriver |
| This automotive
maintenance tutorial was specifically written to assist owners of the third
generation (2014, 2015, 2016, 2017, 2018, 2019, 2020 & 2021) Mitsubishi
Outlander SUV in changing a weak, failing or defective support strut (also
known as a lift strut, prop rod, "spring", gas shock or lift cylinder) for
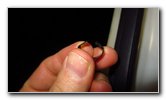
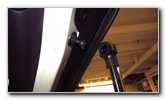
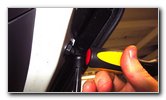
the tailgate cargo area door on the rear of the vehicle. Owners of other Mitsubishi vehicles such as the Outlander Sport, Eclipse Cross, Mirage, Mirage G4, Lancer, ASX, Montero Sport, Pajero, Xpander, Strada and RVR may also find these DIY instructions to be helpful. The OEM (original equipment manufacturer) part numbers are as follows: Driver (Left) Side # 5802A781 and Passenger (Right) Side # 5802A782. The only tool needed to release and replace the tailgate support struts is either a flat head screwdriver or a small plastic pry bar tool. Please verify the correct replacement part numbers for your SUV before ordering the struts. The part numbers may vary depending on the model year, trim level, your region of the world and whether the vehicle has the power tailgate option or the standard manually operated tailgate. The first two steps are to open the tailgate door for the cargo area and move to the side of the vehicle with the weak or faulty lift strut. Have an assistant hold the tailgate door open with both hands to make sure it doesn't fall down and injure you when the first strut is detached. Locate the small slot or notch on the metal "C" shaped retaining clip at the bottom of the support strut. Carefully insert the blade of the plastic pry bar tool or a flat head screwdriver into the notch on the outer edge of the "C" shaped retaining clip. |
||
|
|
||
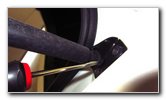 Pry Out "C" Retaining Clip |
 Retaining Clip Removed |
 Top of Lift Strut |
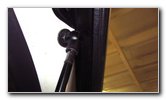
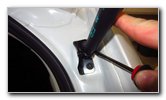
| Gently pry out the
"C" shaped metal retaining clip.
You don't need to fully remove the clip, but it doesn't matter if it pops out entirely. Warning: Make sure your assistant is securely holding the tailgate door open! While holding the clip partially out, pull the ball socket at the bottom of the strut off the corresponding ball mount. |
||
 Locate Small Notch |
 Pry Out Metal "C" Clip |
 Pull Socket Off Ball |
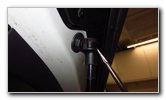
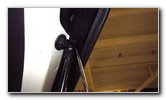
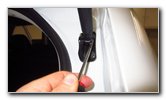
| Locate the small
notch on the "C" clip at the top of the strut. Insert the screwdriver into the notch and gently pry out the "C" clip. Pull the top socket off the ball mount attached to the tailgate door. |
||
 Passenger Side Removed |
 OEM Part Number |
 5802A782 9908 |
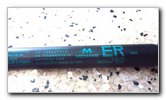
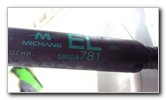
| The full
information listed on each of the old struts was Passenger Side: "Michang ER
5802A782 9908" and Driver Side: "Michang EL 5802A781 9906". The OEM (original equipment manufacturer) part numbers are as follows: Driver (Left) Side # 5802A781 and Passenger (Right) Side # 5802A782. The old Mitsubishi cross reference part numbers for the tailgate include 5802A507, 5802A601 and 5802A769. |
||
 Pry Out C Clip |
 Push On To Ball Mount |
 Line Up Bottom Socket |
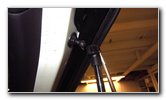
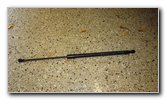
| To install the new
support strut, orientate the larger shock body near the bottom of the SUV
and the thinner metal rod part at the top by the tailgate door. Partially remove the "C" clip at the top of the strut and push the socket over the ball mount attached to the tailgate door. Push in the back side of the "C" clip to make sure it is fully locked in place. Line up the bottom socket with its corresponding ball mount. |
||
 Install On Ball Mount |
 Driver Side Part Number |
 New Strut Installed |
| Carefully pry out
the "C" clip just a small amount until the socket can be pushed over the
ball mount. Push on the back side of the "C" clip to make sure it is fully locked in place. Double check that both of the "C" shaped retaining clips are secure before moving on to the next steps. Once you are certain that the tailgate is securely supported by the new lift strut, allow your assistant to let go of the tailgate door. Test the new strut by carefully opening and closing the tailgate a few times. Don't forget to write down the procedure in your vehicle's service records. Please check out all of the
2014-2021 Mitsubishi Outlander DIY Repair & Maintenance Guides. |
||
| If you found this guide to be helpful,
please consider making a small donation by clicking on the PayPal.com
"Donate" button located to the right of this paragraph. Thank you!
(Note: I am not a registered charity. Donations are not tax deductible.) |