
Ford Edge 12V
Automotive Battery Replacement Guide
How to change a weak or dead 12 volt car
battery in a 2nd generation 2015 to 2019 Ford Edge with the group size.

By Paul B. Michaels Author & Photographer Auto Mechanic Since 1989 |
||
 2017 Edge 2.0L I4 Engine |
 OEM 12V Battery |
 Socket & Ratchet |
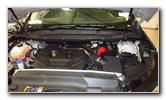
| This automotive
maintenance tutorial was specifically written to assist owners of the second
generation 2015, 2016, 2017, 2018 and perhaps also the updated 2019, 2020,
2021 and 2022 model years of the Ford Edge SUV in changing a weak or dead 12
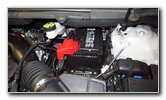
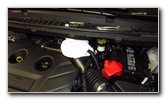
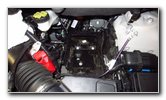
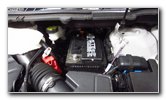
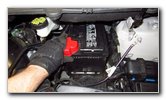
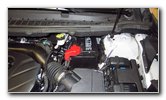
volt car battery for the EcoBoost 2.0L turbocharged I4 engine. A few symptoms of a weak or failing 12V battery include headlights that dim when you come to a stop, slow cranking, slow starting or headlights that become brighter when accelerating from a stop. Owners of other Ford and Lincoln vehicles such as the Escape, Expedition, EcoSport, Flex, Explorer, Fiesta, Focus, Fusion, Mustang, Taurus, Ranger, Transit Connect, F-150, Endura, C-Max, Kuga, Mondeo, MKZ, Navigator, Aviator, Nautilus and Continental may also find these DIY instructions to be helpful. The OEM battery "Group Size" is T5 which is also known as 90. You can also use the similar group size 48 batteries. A few compatible replacement aftermarket batteries with their part numbers include the following: DieHard 50748, Delphi BU9048, ACDelco 48AGM and EverStart MAXX-T5 (at Walmart). The tools and other items needed to complete this procedure include an 8mm socket, a 10mm socket or a 10mm wrench and a 1/4" drive ratchet. The first two steps are to open the hood and then move to the right (driver) side of the engine bay. The battery is located to the right of the brake fluid reservoir, behind the engine air filter box and to the left of the front driver side suspension assembly. |
||
|
|
||
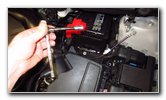
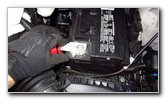
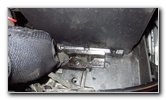
 Hold Down Clamp |
 Loosen Counterclockwise |
 Using Long Extension Bars |
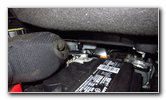
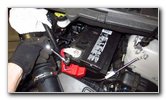
| Look at the bottom
front edge of the battery tray and locate the small metal battery hold down
bracket. It is secured in place by a single small bolt. Loosen the hold down bar bolt in the counterclockwise direction with an 8mm socket and a 1/4" drive ratchet. I found it easiest to attach a few extension bars to my ratchet to loosen the bolt without the various obstructions in the way. |
||
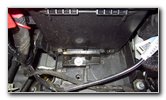
 Single Bolt Removed |
 Lift Out Hold Down Bar |
 Slide Battery Forward |
| Once the bolt is
loose, spin it out the rest of the way by hand to prevent from having fall
down into the engine bay and become lost. Set the bolt and hold down clamp aside in a safe place. Carefully slide the battery forward towards yourself. The negative terminal is partially hidden by the cowl, so moving the battery forward will allow easier access to detach it. |
||
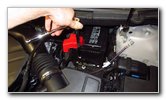
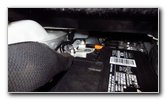
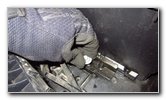
 Loosen Negative Terminal |
 Pull Off Negative Terminal |
 Cover & Tuck Away |
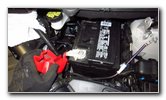
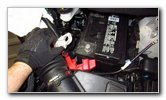
| First, loosen the
"-" negative terminal nut by turning it in the counterclockwise direction
with a 10mm socket and a 1/4" drive ratchet or instead use a 10mm wrench. There is limited room above the negative terminal, so I found that a small 10mm wrench was the best option. Pull the negative terminal off the "-" battery post. Cover the terminal in a small towel and tuck it away on the left side of the battery to help prevent accidental electrical contact. |
||
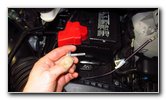
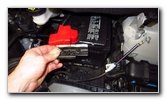
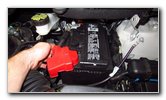
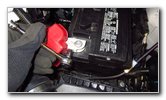
 Pull Off Red Cover |
 Loosen Positive Terminal |
 Pull Off Positive Terminal |
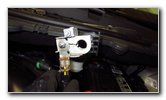
| Then gently pull
the red rubber cover off the "+" positive terminal. Loosen the nut on the positive terminal a few turns in the counterclockwise direction with a 10mm socket and a 1/4" drive ratchet. You don't need to fully remove the nut. Just loosen it a few turns until the terminal can be pulled off the "+" battery post. Pull the positive terminal off the battery post. Close the red rubber cover over the terminal to help prevent accidental electrical contact. |
||
|
|
||
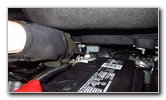
 Old Battery Removed |
 Clean Off Battery Tray |
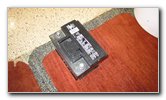
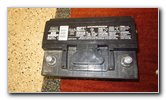 FoMoCo - 590 CCA |
| Carefully lift the
old battery out of the engine bay.
Avoid touching the "-" negative or "+" battery posts! Gently rest the old battery on the ground. Try to avoid dropping or tipping over the old battery which could lead to an acid leak. Be sure to bring the old battery with you to Walmart or the auto parts store in order to avoid having to pay a "core", "disposal", "recycling" or "environmental" fee. If you can wait a few days for delivery, I recommend buying the DieHard 50748 12V battery since it has excellent reviews on Amazon. The OEM (original equipment manufacturer) battery was marked as Ford part number FoMoCo BXT-90T5-590 which is a group size T5 (also known as 90). |
||
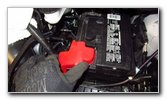
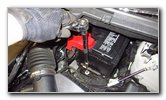
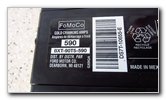 Ford BXT-90T5-590 |
 Lower In New Battery |
 Push On Positive Terminal |
| Clean off any
debris or sand on the plastic tray so that the new battery will rest evenly
on it. Carefully lower the new battery into the engine bay and on to the tray with the "+" positive post situated closer to the front of the car and the "-" negative battery post situated at the rear of the engine bay closer to the windshield. If you've had an issue with corrosion (white or blue powder) building up on the battery posts or terminals, consider installing some felt anti-corrosion washers over the battery posts. Push the positive terminal over the "+" battery post. |
||
 Tighten Terminal Nut |
 Replace Rubber Cover |
 Push On Negative Terminal |
| Tighten the
positive terminal nut in the clockwise direction with the 10mm socket and a
1/4" drive ratchet. Push the red rubber cover over the positive terminal. Carefully push the negative terminal over the "-" battery post under the cowl near the windshield. |
||
 Tighten Clockwise |
 Slide Battery Back |
 Lower In Hold Down Bar |
| Tighten the
negative terminal nut in the clockwise direction until it is snug. Try to avoid over tightening the terminal nut to prevent from cracking and damaging the battery post which could lead to an acid leak. Carefully slide the new battery back on the tray towards the windshield. Lower the hold down bracket down to the front edge of the new battery. |
||
 Spin In Bolt Clockwise |
 Tighten Clamp Bolt |
 New Battery Installed |
| Spin in the bolt a
few turns by hand in the clockwise direction to prevent it from becoming
cross threaded. Tighten the bolt in the battery hold down clamp in the clockwise direction with the 8mm socket and a 1/4" drive ratchet until it is snug. Try to move, rock or slide the new battery on the tray. If the new battery can be moved, you may need to tighten the bolt an extra turn or two. To test the new battery, start the engine, turn on the headlights and flash the high beams. If you only drive short trips or don't drive your SUV for weeks at a time, I highly recommend using a trickle charger to keep the battery fully charged. Lead-acid 12V car batteries have the longest life span when they are kept fully charged. I use a Battery Tender Junior intelligent trickle charger to maintain the 12 volt batteries in our vehicles at optimal condition. Be sure to write down the battery change in your vehicle's service records.
Please check out all of my
2015-2019 Ford Edge DIY Repair & Maintenance Guides. |
||
| If you found this guide to be helpful,
please consider making a small donation by clicking on the PayPal.com
"Donate" button located to the right of this paragraph. Thank you!
(Note: I am not a registered charity. Donations are not tax deductible.) |