
Honda Civic
Tail Light Bulbs Replacement Guide
How to change a burnt out brake, rear
turn signal or reverse light bulb in a 10th generation 2016 to 2019 Civic.

By Paul B. Michaels Author & Photographer Auto Mechanic Since 1989 |
||
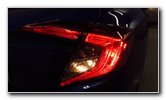
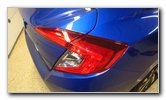 2016 Civic Tail Lights |
 Open Trunk Lid |
 Loosen Counterclockwise |
| This automotive
maintenance tutorial was specifically written to assist owners of the tenth
generation 2016, 2017, 2018 and 2019 Honda Civic in changing a burnt out
brake, rear turn signal or reverse bulb located in the tail light housings. Owners of other Honda or Acura vehicles such as the Accord, Insight, Clarity, Fit, HR-V, CR-V, Pilot, Passport, Odyssey, Ridgeline, ILX, MDX, RDX, NSX, RLX and TLX may also find these DIY instructions to be helpful. The compatible replacement light bulb part numbers are as follows: Brake # 7440, Rear Turn Signal # 7440NA (also known as 7440A or WY21W) and Reverse # 921 (also known as W16W). If you would like to have brighter tail lights, install some 7440 LED, 7440NA LED and 921 LED bulbs. The tools needed to complete this procedure include an 8mm socket with a 1/4" drive ratchet or a Phillips head screwdriver and a plastic pry bar tool. The first two steps are to open the trunk lid (or the hatch door if you have a hatchback Civic) and move to the side of the car with the burnt out tail light bulb. Locate the two black metal bolts at the inner edge of the tail light housing on the black plastic piece. |
||
|
|
||
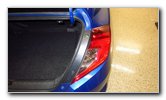
 Remove Second Bolt |
 Two Bolts Removed |
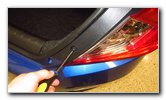
 Pry Towards Outside |
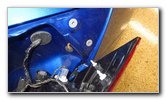
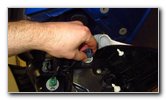
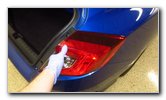
| Loosen the two
bolts by turning them in the counterclockwise direction with the 8mm socket
and a 1/4" drive ratchet. I found it easiest to also have a short extension bar attached to the socket and ratchet. You could also use a Phillips head screwdriver, but then you risk stripping the screws if they were over tightened at the factory or have rusted in place. Set the two bolts aside in a safe place. The tail light housing is still held in place to the rear corner of the car by two metal pegs or "spikes" on the back side of the assembly that are inserted into two white plastic grommet on the metal body panel. Do NOT pull the tail light housing away from the rear of the car. The metal pegs are pointing in from the side of the car towards the middle of the trunk. |
||
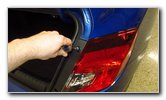
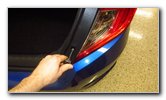
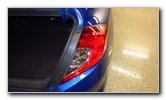
 Pull Away From Side |
 Loosen Friction Fasteners |
 2 Pegs & 2 Grommets |
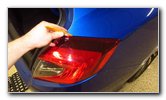
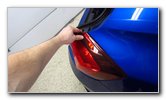
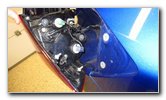
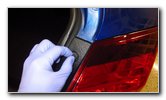
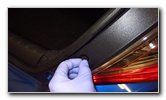
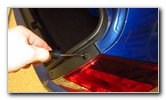
| Please take a
closer look at some of the pictures on this page by clicking on the
thumbnails to view the full size images before you start pulling on the
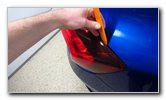
housing. Move to the side of the car (away from the trunk and closer to the rear passenger door). Pull the tail light housing away from the side of the car towards yourself. If the housing feels stuck in place, use a plastic pry bar tool to very gently loosen the friction fasteners. Insert the pry bar tool in between the side of the light housing and the painted metal rear quarter panel. Do not use much force and be patient! Re-insert the pry bar tool into several locations along the tail light until you feel the pegs separating from the grommet. |
||
 Grey Plastic Grommets |
 Towel - Protect Bumper |
 Turn Over Access Sockets |
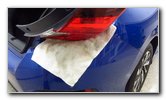
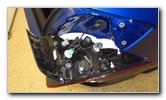
| Place a towel on
the rear bumper cover to protect the paint and also the tail light housing's
lens cover from being scratched. Turn over the tail light housing to access the three bulb sockets. The large grey plastic brake light bulb socket is located at the outer edge of the housing. |
||
 1/4 Turn Counterclockwise |
 Brake Light Bulb Socket |
 Pull Out Old Light Bulb |
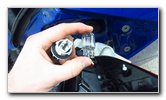
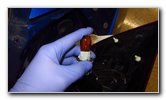
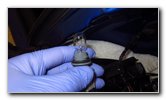
| Twist the bulb
socket 1/4 turn in the counterclockwise direction before pulling it straight
out of the housing. Carefully pull the old bulb straight out of the socket. If you have trouble removing a stuck or stubborn old bulb that might be rusted in place, try gently wiggling it back and forth while pulling it straight out. Try to avoid using excessive pressure on the bulb to prevent from having it break and cut your fingers. |
||
 Push In New Light Bulb |
 1/4 Turn Clockwise - Lock |
 Turn Signal Bulb Socket |
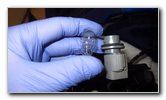
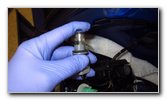
| Push a new number
7440 wedge base light bulb
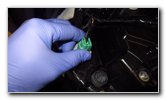
straight into the socket. Clean the new incandescent bulb by wiping it with a paper towel. Any grease, fingerprints or dirt on the new bulb may create a hotspot and cause it to burn out prematurely. If you would like to have a brighter brake light that will also last a lot longer before burning out, install a compatible replacement 7440 LED bulb. Re-insert the bulb socket into the housing and rotate it 1/4 turn in the clockwise direction. The rear turn signal bulb socket (with the green plastic electrical connector) is located near the top middle area of the housing. |
||
 Bulb Socket Removed |
 Pull Out Old Light Bulb |
 Push In New Light Bulb |
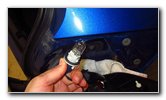
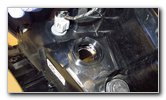
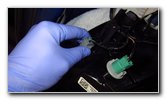
| Rotate the turn
signal bulb socket 1/4 turn in the counterclockwise direction before pulling
it straight out of the housing. Carefully pull the old light bulb straight out of the socket. Push a new amber colored number 7440NA bulb straight into the socket. Wipe off the new bulb with a paper towel to make sure it's clean. If you would like to have brighter rear turn signal lights, install a compatible replacement 7440NA LED bulb. |
||
|
|
||
 Empty Socket Housing |
 1/4 Turn Clockwise - Lock |
 Reverse Light Bulb Socket |
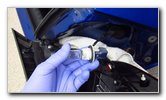
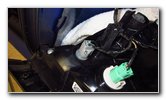
| Re-insert the bulb
socket into the port (opening) in the housing and rotate it 1/4 turn in the
clockwise direction to secure it into place. The small grey plastic reverse bulb socket is located next to the turn signal socket and closer to the trunk (cargo area) of the car. |
||
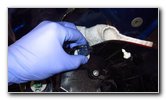
 1/4 Turn Counterclockwise |
 Reverse Socket Removed |
 Pull Out Old Light Bulb |
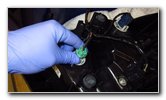
| Rotate the reverse
bulb socket 1/4 turn in the counterclockwise direction before pulling it
straight out of the housing. Pull the old light bulb straight out of the socket. |
||
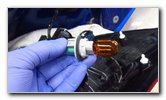
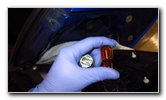
 Push In New Light Bulb |
 1/4 Turn Clockwise - Lock |
 Line Up Spikes & Holes |
| Push a new number
921 miniature wedge base light
bulb straight into the socket. Clean the new bulb with a paper towel. If you would like to have brighter reverse lights for extra safety when you are backing up, install some compatible replacement 921 LED bulbs. Re-insert the bulb socket and rotate it 1/4 turn in the clockwise direction to secure it into place. If you installed LED bulbs, I recommend testing the tail lights before re-installing the housing. If the LED bulbs don't work, try removing them from the socket, rotating them 180 degrees and pushing them back into place. Some LED bulbs are polarized and will only work when the "+" positive and "-" negative electrical contacts are in the correct orientation. Line up the two metal pegs on the back side of the housing with holes in the grey plastic grommets. |
||
 Push Housing In Place |
 Spin In Top Screw |
 Turn Screw By Hand |
| Push the tail light
housing back into place on the rear corner of the vehicle. Spin in the two bolts a few turns by hand in the clockwise direction to help prevent them from becoming cross threaded. |
||
 Tighten Bolts Clockwise |
 Tighten Bottom Bolt |
 Light Housing Replaced |
| Tighten the two
bolts in the clockwise direction with the 8mm socket and a 1/4" drive
ratchet or use the Phillips head screwdriver. Try to avoid over tightening the two bolts to prevent from cracking the black plastic inner section of the housing. |
||
 Close Trunk Lid |
 Test New Reverse Bulb |
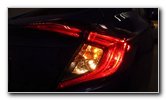 Test Brake & Turn Signal |
| Close the trunk lid
or the hatch to complete the job. To test the new tail light bulbs, have an assistant step on the brake pedal and hold it, then activate the hazard lights and place the transmission into reverse. Be sure to write down the bulb change in your car's service records. Please
check out all of my
2016-2019 Honda Civic DIY Repair & Maintenance Guides. |
||
| If you found this guide to be helpful,
please consider making a small donation by clicking on the PayPal.com
"Donate" button located to the right of this paragraph. Thank you!
(Note: I am not a registered charity. Donations are not tax deductible.) |