
Jeep Compass
12V Automotive Battery Replacement Guide
How to change a weak or dead 12 volt car
battery in a 2nd generation 2017 to 2022 Jeep Compass SUV.

By Paul B. Michaels Author & Photographer Auto Mechanic Since 1989 |
||
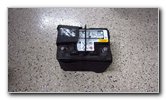
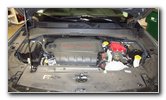 2019 Compass 2.4L I4 |
 OEM 12V Car Battery |
 Loosen Counterclockwise |
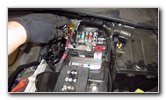
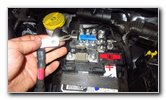
| This automotive
maintenance tutorial was specifically written to assist owners of the second
generation (2017, 2018, 2019, 2020, 2021 and revised 2022) Jeep Compass
SUV equipped with the Tigershark MultiAir II 2.4 liter inline four cylinder
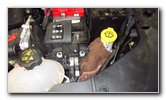
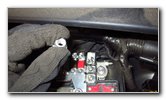
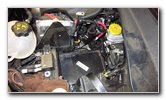
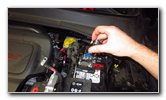
engine in changing a weak or dead 12V automotive battery. Owners of other Jeep, Dodge and RAM vehicles such as the Grand Cherokee, Wrangler, Renegade, Gladiator, Cherokee, Grand Wagoneer, Wagoneer, Charger, Challenger, Durango, RAM 1500, Promaster, 2500 and 3500 may also find these DIY instructions to be helpful. The OEM battery's part number is 56029775AA (or 56029 775 AA) AGM and the "Group Size" is H6 (also known as "48"). (You could also use a slightly smaller group size H5 / 47.) A few compatible replacement H6 / 48 or H5 / 47 AGM (absorbed glass mat) batteries with their part numbers are as follows: Bosch S6585B, Deka 9A48, Delphi BU9047, ACDelco Gold 47AGMA and Deka 9A47. The tools needed to complete this procedure include the following: a 10mm socket, a deep well 13mm socket, an 8mm socket, a 1/4" drive ratchet, a 3/8" drive ratchet, a set of extension bars and a Phillips head screwdriver. The first two steps are to open the hood and move to the right (driver) side of the engine bay. First, loosen the nut on the "-" negative (black cable) terminal at the front of the engine bay by turning it a few turns in the counterclockwise direction with a 10mm socket and a 1/4" drive ratchet. |
||
|
|
||
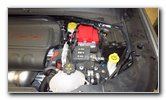
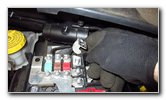
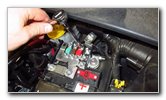
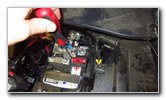
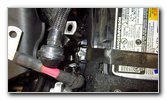
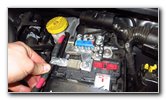
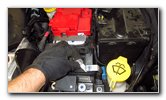
 Pull Off Negative Terminal |
 Cover & Tuck Away |
 Red Plastic "+" Cover |
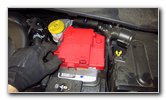
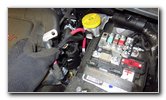
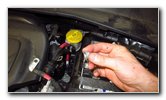
| Pull the negative
terminal off the "-" battery post. Wrap the terminal in a small towel and tuck it away on the right side of the battery to help prevent accidental electrical contact. Pull the red plastic cover off the top of the positive terminal and the power distribution board. |
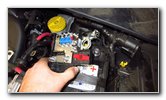
||
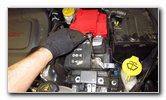
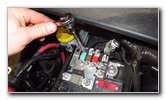
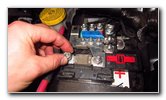
 Positive Cover Removed |
 Power Distribution Board |
 Remove 10mm Nut |
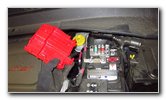
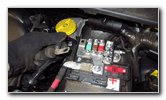
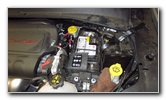
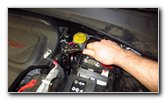
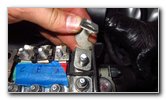
| Set the red plastic
cover aside in a safe place. Remove the 10mm nut on the left side of the power distribution panel by turning it in the counterclockwise direction. |
||
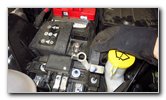
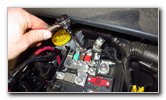
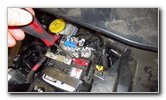
 10mm Nut Removed |
 Pull Off Large Red Cables |
 Second Large Red Wire |
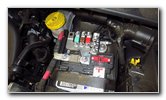
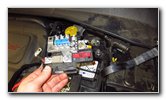
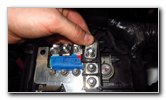
| Set the 10mm nut
aside in a safe place such as on top of the black plastic cowl near the
windshield and wiper arms. Pull the two thick red cables off the left side of the power distribution board. |
||
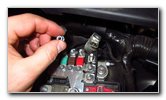
 Remove 13mm Nut |
 13mm Rear Nut Removed |
 Remove Two Rear Cables |
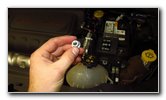
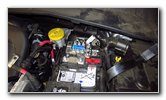
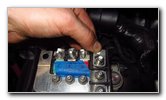
| Remove the 13mm nut
at the right rear corner of the power distribution board. Set the 13mm nut aside in a safe place. Pull off the two medium sized black cables off the board. |
||
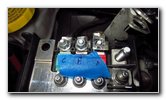
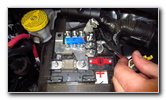
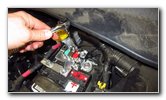
 Loosen 8mm Nuts |
 |
 Three 8mm Nuts Total |
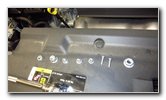
| Remove the three
8mm nuts that secure the "C" "B" and "A" wires to the rear edge of the power
distribution board. Set the three 8mm nuts aside in a safe place. |
||
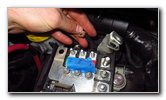
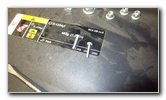
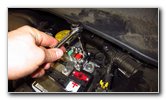
 Spin Off 8mm Nuts |
 Label "A" "B" "C" Wires |
 10mm, 13mm, 8mm |
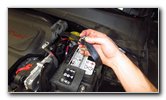
| I recommend
labeling the "C", "B" and "A" cables before removing their connectors from
the power distribution board.
It probably doesn't matter if you mix them up, but why take the chance of causing a problem. At this point you should have removed one 10mm nut, one 13mm nut and three 8mm nuts. |
||
 Loosen 10mm Terminal |
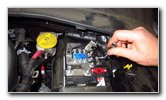 Positive Terminal Nut |
 Pull Off A B C Wires |
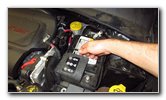
| Loosen the 10mm nut
on the right side of the positive terminal by turning it in the
counterclockwise direction. You don't have to remove the terminal nut. Just loosen it a few turns. Pull the A B C wires off the rear edge of the board. |
||
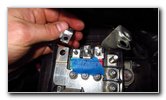
 ABC Cables Removed |
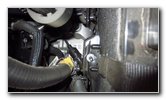
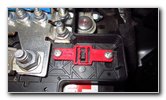 Red Plastic Retaining Clip |
 Loosen Two Screws |
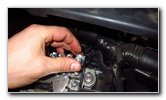
| Locate the red
plastic retaining clip. Remove the two screws by turning them in the counterclockwise direction with a Philips head screwdriver. |
||
 Two Phillips Head Screws |
 Pull Off Positive Terminal |
 Left Side - Strap Bolt |
| Set the two screws
aside with the other fasteners. Carefully pull the positive terminal and power distribution board off the "+" battery post. Locate the black metal bracket on the left side of the battery that is attached to the hold down strap. |
||
 Hold Down Strap Bolt |
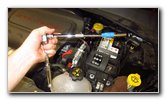 Deep Well 13mm Socket |
 Loosen Counterclockwise |
| Attach a deep well
13mm socket to a long extension bar and a 3/8" drive ratchet. I like to use a piece of painter's tape of electrical tape to keep the socket securely attached to the extension bar. Loosen the nut by turning it in the counterclockwise direction. |
||
 13mm Nut Removed |
 6 Nuts & 2 Screws |
 Lift Off Vinyl Strap |
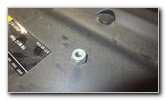
| Set the 13mm nut
aside with the other fasteners. Lift the metal bracket off the battery tray and set the hold down strap on the right side of the old battery. At this point, you should have removed 6 nuts and 2 screws. |
||
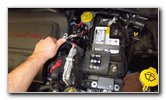
 Lift Out Old Battery |
 Set Battery On Ground |
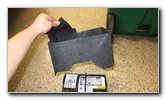 Remove Heat Shield |
| Raise the plastic
handle on the old battery and carefully lift it out of the engine bay. Gently set the old battery down on the ground. Try to avoid tipping over or dropping the old battery to prevent from having acid leak out. Remove the felt fabric heat shield from the old battery. |
||
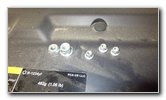
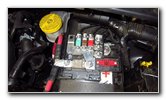
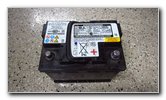 OEM Battery Removed |
 Clean Off Battery Tray |
 Battery Tray Cleaned |
| The OEM (original
equipment manufacturer) 12V battery part number in this 2019 Compass
Trailhawk 4X4 was a 56029 775 AA (also known as 56029775AA). Clean off any debris from the plastic tray so that the new battery will rest evenly on it. |
||
 Lower In New Battery |
 Lower Power Board |
 Positive Terminal In Place |
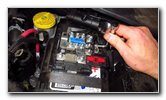
| Carefully lower the
new battery into the engine bay. The negative post should be at the front and the positive post should be closer to the rear of the engine bay near the cowl and windshield. Lower the power distribution board and positive terminal over the "+" battery post. |
||
 Lower Hold Down Strap |
 13mm Nut For Strap |
 Tighten Clockwise |
| Lower the hold down
strap over the top of the new battery and position the metal bracket over
the threaded bar on the left side of the battery tray. Spin the 13mm nut on to the threaded bar on the left side of the battery tray. |
||
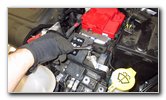
 Replace Rear Wires |
 Second Rear Cable |
 |
| Lower the two
medium sized black cables over their mounting post on the power distribution
board. Spin on the 13mm nut in the clockwise direction. |
||
 Replace A B C Cables |
 Tighten Terminal Nut |
 Use 10mm Wrench |
| Replace the A B C
cables on to their posts. Tighten the 10mm positive terminal nut in the clockwise direction. |
||
 Replace Side Red Cables |
 Second Side Red Cable |
 Spin On 10mm Nut |
| Replace the two
larger red cables on the left side of the power distribution board. Spin on the 10mm nut to secure the two large red cables. |
||
 Replace Two Screws |
 Tighten 8mm Nuts |
 A B C 8mm Nuts Tight |
| Replace the two
Phillips head screws into the red plastic retaining clip by turning them in
the clockwise direction. Tighten the 8mm nuts for the A B C wires. |
||
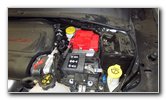
 Power Board Assembled |
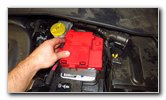 Push On Red Plastic Cover |
 Push On Negative Terminal |
| Make sure that all
of the nuts on the power distribution board and positive terminal are snug. Push the red plastic cover down into place. |
||
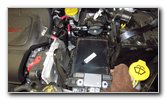
 Tighten Nut Clockwise |
 New Battery Installed |
 Start Engine - Test Battery |
| Carefully lower the
negative terminal over the "-" battery post. Tighten the terminal nut in the clockwise direction until it is snug. Try to avoid over tightening the terminal nut to prevent from cracking the battery post which could result in an acid leak. To test the new battery, start the engine. If you have a digital multimeter, the new battery should have a voltage of just over 12 volts when the engine is off and any where from 13 to about 14.4 volts when the engine is running. If the alternator is not charging the new battery at a range of 13 to 14 volts, it may need to be replaced. Please
check out all of my
2017-2022 Jeep Compass DIY Repair & Maintenance Guides. |
||
| If you found this guide to be helpful,
please consider making a small donation by clicking on the PayPal.com
"Donate" button located to the right of this paragraph. Thank you!
(Note: I am not a registered charity. Donations are not tax deductible.) |