
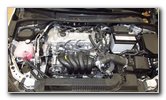
Toyota Corolla Serpentine
Accessory Belt Replacement Guide
How to change the serpentine accessory
belt on the 2ZR-FAE 1.8L I4 engine in a 2020, 2021 and 2022 Corolla.

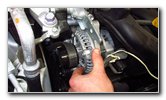
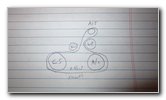
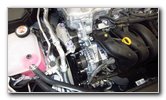
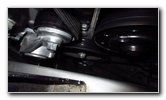
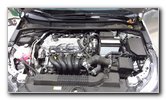 2020 Corolla 2ZR-FAE |
 Left (Passenger) Side |
 Alternator - Top Front |
| This automotive maintenance
tutorial was specifically written to assist owners of the twelfth generation
2019 (hatchback), 2020, 2021, 2022 (and probably also the 2023, 2024 & 2025)
Toyota Corolla sedan in changing the serpentine accessory belt on the
2ZR-FAE 1.8 liter inline four cylinder engine. Owners of other Toyota and Lexus vehicles such as the Camry, C-HR, Venza, Avalon, 86, Sienna, Tacoma, RAV4, Highlander, 4Runner, Sequoia, IS 350, RX 350, UX 200, GS 350, IS 300 and ES 350 may also find these DIY instructions to be helpful. The OEM (original equipment manufacturer) belt part number is Toyota 90916-A2024 (also known as part # 90916A2024). The tools needed to complete this procedure include a 14mm wrench, a 14mm socket, a 12mm socket and a 1/4" or 3/8" drive ratchet. The first two steps are to open the hood and move to the left (passenger) side of the engine bay. |
||
|
|
||
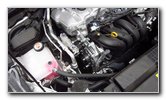
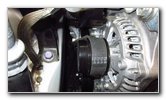
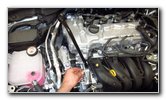
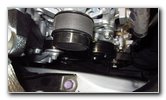
 Study Belt Routing |
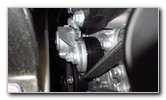 Belt Tensioner & Pulley |
 14mm Wrench |
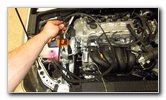
| Take a moment to
study how the original belt is routed around the various pulleys including
the alternator, coolant pump, A/C compressor and tensioner. There are two methods to remove the old belt. The first method involves using a 14mm wrench to rotate the tensioner arm to release the tension on the belt. This requires a lot of strength since the tensioner might be very difficult to rotate. Especially if your vehicle is only a few years old. I recommend using the second method. To view the second method, skip past the next three pictures. |
||
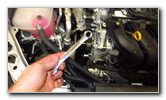
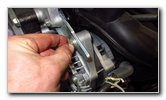
 Wrench On Tensioner |
 Lift Wrench Up & Back |
 Tensioner Too Tight !!! |
| If you'd like to
try rotating back the tensioner arm, place the 14mm wrench on the hex head
drive attached to the tensioner assembly. Lift the handle of the 14mm wrench up and rotate it back towards the rear of the vehicle to release the tension on the old belt. Hold the handle of the wrench in that position with one hand while slipping the old belt off the alternator pulley with your other hand. I found that the tensioner was way too difficult to rotate, so I abandoned trying to slip off the old belt with this method. |
||
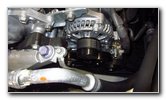
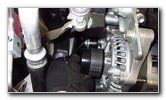
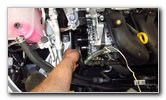
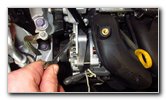
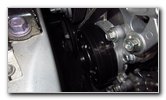
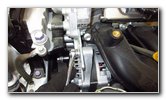 Loosen Top Alt. Bolt |
 Remove Top 12mm Bolt |
 Loosen Bottom 14mm Bolt |
| The easier method
that might require an extra minute or two of your time involves removing the
top alternator bolt and loosening the bolt at the bottom of the alternator. Remove the bolt at the top of the alternator by loosening it in the counterclockwise direction with a 12mm socket and a 1/4" or 3/8" drive ratchet. Set the bolt aside in a safe place. Then loosen the bolt at the bottom of the alternator by turning it a few turns in the counterclockwise direction with the 14mm socket and a 3/8" drive ratchet. Do NOT remove the bottom alternator bolt! It just needs to be loosened a few turns. |
||
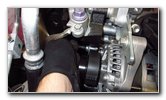
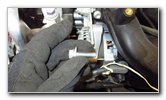
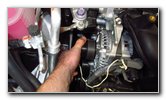
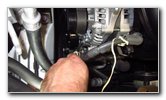
 Rotate Back Alternator |
 Old Belt Removed |
 Toyota 90916-A2034 |
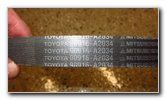
| Carefully push on
the alternator until it rotates back towards the windshield. Slip the old belt off the pulleys. Check the old belt for any wear, chunks of missing rubber or small cracks. If the old belt is in good condition, consider saving it as an emergency backup part just in case the new belt fails prematurely. It's also a good idea to check the condition of the tensioner pulley. Make sure that you can easily spin it and that there isn't any wobbling, grinding or noise that might indicate a worn out bearing. I recommend buying the OEM belt which is part number Toyota 90916-A2024. There might be a belt routing diagram in the owner's manual, but I went ahead and sketched out my own rough diagram as shown in the row of pictures below. |
||
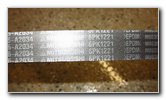 6PK1221 M803053 |
 Belt Routing Diagram |
 Lower In New Belt |
| Lower the new belt
down into the engine bay. A good rule to remember is that the ribbed side of the belt should be wrapped around ribbed pulleys and the smooth side should be against any smooth pulleys. |
||
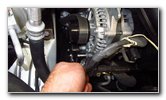
 New Belt Installed |
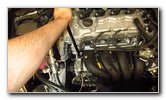 Rotate Alt. Forward |
 Spin In Top 12mm Bolt |
| Wrap the new belt
around the crankshaft, A/C compressor, behind the water pump, under the
tensioner pulley and bring the last loop up over the alternator.
Double check that the new belt is routed properly. Pull the alternator forward towards yourself until it rotates back into position. You may need to use the flat end of the lug nut wrench to help you pry the alternator back into place. Line up the bolt holes in the mounting bracket with the corresponding hole in the top of the alternator. Spin in the 12mm bolt a few turns by hand in the clockwise direction to help prevent it from becoming cross threaded. |
||
 Tighten Bolt Clockwise |
 |
 Tighten Bottom 14mm Bolt |
| Tighten the top
bolt in the clockwise direction with the 12mm socket and a 1/4" or 3/8"
drive ratchet until it is snug. If you are worried about the bolt vibrating loose, you can always use a drop of Loctite Blue (medium strength - removable with hand tools) on the bolt. Tighten the larger 14mm bolt at the bottom of the alternator by tightening it in the clockwise direction until it is snug. Double check that the two bolts are tight before moving on to the next steps. |
||
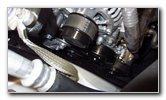
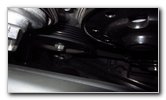
 Alternator Secured |
 Check Belt Routing |
 Water Pump Pulley |
| Unlike the 2014 to
2018 Corolla and the 2009 to 2013 Corolla models with the long tension
adjustment bolt on the top of the alternator, there is no need to manually
adjust the tension. The 12th generation Corolla with the 2ZR-FAE 1.8L I4 engine has a spring loaded automatic tensioner. It's still a good idea to reach down and check the tension on the belt at the longest run in between the crankshaft pulley and the A/C compressor. If the tension is too loose, you'll be able to easily twist the belt past 90 degrees (perpendicular) with the rest of the belt on the neighboring pulleys. If the tension is too tight, you won't be able to twist the belt much at all. The correct amount of tension will allow you to twist the belt to just around 90 degrees. |
||
 Crankshaft Pulley |
 Tensioner Pulley |
 Start Engine - Test Belt |
| Triple check that
the new belt is routed properly around the pulleys. Take a look at the
routing diagram above for reference. To test the new belt, start the engine and listen closely for any strange sounds. If you hear any weird noises, immediately turn off the ignition and check your work again. A belt that is extremely tight might make a very loud and continuous screeching or squealing sound as the belt stays put and the pulleys spin against it. An occasional chirping or squeaking sound could indicate a loose belt that is sometimes slipping or jumping off the pulleys. Be sure to write down the belt change in your car's service records. There is no "service interval" specification listed in the owner's manual for changing the drive belt. The maintenance schedule simply recommends checking its condition at 60,000 miles or 72 months and then again every 15,000 miles after that. Please check out all of my
2020 Toyota Corolla DIY Repair & Maintenance Guides. |
||
| If you found this guide to be helpful,
please consider making a small donation by clicking on the PayPal.com
"Donate" button located to the right of this paragraph. Thank you!
(Note: I am not a registered charity. Donations are not tax deductible.) |