
Acura MDX
Drive Belt Auto Tensioner Replacement Guide
How to change the serpentine accessory
belt, auto tensioner and idler pulley in a 2001 to 2006 Acura MDX.

By Paul B. Michaels Author & Photographer Auto Mechanic Since 1989 |
||
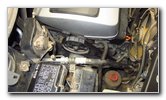
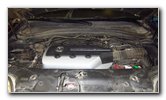 2006 Acura MDX 3.5L |
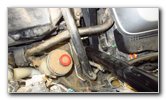
 Passenger Side Drive Belt |
 Pull Out Coolant Tank |
|
This
automotive maintenance tutorial was specifically created to assist
owners of the first generation (2001, 2002, 2003, 2004, 2005 & 2006)
Acura MDX in changing the serpentine accessory or "drive" belt, the
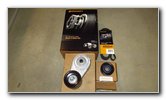
auto tensioner assembly and the idler pulley. Owners of other Acura or Honda vehicles such as the RDX, ILX, TLX, RLX, TL, CL, RSX, RL, TSX, ZDX, NSX, Integra, Pilot, Accord, Civic, Fit, Clarity, CR-V, CR-Z, HR-V, Odyssey, Element and Ridgeline with the VTEC 3.5L V6 engine may also find these DIY instructions to be helpful. The parts I personally purchased and can recommend were included in the Continental K49349A kit. The individual part numbers in the kit are as follows: Continental belt # 4060840, Continental tensioner assembly # 49349 and Continental idler pulley # 49096. If you prefer to buy another brand, here are a few other kits: Gates 90K-38332, ACDelco ACK060841 and Dayco 5060840K1. The tools needed to complete this procedure include a 12mm socket with an extension bar and a 1/4" drive ratchet, a 14mm socket with a 3/8" drive ratchet, a long 3/8" drive breaker bar with a "cheater bar" or a Honda serpentine belt tool. The first few steps are to park the SUV on a level surface, shift the transmission into "P" (Park) and engage the emergency / parking brake and turn off the ignition. It would also a be a good idea to chock the rear tires to help prevent the vehicle from moving. |
||
|
|
||
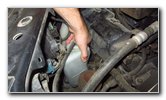
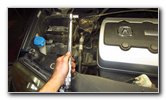
 Overflow Bottle - Moved |
 Pull Back Release Tab |
 P/S Fluid Reservoir |
|
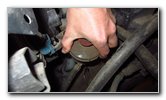
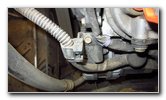
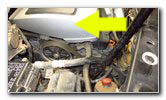
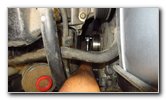
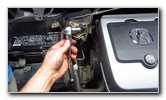
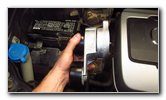
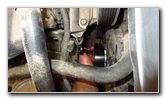
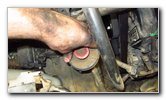
Open the hood and move to the left (passenger)
side of the vehicle. Gently pull the coolant overflow / expansion bottle up and move it out of the way at the front of the engine. Pull back the release tab on the side of the power steering fluid reservoir and slide it out of the mounting bracket. Move it out of the way closer to the headlight. |
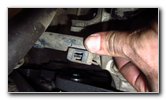
||
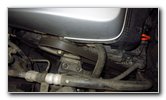
 Alternator Cable |
 Pull Back Release Tab |
 Release Front Fastener |
|
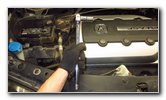
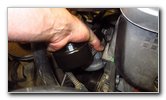
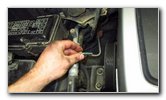
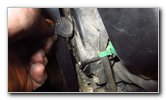
An optional step to create more working room is
to detach the alternator cable from its mounting brackets. Pull the small plastic release tab on each retaining clip away from the cable. Slide the cable retaining clip off the mounting bracket. |
||
 Cable Released |
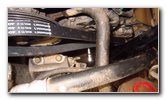
 Continental Tensioner |
 Breaker Bar & 14mm |
|
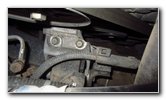
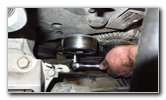
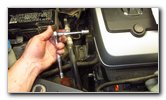
Attach a 14mm socket to a long 18" or 24" 3/8"
drive breaker bar.
I used a 1/2" drive breaker bar with a 3/8" to 1/2" adapter and a 3/8" drive 14mm socket. You may also need a "cheater bar" to slip over the end of the breaker bar to add extra leverage. In a pinch, you can use a bicycle seat post. |
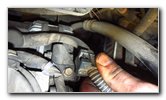
||
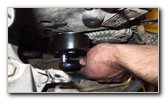
 Tensioner Release Bolt |
 Breaker Bar On Bolt |
 Rotate Back - Release |
|
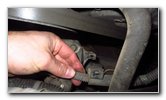
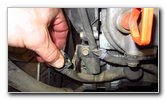
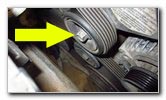
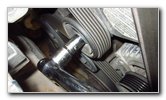
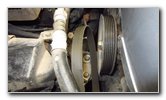
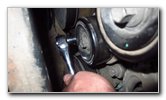
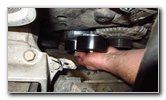
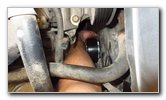
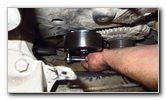
Place the 14mm socket over the tensioner pulley
bolt as shown by the yellow arrow in the picture above. (The tensioner pulley bolt is reverse threaded so that it will not loosen when you rotate back the tensioner arm in the counterclockwise direction). Firmly push the breaker bar back towards the rear of the vehicle (closer to the windshield). |
||
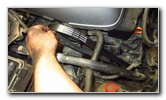
 Slip Belt Off Water Pump |
 Pull Belt Off Pulleys |
 100,000 Mile Old Belt |
| Hold the tensioner
arm in the released position with one hand. With your other hand, very carefully slip the old serpentine belt off the water pump pulley at the top of the engine. Warning: Do NOT place your fingers or hands in between the belt and any of the pulleys! Very carefully and gently allow the tensioner arm to rotate back down. Do not allow the tensioner to quickly snap back into place to avoid injuring yourself or damaging anything in the engine bay. Continue pulling the old belt off the other pulleys (crankcase, alternator, air conditioning compressor, idler and tensioner). My old belt had not been changed in 100,000 miles and it still looked to be in very good condition. It was last replaced at 109,000 miles when the timing belt service was completed. The odometer is currently at 209,000 miles. |
||
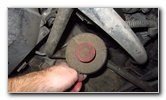
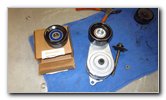
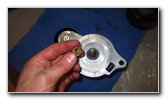
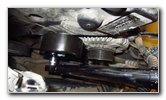
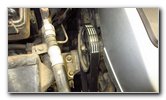
 Tensioner Assembly |
 Lower 12mm Bolt |
 12mm Socket & Extension |
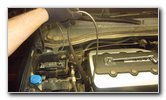
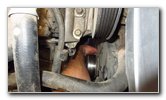
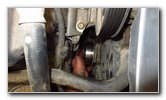
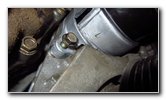
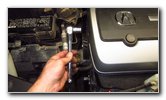
| The tensioner
assembly is held in place by two bolts. There is a 12mm bolt near the bottom
edge as indicated by the yellow arrow above. Attach a 12mm socket to a short extension bar and a 1/4" drive ratchet. |
||
 Loosen Counterclockwise |
 Loosening 12mm Bolt |
 Spin Out Bolt By Hand |
| Loosen the 12mm
bolt in the counterclockwise direction (rotate the ratchet handle towards
the rear of the vehicle). Spin out the 12mm bolt the rest of the way by hand to prevent it from falling down and becoming lost in the engine bay. Set the 12mm bolt aside in a safe place. |
||
 12mm Bolt Removed |
 14mm Socket |
 Loosen Idler Pulley Bolt |
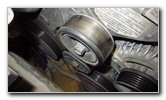
| Attach the 14mm
socket to a 3/8" drive ratchet. Loosen the bolt in the center of the idler pulley (situated below the tensioner pulley and above the 12mm bolt) by turning it in the counterclockwise direction. |
||
 Spin Out Counterclockwise |
 Idler Pulley Bolt |
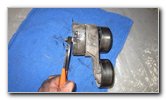 Hold Plastic Ring |
| Continue spinning
out the 14mm bolt in the counterclockwise. You will not be able to fully remove the 14mm bolt. Just loosen it enough until the tensioner assembly is free from the engine and can be pulled out. Use pliers to hold the plastic bolt retaining ring and spin out the 14mm bolt from the old tensioner assembly. |
||
 Spin Out 14mm Bolt |
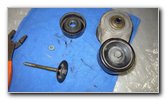 Reuse Bolt, Dust Shield |
 New Tensioner Assembly |
| We will be reusing the 14mm bolt, the metal dust shield, the plastic bolt retaining washer and the 12mm bolt. | ||
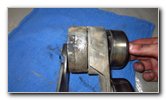
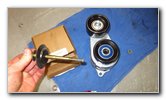 New Idler Pulley Old Bolt |
 Plastic Retaining Washer |
 Hold Plastic Retainer |
| Lower the new idler
pulley on to the new tensioner assembly. Insert the old 14mm bolt with metal dust shield attached through the new idler pulley and the tensioner assembly. Spin the plastic retaining ring on to the end of the 14mm bolt. |
||
 Spin Bolt Clockwise |
 Blue Medium Loctite |
 New Tensioner Assembly |
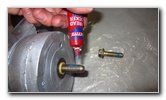
| Hold the plastic
retaining ring with pliers and spin it on to the end of the 14mm bolt. Optional - I prefer to place a drop of Loctite Blue on to the bolts since we take the vehicle off-road frequently. If you never leave paved roads. You can skip this step. |
||
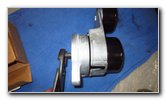
 Lower Past Hoses |
 Line Up Bolt Holes |
 Spin In 14mm Bolt |
| Carefully lower the
new tensioner assembly down past the hoses. Spin in the 14mm bolt a few turns by hand in the clockwise direction to help prevent it from becoming cross threaded. |
||
 Smaller 12mm Bolt |
 Spin In 12mm Clockwise |
 12mm Bolt Inserted |
| Spin in the 12mm bolt a few turns by hand in the clockwise direction at the bottom edge of the new tensioner assembly. | ||
 12mm Socket & Extension |
 Tighten 12mm Bolt |
 Torque 12mm To 16 lb-ft |
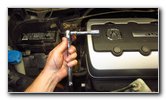
| Tighten the 12mm
bolt in the clockwise direction until it is snug. If you have a torque wrench, the service manual has a torque specification of 16 lb-ft (22 N*m) for the lower 12mm bolt. (Note - Some mechanics believe that torque values should be reduced when using Loctite. Please do your own research.) |
||
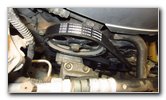
 14mm Socket & Ratchet |
 Tighten 14mm Clockwise |
 Torque Wrench & 14mm |
| Tighten the 14mm bolt to 33 lb-ft (or 45 N*m) of torque. | ||
 Torque 14mm To 33 lb-ft |
 Lower In New Belt |
 Last Loop Water Pump |
| Double check that
both of the bolts are tight before moving on to the next steps. Lower the new belt down in to the engine bay. Route the belt around the various pulleys as shown in the routing diagram. Hold the last loop near the water pump pulley with one hand. |
||
 |
||
 Breaker Bar & Cheater Bar |
 Rotate Forward - Release |
 Slip Belt Over W/P Pulley |
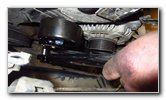
| Use the 14mm socket
attached to the breaker bar and a cheater bar to rotate the tensioner
assembly back towards the rear of the vehicle.
Carefully slip the new bolt over the top of the water pump pulley. |
||
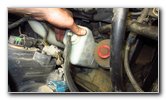
 New Belt Installed |
 Replace Reservoir |
 Replace Coolant Bottle |
| Double check that
the new belt is properly routed around the pulleys and fully seated in
place. Replace the coolant overflow bottle and the power steering fluid reservoir tank. |
||
 Bottle Secured |
 Close Rubber Plug |
 Rubber Plug Secured |
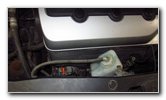
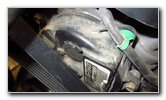
| If the small rubber access plug on the side of the engine popped out, push it back into place. | ||
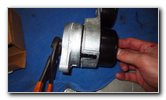
 Secure Cable Loom |
 Replace Alternator Cable |
 Procedure Complete! |
| Secure the
alternator cable back into place. Double check that all of your tools have been removed, all of the bottles / tanks have been replaced and the hoses / cables are secured. To test the new tensioner assembly and belt, start the engine. Listen closely for any strange sounds. If you do hear a weird noise, immediately turn off the ignition and check your work again. If your pulleys and tensioner were worn out like mine, the engine should now sound smooth and quiet. There shouldn't be any squeaking, squealing, chirping, rattling, tapping or jingling sounds coming from the engine bay. Don't forget to write down the procedure in your vehicle's service records. For more,
please check out all of my
2001-2006 Acura MDX DIY Repair & Maintenance Guides. |
||
| If you found this guide to be helpful,
please consider making a small donation by clicking on the PayPal.com
"Donate" button located to the right of this paragraph. Thank you!
(Note: I am not a registered charity. Donations are not tax deductible.) |