
Acura MDX PCV
Valve Replacement Guide
How to check or change the PCV valve in a
1st generation 2001 to 2006 Acura MDX with the VTEC 3.5L V6 engine.

By Paul B. Michaels Author & Photographer Auto Mechanic Since 1989 |
||
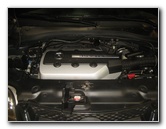 2006 MDX 3.5L V6 Engine |
 Front Left Side of Engine |
 Oil Dipstick, Spark Plug Coil |
| This
automotive maintenance tutorial was specifically created to assist
owners of the first generation (2001, 2002, 2003, 2004, 2005 & 2006)
Acura MDX in checking or changing the PCV (positive crankcase
ventilation) valve in the J35A3 or J35A5 VTEC 3.5 liter V6 engine. Owners of other Acura or Honda vehicles such as the RDX, ILX, TLX, RLX, TL, CL, RSX, RL, TSX, ZDX, NSX, Integra, Pilot, Accord, Civic, Fit, Clarity, CR-V, CR-Z, HR-V, Odyssey, Element and Ridgeline may also find these DIY instructions to be helpful. A few compatible replacement PCV valves for the 2003, 2004, 2005 and 2006 MDX with their part numbers are as follows: Standard Motor Products V384, OES W01331709800OES, Beck Arnley 045-0358, Airtex 6P1243 and genuine OEM Acura 17130-RCA-A02. The only tools needed to remove and replace the PCV valve are a 10mm socket with a 1/4" or 3/8" drive ratchet. |
||
|
|
||
The earlier 2001 and 2002 model year MDX vehicles with the J35A3 3.5L V6 engine are equipped with a different PCV valve. The compatible replacement part numbers for those vehicles are as follows: Beck Arnley 045-0301, Standard Motor Products V316 and Fram FV365. The PCV valve location on a 2001 and 2002 MDX is on the rear cylinder valve cover on the back side of the engine on the driver side of the engine bay. The instructions below only apply to the 2003, 2004, 2005 and 2006 MDX with the updated J35A5 3.5L V6 engine. |
||
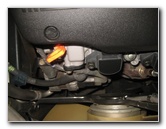
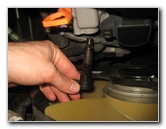
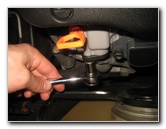
 2006 MDX PCV Valve |
 10mm Bolt - Left Side |
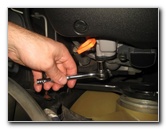 Loosen Counterclockwise |
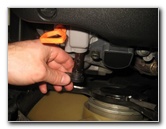
| The first two steps
are to open the hood and then move to the left (passenger) side of the
engine bay. Locate the orange plastic oil level dipstick on the front left corner of the engine. The PCV valve is situated just below the oil dipstick and to the left of a spark plug ignition coil. It is held in place to the engine by a single bolt located on the left side of the valve. Loosen the bolt by turning it in the counterclockwise direction with a 10mm socket and a 1/4" drive ratchet. If you have trouble loosening the bolt, try spraying some penetrating oil on it such as PB Blaster, Liquid Wrench or WD40 and waiting a few minutes before attempting to loosen it again. |
||
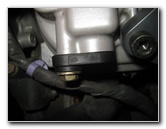
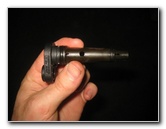
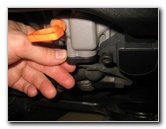
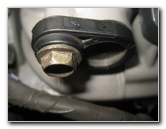
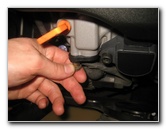 Spin Out By Hand |
 PCV Valve Bolt |
 Pull Out Old Valve |
| Once the bolt is
loose, carefully spin it out the rest of the way by hand. Avoid dropping the bolt down into the engine bay. Set the bolt aside in a safe place. Carefully slide the old PCV valve out of the engine. If you have trouble removing the old PCV valve, try gently rotating the valve clockwise and counterclockwise in the port. |
||
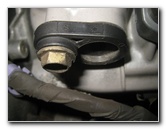
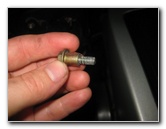
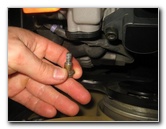
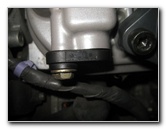
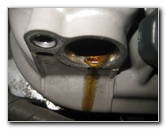 Oil Dripping Out of Port |
 Soot & Sludge On Valve |
 Inspect Old Valve |
| If your old PCV
valve hasn't been replaced in many years, I recommend holding a paper towel
below the port to catch any oil that may drip out. I suspect that the PCV valve in our 2006 MDX had never been replaced after 160,000 miles. It was discolored, covered in oil and clogged with powdery soot and oily sludge. The service records from the dealership indicated that the previous owner had complained of decreased fuel economy with a loss of about 3 to 4 MPG when the SUV had approximately 130,000 miles. Since the PCV valve is such an inexpensive part, I figured that replacing it was an easy way to possibly restore the SUV's optimum fuel economy. I plan to also check, clean and possibly replace the MAP sensor and EGR valve. |
||
|
|
||
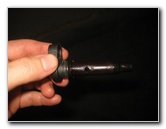
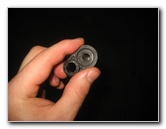
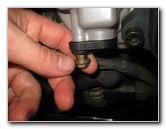
 Original After 160K Miles? |
 Shake - No Rattle Sound |
 Slide In New PCV Valve |
| A rudimentary way
to test an old PCV valve and check its condition is to vigorously shake it.
If you hear a healthy sounding rattle noise when you are shaking the old valve, it is probably still in good working condition. If the valve doesn't make any noise when you shake it, it may be seized or clogged and should be replaced. Edit - Apparently the PCV valve for the MDX (and also the Pilot, Odyssey and Ridgeline) do not have a metal ball valve inside. So the rattle test doesn't work. If you blow into the small tip, the one way valve should stop the air flow. But I don't recommend putting your mouth on the PCV valve, just replace it with a new one. I recommend buying the Standard Motor Products V384 PCV valve since it has excellent reviews on Amazon. I was still waiting for my new part to arrive, so I temporarily re-installed the old valve. |
||
 New Valve Installed |
 Line Up 10mm Bolt |
 Spin In By Hand |
| Apply a small
amount of new motor oil to the rubber o-ring gasket on the new valve. Lubricating the gasket will help it to form a better seal and also make it easier to remove during the next replacement. Line up the new valve and slide it back into the engine. Line up the bolt hole in the valve with the corresponding hole in the engine. Carefully spin in the bolt in the clockwise direction a few turns by hand to prevent it from becoming cross threaded. |
||
 Tighten Bolt Clockwise |
 10mm Bolt Secured |
 PCV Valve Replaced |
| Tighten the bolt in
the clockwise direction with the 10mm socket and a 1/4" drive ratchet until
it is snug. The torque specification in the service manual is 8.7 lb-ft (or 12Nm). Try to avoid over tightening the bolt to prevent from cracking the plastic PCV valve or stripping the threads. Be sure to record the PCV valve change in your SUV's service records. You may also want to reset the fuel economy meter on the driver information center screen to see if you re-gain any MPG on your next long trip. For more,
please check out all of my
2001-2006 Acura MDX DIY Repair & Maintenance Guides. |
||
| If you found this guide to be helpful,
please consider making a small donation by clicking on the PayPal.com
"Donate" button located to the right of this paragraph. Thank you!
(Note: I am not a registered charity. Donations are not tax deductible.) |