
Acura MDX
Transmission Fluid Replacement Guide
How to change the automatic transmission
fluid (ATF) in a first generation 2001 to 2006 Acura MDX SUV.

By Paul B. Michaels Author & Photographer Auto Mechanic Since 1989 |
||
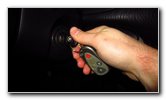 Warm Engine - Turn Off |
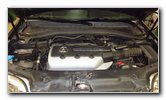 2006 MDX 3.5L V6 |
 Driver Side - Air Intake |
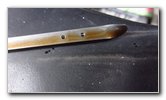
| This
automotive maintenance tutorial was specifically created to assist
owners of the first generation (2001, 2002, 2003, 2004, 2005 & 2006)
Acura MDX equipped with the 3.5L VTEC V6 engine in draining and
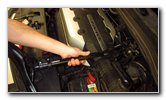
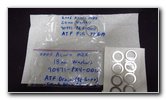
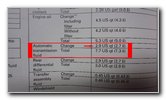
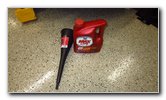
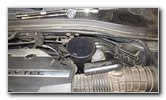
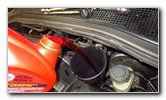
refilling the automatic transmission fluid or "ATF". Owners of other Acura or Honda vehicles such as the RDX, ILX, TLX, RLX, TL, CL, RSX, RL, TSX, ZDX, NSX, Integra, Pilot, Accord, Civic, Fit, Clarity, CR-V, CR-Z, HR-V, Odyssey, Element and Ridgeline with the VTEC 3.5L V6 engine may also find these DIY instructions to be helpful. Acura recommends only using genuine Honda ATF-DW1 fluid which is part number Honda 08200-9008. The original ATF fluid was Honda ATF-Z1 which has been discontinued. I chose to buy a one gallon jug of compatible replacement Valvoline MaxLife ATF (full synthetic) since we've been using it in other Honda vehicles for many years. The ATF fluid change capacity specification in the owner's manual for this 2006 Acura MDX Touring AWD is 2.9 U.S. quarts (or 2.7L). Please check your owner's manual to verify the capacity specification for your vehicle since it may vary by year, trim level and whether or not you have the FWD (front wheel drive) or AWD (all-wheel drive) transmisson. For example, the 2006, 2007 and 2008 Honda Pilot and the 2008 Acura MDX service manuals list 3.0 U.S. quarts (2.8L) for an ATF drain and refill. The tools required to complete this procedure include a used oil catch container, a 17mm socket, a set of extension bars, a 1/2" drive ratchet or a 1/2" drive breaker bar, a 3/8" drive ratchet and an ATF funnel. To help prevent ATF leaks, I highly recommend replacing the metal washers or "gaskets" on the drain and fill plugs. Their part number are as follows: ATF fill plug 24mm washer - Honda 90441-PK4-000 and ATF drain plug 18mm washer - Honda 90471-PX4-000. The first step is to warm up the engine to normal operating temperature (the radiator fan comes on). Drive the SUV on to a level surface, shift the transmission into "Park" and turn off the ignition. Engage the emergency / parking brake and place wheel chocks on both sides of the rear tires to help prevent the vehicle from moving unexpectedly. Open the hood and locate the ATF filler bolt on the rear driver side of the engine. |
||
|
|
||
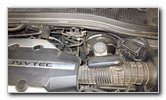
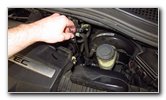
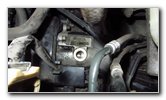
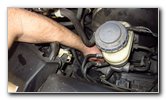
 Below Brake Fluid Bottle |
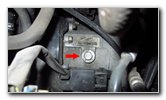 ATF Fill Plug |
 Penetrating Oil |
| The ATF
fill plug is situated down below the brake fluid reservoir. The pictures above have a red arrow pointing to the fill bolt which has the letters "ATF" printed on it. The ATF fill plug is notorious for being very difficult to remove due to corrosion (rust) and debris. So you should always remove the fill plug first before draining out the old ATF fluid. If the fill plug can not be removed, you obviously won't be able to refill the ATF fluid. (If you are unable to remove the fill plug, there is always the much slower option of pouring the new fluid down into the ATF dipstick tube with a small funnel.) I recommend spraying a small amount of penetrating oil around the fill bolt and allow it to seep into the threads for at least 5 to 10 minutes. After allowing the penetrating oil to work for at least 5 to 10 minutes, clean off any debris or oil on and around the fill bolt with a paper towel or a shop rag. |
||
 Spray Fill Bolt |
 Socket & Extension Bars |
 Loosen Counterclockwise |
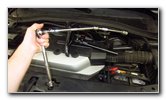
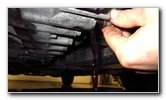
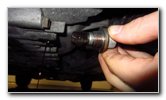
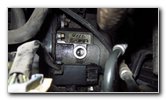
| Attach the 17mm
socket to a long extension bar and a 1/2" drive ratchet or a 1/2" drive
breaker bar. You may need to use two extension bars in order to reach down to the ATF fill bolt. Loosen the bolt by turning it in the counterclockwise direction. |
||
 Socket On ATF Fill Bolt |
 (Bike Seat) Breaker Bar |
 Spin Out Fill Bolt |
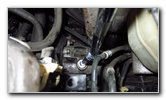
| A trick I learned
when changing the ATF fluid on my friend's 2006 Honda Pilot was to use a
bicycle seat post as a breaker bar for some extra leverage and torque on the
1/2" drive ratchet to loosen the fill bolt. Once the fill bolt is loose, detach the ratchet and spin it out the rest of the way with the extension bar.
|
||
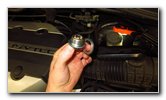 Fill Bolt Removed |
 Filler Bolt & Washer |
 ATF Filler Port (Hole) |
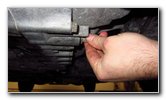
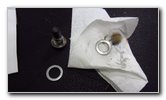
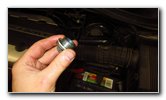
| Carefully remove
the fill bolt and the old washer. Inspect the old washer for any damage. The 24mm fill plug washer part number is Honda 90441-PK4-000. You may be able to re-use the old washer, but I recommend buying a new one. |
||
 |
 |
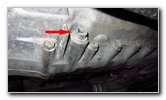 |
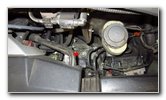
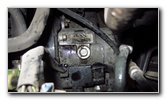
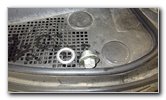
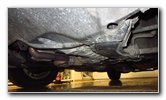
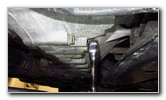
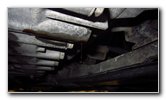
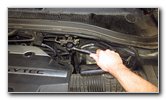
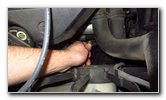
| Slide under the
front driver side of the engine bay with the used oil catch basin and a 3/8"
drive ratchet. Locate the automatic transmission drain plug which has a square opening in the center of it. The pictures above point to the drain plug with a red arrow. |
||
 3/8" Drive Ratchet |
 Loosen Drain Plug |
 Tap With Rubber Mallet |
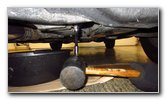
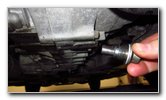
| Slide the used oil
catch basin to just below the drain bolt. Loosen the drain bolt by turning it in the counterclockwise direction with the 3/8" drive ratchet. If you have trouble loosening the drain bolt, use a rubber mallet to firmly hit the end of the ratchet a few times. |
||
 Slowly Spin Out Plug |
 Slowly Draining Fluid |
 Remove Plug & Magnet |
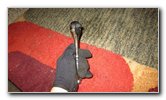
|
Slowly spin out the drain bolt in the counterclockwise direction until you see a small stream of old fluid start to drain out. Allow the old fluid to slowly drain out for at least a minute or two before you fully remove the drain plug to prevent the hot fluid from spraying out quickly. When the flow slows down, fully remove the drain plug. Clean off any fine metal particles from the magnet on the end of the drain plug. If there are large metal shavings or small chunks of metal on the drain plug, consider having your transmission inspected by a professional mechanic. |
||
 New Washers (Gaskets) |
 Clean Off Magnet |
 New Fill Plug Washer |
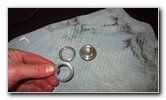
| Inspect the old
metal washer on the drain plug. The 18mm drain plug washer part number is Honda 90471-PX4-000. You may be able to re-use the washer, but I'd recommend installing a new washer to help prevent ATF fluid leaks. |
||
 Last Drops Falling Out |
 Spin In Drain Bolt |
 Torque Drain Bolt |
| Once the flow of
old ATF fluid draining out slows down to just an occasional drop, you can
clean off the drain port with a paper or a shop rag. (Tip - If you would like to drain out slightly more ATF, you can very carefully raise the rear of the SUV with a floor jack and support it with two jack stands. Make sure the emergency / parking brake is engaged and place wheel chocks on both sides of the front tires.) Spin in the drain bolt with a new washer attached in the clockwise direction by hand to make sure it doesn't become cross threaded. Then tighten the drain bolt in the clockwise direction with the 17mm socket and a 1/2" ratchet until it is snug. If you have a torque wrench, the specification in the service manual for the ATF drain plug is 36 lb-ft of torque. Double check that the drain plug is tight before moving on to the next steps. |
||
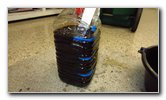
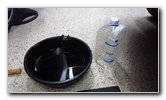 Measured Gallon Jug |
 Insert Automotive Funnel |
 Pouring Out Old Fluid |
| I marked an old gallon water jug in quarts with painter's tape to measure how much old ATF fluid I drained out. | ||
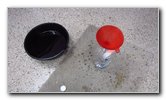
 About 3 Quarts Drained |
 Change - 2.9 U.S. Quarts |
 ATF Fill Funnel |
| After pouring the old fluid from the basin into the gallon jug, it looks like I drained out about 3 U.S. quarts which is very close to the 2.9 U.S. quarts specification in the owner's manual. | ||
 Insert ATF Funnel |
 Pour In New Fluid |
 About 1 Quart Left |
| Insert the ATF
funnel into the filler hole. Slowly pour in the new 2.9 U.S. quarts of ATF fluid. |
||
 Fill Port Opening |
 Attach New Washer |
 Spin In Bolt Clockwise |
| Attach the new
washer to the fill plug. Spin in the fill plug a few turns by hand in the clockwise direction to help prevent it from becoming cross threaded. |
||
 Torque Fill Bolt |
 How To Check ATF Fluid |
 ATF Dipstick - Yellow |
| Tighten the fill
bolt in the clockwise direction with the 17mm socket, a long extension bar
and the 1/2" drive ratchet until it is snug. If you have a torque wrench, the service manual specification for the ATF fill plug is 33 lb-ft of torque. Double check that the fill plug is tight before moving on to the next steps. To check the ATF level, start the engine and let it warm up to operating temperature (when the radiator fans turns on once) and then turn off the ignition. Do not allow the engine to warm up any longer than it takes for the radiator fans to turn on twice. |
||
 Check Dipstick Level |
 Replace Dipstick |
 ATF Change Complete! |
| Check the fluid
level within 60 to 90 seconds of turning off the engine. Pull out the transmission fluid dipstick (yellow handle), wipe it clean and fully re-insert it. Then pull it out again to check the level. The ATF level should be between the lower hole which indicates the "LOW" or "MIN" (minimum) mark and the upper hole which marks the "FULL" or "MAX" (maximum) line. Since I measured that I drained out about 2.9 U.S. quarts of old fluid and I poured in 2.9 U.S. quarts of new fluid, I was confident that the level was correct. This is why I recommend measuring the old fluid to help avoid under filling or over filling the ATF fluid. Push the dipstick back in to place. It would be a good idea to check your driveway, parking spot or garage for drops of fresh ATF fluid which might indicate a leak from the drain plug or the fill bolt. The service interval specification in the owner's manual is to change the ATF fluid every 30,000 miles after the initial 45,000 miles change. Be sure to record the ATF change in your SUV's service records.
For more,
please check out all of my
2001-2006 Acura MDX DIY Repair & Maintenance Guides. |
||
| If you found this guide to be helpful,
please consider making a small donation by clicking on the PayPal.com
"Donate" button located to the right of this paragraph. Thank you!
(Note: I am not a registered charity. Donations are not tax deductible.) |