
BMW E36 Rear
Trailing Arm Bushings Replacement Guide
How to change the suspension's rear
trailing arm bushings (RTAB) on a 1990 to 2000 BMW E36 3 Series sedan.

By Paul B. Michaels Author & Photographer Auto Mechanic Since 1989 |
||
 1998 BMW 328i Sedan |
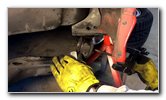
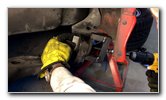
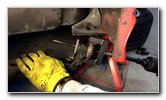
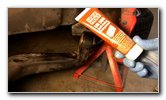
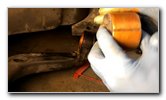
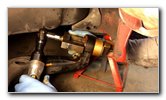
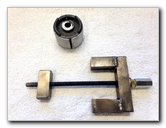
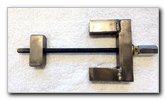
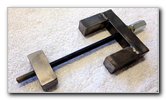
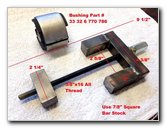 Custom RTAB Tool |
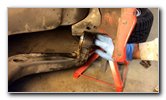
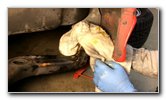
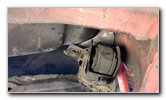 Disconnect RTA Bracket |
| This automotive
maintenance tutorial was specifically written to assist owners of the 1998
BMW 3 Series 328i sedan in changing worn out rubber bushings in the rear
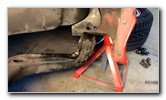
trailing arms with a custom made "RTAB" removal and installation tool. Owners of other BMW E36 series vehicles produced in 1990, 1991, 1992, 1993, 1994, 1995, 1996, 1997, 1998, 1999 and 2000 such as the 316i, 318i, 320i, 323i, 325i, 328i, M3, 318tds, 325td, M3, Z3 and the Alpina (B3, B6, B8) models should also find these instructions to be helpful. The procedure should be the same or very similar for the E46 models, the X3 E83 SUV and the E85 Z4. Some symptoms of worn out, cracked, torn or hardened RTABs on the rear suspension system include excessive roll, vibrations, unresponsive steering, clunking noises when accelerating or braking, clanking sounds when driving over speed bumps, skipping over small road imperfections, premature or irregular wear on the rear tires and loose steering around corners. The OEM (original equipment manufacturer) part number for the bushings is genuine BMW 33326770786 (also known as # 33-32-6-770-786 or 33 32 6 770 786). The best and safest way to remove the old bushings is with a BMW E36/E46 RTAB Removal Tool or you can create your own custom tool as shown in the top row of pictures above. Two commercially available rear trailing arm bushing removal and installation tools with their part numbers include the following: KTC Auto Tools BMW2074 and the Laser 4779. Another option (that is potentially dangerous and more difficult) is to use an electric drill with a large drill bit, a Sawzall tool or a rotary multi tool to destroy and remove enough small pieces of the old bushing until it can be pulled out of the rear trailing arm. If you would like to avoid having to push in the new OEM style rubber bushings, choose a pair of two piece polyurethane plastic rear trailing arm bushings such as the PSB 605X2. The two piece style polyurethane plastic bushings can be simply and easily popped in to each side of the opening in the rear trailing arm. If you have trouble pushing in the two piece bushings by hand, you can use an "F" clamp to install them. The tools and other items needed to complete this procedure include a floor jack, two jack stands, a 10mm socket with a 1/4" drive ratchet, an 18mm socket with a 3/8" or 1/2" drive ratchet, a Sharpie marker or a pencil and a tube of anti-seize lubricant such as Liqui Moly LM 508. The first few steps are to slightly loosen the lug nuts on the rear wheel in the counterclockwise direction with a lug nut wrench, raise the back of the vehicle with a floor jack and securely support it with at least two jack stands. Do not solely rely on the floor jack to support the vehicle! The floor jack will also be needed for another step later. I prefer to work on one side of the vehicle at a time to keep three tires on the ground for extra safety. Then spin off the lug nuts and remove the rear wheel. Disconnect the brake line bracket from the rear trailing arm by removing the two bolts in the counterclockwise direction with a 10mm socket and a 1/4" drive ratchet. The rear trailing arm is responsible for the rear toe adjustment of the suspension. So be sure to mark the position of the three bolts on the mounting bracket to the vehicle's frame by using a Sharpie marker, a paint pen or a pencil. Support the bottom of the rear trailing arm with the floor jack. Remove the three bolts that secure the RTA bracket to the frame by turning them in the counterclockwise direction with a 18mm socket and a 3/8" or a 1/2" drive ratchet. Carefully lower the RTA. To keep the RTA in position and prevent it from hitting the rocker panels, use a block of wood. Set the bolts aside in a safe place. |
||
|
|
||
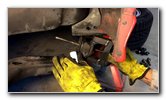
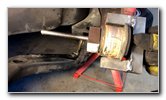
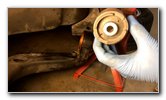
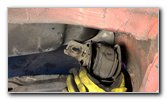 Worn Out Old Bushing |
 Remove RTAB Bracket |
 Insert Threaded Bar |
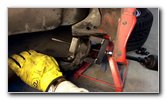
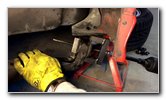
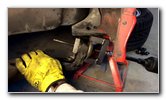
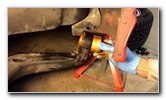
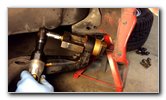
| Remove the nut and
bolt that secures the bracket to the RTAB by turning the nut in the
counterclockwise direction with an 18mm wrench and a 3/8" or 1/2" drive
ratchet. Use an 18mm wrench to hold the bolt head in place while you turn
the nut. If you have trouble removing the nut, spray some penetrating oil on to the bolt and nut. Allow the penetrating oil to seep into the threads for at least a few minutes. If you are using a BMW E36/E46 specific RTAB removal tool, follow the instructions provided by the manufacturer. For this custom made tool, the old bushing was removed from the outer side of the RTA. Some OEM bushings have a flange on the outer edge that would prevent it from being removed from the inner edge. |
||
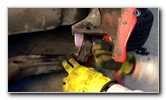
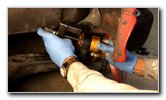
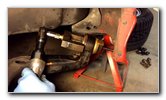
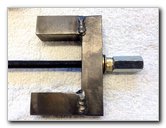
 Line Up Tool & Cutouts |
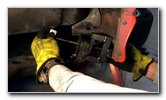 Threaded Pulling Rod |
 Spin On Pulling Rod |
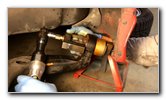
| Slowly turn the
long threaded bolt in the clockwise direction until the pulling rod
dislodges the old bushing from the sleeve in the RTA. Avoid using an electric impact wrench or an air impact gun to prevent from damaging the threads on the RTAB removal tool. |
||
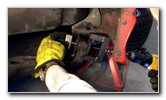
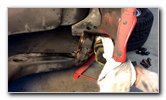
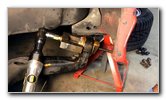
 |
 Removing Old Bushing |
 |
 |
 Turn Bolt Clockwise |
 Old Bushing Removed |
| Once the old bushing has been removed, disconnect the RTAB tool and discard the old part. | ||
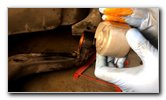
 Clean With Emory Cloth |
 Wipe With Lacquer Thinner |
 Anti-Seize Lubricant |
| Remove any rust or
debris from the opening in the rear trailing arm with some
Emory cloth or fine sandpaper.
Clean the RTA with some lacquer thinner or paint thinner. |
||
 |
 Apply To RTA |
 Apply To New Bushing |
| Apply some anti-seize lubricant such as Liqui Moly LM 508 to the opening or "sleeve" in the RTA and to the metal collar (A.K.A. "enclosure" or "jacket") on the outside of the new bushing. | ||
 |
 |
 Insert From Outer Side |
| If your new OEM bushing has a flange (raised edge), it should be situated on the outer edge closer to the outside of the vehicle. | ||
 Attach RTAB Tool |
 Pull In New Bushing |
 Slowly Installing Bushing |
| Attach the RTAB in the opposite direction to "pull" the new rubber bushing into the RTA. | ||
 |
 Center Bushing In RTA |
 |
| Slowly turn the
bolt head on the long threaded rod in the clockwise direction to pull the
new bushing into the RTA. Continue until the new bushing is perfectly centered in the RTA. If you over shoot when centering the new bushing, reverse the tool to push it back a little bit. |
||
 |
 Wipe Clean With Rag |
 New Bushing & Tool |
| Clean the area with
a towel to wipe away any excess anti-seize lubricant. Clean the bracket (also known as the "cassette") and apply a small amount of anti-seize to where it will come in contact with the RTAB. Re-install the bolt through the bracket and the RTAB. Secure it in place with the nut by turning it in the clockwise direction. The nut should be situated on the inboard of the bracket (closer to the exhaust pipes) and the bolt should be pushed through the outboard of the bracket (closer to the outside of the vehicle). Use a torque wrench to tighten the bushing bracket bolt and nut to the service manual specification of 81 lb-ft (or 109.82 Nm) of torque. If you'd prefer, you can wait to fully torque the bushing bolt and nut until you secure the RTA to the chassis. Raise the RTA up towards the frame with the floor jack. Spin in the three RTA mounting bracket bolts a few turns by hand in the clockwise direction to help prevent them from becoming cross threaded. Slightly tighten the bolts with the 18mm socket and a 3/8" or 1/2" drive ratchet. Line up your Sharpie marker or pencil marks on the RTA mounting bracket with the three bolt heads as best you can to ensure the same rear toe adjustment is achieved as before. Tighten the three front carrier bracket bolts that hold it to the chassis to the service manual specification of 57 lb-ft (or 77.28 Nm) of torque. Re-attach the bracket for the brake line with the two 10mm bolts. Tighten the bolts in the clockwise direction until they are snug. |
||
 Custom Welded Tool |
 |
 |
| To complete the
job, replace the rear wheel, spin on the lug nuts a few turns by hand in the
clockwise direction to
prevent them from becoming cross threaded and slightly tighten them in a criss-cross or "star" pattern with the tire iron. Carefully lower the vehicle from the jack stands by using the floor jack. Tighten the lug nuts to the owner's manual specification of 75 lb-ft (or 101.69 Nm) of torque (for 1991-1999 E36 vehicles). Please check your owner's manual for the correct lug nut torque specification for your car. Be sure to record the RTAB replacement in your vehicle's service records. A special thanks goes out to M.M. for the
images and instructions used to create this DIY guide. I can personally
attest that this 1998 BMW 328i once again drives like a brand new car!
|
||
| If you found this guide to be helpful,
please consider making a small donation by clicking on the PayPal.com
"Donate" button located to the right of this paragraph. Thank you!
(Note: I am not a registered charity. Donations are not tax deductible.) |