
Delta
Massaging Shower Head Installation Guide & Review
How to install the Delta 75520 massaging
shower head including pictures illustrated instructions and a consumer review.

By Paul B. Michaels Author & Photographer Auto Mechanic Since 1989 |
||
 |
 |
 |
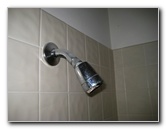
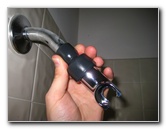
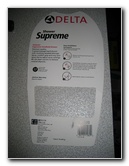
| We
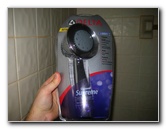
purchased this Delta massaging shower head for about $40. The old
shower head in this bathroom had become partially clogged with
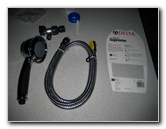
mineral deposits and no longer worked well. The Delta 75520 shower head comes in a variety of styles and colors. We chose the Victorian style model in the chrome metal color. It features five different spray patterns, a six foot tangle free hose, an anti-clog device to remove mineral deposits, a shower arm mount, and a lifetime warranty. The installation process only took a few minutes of actual work if I deduct the time I spent taking pictures of the process for this "how-to" guide. You'll only need a pipe wrench or pliers, and some Teflon or plumber's tape to complete this job. |
||
|
|
||
 |
 |
 |
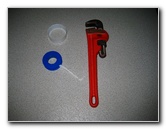
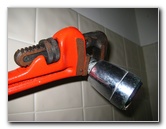
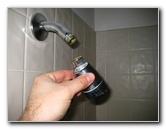
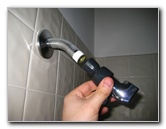
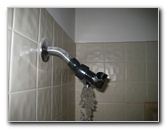
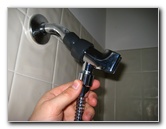
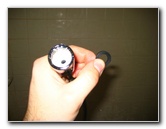
| The first step is to remove the old shower head either by hand or with a pipe wrench. Our old shower head was difficult to remove so I had to use the pipe wrench to twist it counter clockwise and detach it from the water pipe. | ||
 |
 |
 |
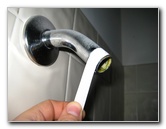
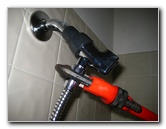
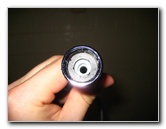
| Next, neatly wrap
the bare threads on the shower water pipe a few times with
Teflon tape.
Avoid wrapping the tape past the end of the threads where it may come in
contact with water and enter the new shower head causing a clog. If the
threads of your shower water pipe are dirty, clean them with a wire brush or
old toothbrush and rinse the area before applying the plumber's tape. Twisting on the shower arm mount in the clockwise direction should be done by hand only. Don't use the pipe wrench to tighten the plastic piece or you may cause damage which can develop into a water leak. Test the shower arm mount by turning on the water. If you see a leak, try removing the mount, cleaning the threads, and re-applying new Teflon tape. Use a glove or rag while tightening the mount by hand to get a better grip. If you must use a wrench or pliers to tighten the mount, wrap the black plastic with a cloth first to prevent cracks or marring. |
||
 |
 |
 |
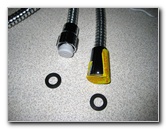
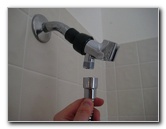
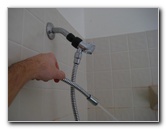
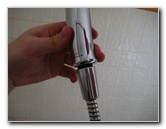
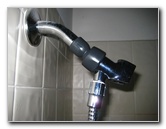
| Locate the shower arm mount end of the hose and insert one of the black rubber o-rings into the end of it until it lies flush. Twist it on to the threads located at the bottom of the shower arm mount until it just past hand tight. Test the connection for leaks by turning on the water and moving the hose around. This connection does not require silicon tape, but it may help. | ||
|
|
||
 |
 |
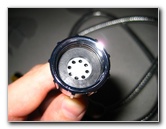 |
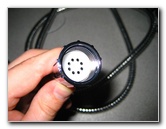
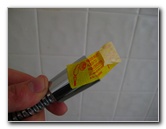
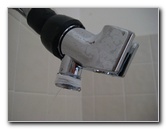
| Then remove the tape or sticker covering the end of the hose that must be attached to the Delta massaging shower head. Insert the other black rubber o-ring into the end of the hose until it lies flush against the white plastic plate with holes in it. | ||
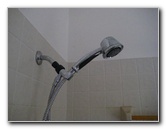
 |
 |
 |
| Twist this end of the hose on to the shower head clockwise until it is just past hand tight. Again, this connection does not require Teflon or "plumber's" tape but it might help if you have a stubborn leak. It would be better to use Teflon tape than to over tighten the shower head and damage the seal or the threads. | ||
 |
 |
 |
| I found that the connection between the shower arm mount and the hose leaked a little bit. So I removed it, added new Teflon tape, and carefully tightened it with my pipe wrench. Another reason for a leak may be that a rubber o-ring dropped out of the hose during installation. Double check the shower floor or tub for the missing o-ring in case of a leak before attempting to further tighten the connection. | ||
 |
 |
 |
| Overall, we're very
happy with this new Delta 75520 "shower supreme" five spray pattern
massaging shower head. The 75520 seems to be really well built and sturdy
with quality materials and finish. It does seem like there is less water
coming out of the shower head compared to the old one. The
Delta 75520 has a
water usage rate of 2.5 GPM (gallons per minute) which helps to conserve
water. So I'm hoping to receive a slightly smaller water bill each month.
If you want higher water pressure and don't mind an elevated water bill, you could remove the water flow restrictor plate located inside the end of the shower head's handle with some needle nose pliers. |
||
 |
 |
 |
| For more of my home
repair or maintenance guides, click on the following links:
Rheem A/C Capacitor Replacment Guide,
Rheem HVAC Condenser Coils Cleaning Guide,
Refrigerator Freezer Icemaker Replacement Guide,
Bathtub Shower Diverter Valve Replacement Guide,
Home Water Heater Sediment Flushing Guide,
Rheem HVAC Air Handle Coils Cleaning Guide,
A/C Condensate Water Drain Pipe Flushing Guide,
Home Clothes Dryer Lint Vent Cleaning Guide,
Laptop HDMI To HDTV Over CAT6 Connection Guide,
Culligan US-600A Under Sink Water Filter Installation Guide,
Culligan IC-EZ-1 Drinking Water Filter Installation Guide,
Culligan IC-100 Icemaker Water Filter Installation Guide,
Kitchen Sink Drain Leak Repair Guide,
Hunter Just Right Digital Thermostat Installation Guide,
Sticky Door Lock Lubrication Guide,
Honda EU3000is Generator Maintenance Guide,
Kenmore Oven/Range 220V Power Restoration Guide,
Toilet Water Supply Valve Leak Repair Guide,
Refrigerator Water Leak Repair Guide,
GE HVAC Condenser Dual Run Capacitor Replacement Guide, and the
Carpenter Bee Insect Pest Control Guide. |
||
| If you found this guide to be helpful,
please consider making a small donation by clicking on the PayPal.com
"Donate" button located to the right of this paragraph. Thank you!
(Note: I am not a registered charity. Donations are not tax deductible.) |