
Ford EcoSport
Fog Light Bulbs Replacement Guide
How to change a burnt out fog light bulb
in the front bumper cover of a 2013 to 2021 Ford EcoSport SUV.

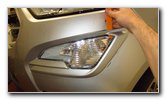
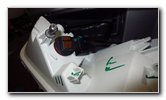
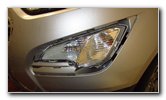
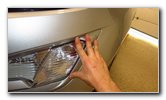
 2020 EcoSport Fog Light |
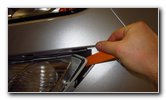
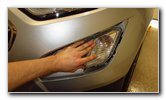
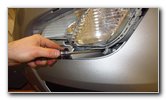
 Insert Plastic Pry Bar |
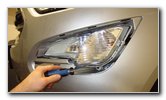
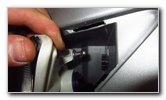
 Gently Release Clips |
| This automotive
maintenance tutorial was specifically written to assist owners of the second
generation 2013, 2014, 2015, 2016, 2017, 2018, 2019, 2020 and 2021 Ford
EcoSport compact SUV in changing a burnt out fog light bulb located in the
housing attached to the bottom of the front bumper cover below the headlight
assembly. Owners of other Ford or Lincoln vehicles such as the Fiesta, B-Max, Escape, Edge, Bronco Sport, Explorer, Expedition, Transit, Focus, Mondeo, S-Max, Puma, Kuga, Endura, Everest, Ka, Figo, Endeavour, Aviator, Corsair, Nautilus and Navigator may also find these DIY instructions to be helpful. The compatible replacement halogen light bulb part number is H8 (12V 35W). If you would like to have brighter fog lights, install some H8 LED bulbs. The tools needed to remove the housing and access the bulb include a plastic pry bar tool and a Torx T30 star bit screwdriver.
Insert the plastic pry bar tool in between the trim ring and the front bumper cover. Very carefully and gently pry out the plastic retaining clips. Try to avoid using excessive force. The retaining clips should pop out relatively easily. You may need to remove and re-insert the plastic pry bar tool into several areas around the trim ring to fully remove it. Please take your time and be gentle. |
||
|
|
||
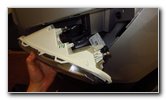
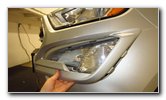
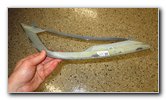 Trim Ring Removed |
 Loosen Counterclockwise |
 Black Screw Removed |
| Set the trim cover
aside in a safe place. Locate the black metal Torx screw situated at the bottom outer corner of the light housing. Loosen the screw by turning it in the counterclockwise with the Torx T-30 star bit screwdriver. Set the screw aside in a safe place. |
||
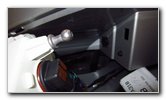
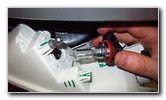
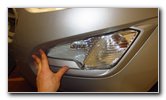
 Release Outer Ball Mount |
 Outer Peg & Socket |
 Detach Inner Peg |
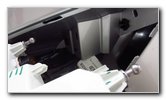
| The light housing
is still held in place by two metal pegs with ball mounts on their ends
attached to black plastic ball sockets on the SUV. Very carefully pry out the outer edge of the light housing to separate the outer ball mount from its socket. Try to avoid using excessive force to prevent from breaking the housing. If you have trouble separating the peg from the ball socket, try gently wiggling the housing up and down or back and forth while pulling it straight out. Repeat the process to separate the inner peg from its socket. |
||
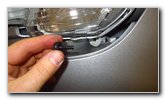
 Inner Metal Ball Mount |
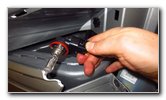
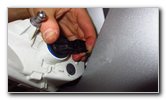
 Disconnect Turn Signal |
 Fog Light - Inner Corner |
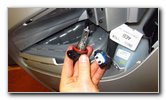
| The front turn
signal bulb socket is located near the outer edge of the light housing. Push in the release tab on the electrical connector before sliding it straight off the base of the bulb. The fog light bulb socket is located closer to the inner edge of the housing. |
||
 1/4 Turn Counterclockwise |
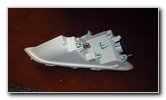 Housing Removed |
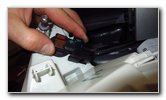
 Push In Release Tab |
| Rotate the old
light bulb 1/4 turn in the counterclockwise direction before pulling it
straight out of the housing. Set the light housing down on a soft surface such as a towel to help prevent the lens from being scratched. Push down the release tab on the electrical connector before separating it from the old fog light bulb. |
||
 Old Bulb Detached |
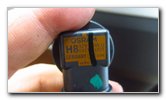 Osram # H8 35W Bulb |
 1/4 Turn Clockwise |
| The OEM (original
equipment manufacturer) light bulb part number in this 2020 EcoSport
Titanium was an Osram H8 12V 35W. Try to avoid touching the glass part of the new halogen bulb with anything oily or greasy. If you do get the new bulb dirty, wipe it clean with a paper towel and some rubbing alcohol. If there is any oil or grease on the new bulb, it may create a hot spot and reduce the lifespan of the bulb. Install the new number H8 bulb into the housing and rotate it 1/4 turn in the clockwise direction to secure it into place. If you would like to have brighter fog lights that will also last much longer before burning out like traditional halogen bulbs, install some compatible replacement H8 LED bulbs. Push the electrical connector straight on to the base of the new fog light bulb. You should feel or hear the power plug "click" securely into place. |
||
 Push In Power Plug |
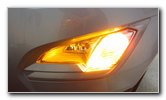
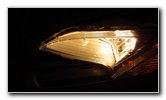 Test New Fog Light Bulb |
 Line Up Ball Mounts |
| Re-attach the
electrical connector for the front turn signal light bulb. If you also need replace the turn signal, the compatible replacement wedge base light bulb part number is 7444NA (also known as 7444A). If you would like to have brighter front turn signal lights that will also last much longer before burning out like the traditional incandescent bulbs, install some 7444NA LED units. I recommend testing the new fog light bulb before you replace the housing. To test the fog light bulbs, turn on the headlights and activate the fog lights. It would also be a good idea to turn on the hazard lights to make sure the front turn signal light bulbs are working properly. Line up the two ball mounts at the end of the metal pegs with their corresponding black plastic sockets on the front of the vehicle. |
||
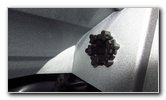 Black Plastic Socket |
 Push To Secure Mounts |
 Light Housing Secured |
| Firmly push on the
light housing to secure the two pegs into their ball sockets. Make sure the light housing is securely in place. |
||
 Tighten Screw Clockwise |
 Line Up Trim Cover |
 Pop In Retaining Clips |
| Replace the screw
at the bottom outer corner by turning it in the clockwise direction with the
Torx T30 screwdriver. Line up the plastic trim ring with the light housing. Carefully insert the plastic tabs on the outer edge. |
||
 Gently Secure Tabs |
 Trim Ring Re-Installed |
 Test Front Turn Signal |
| Gently push on the
retaining clips to secure them into place. Avoid using excessive force. If you have trouble pushing in the retaining clips, remove the trim ring and try again. If you do happen to break any of the clips or tabs, you can always use a small piece of 3M double sided tape to help securely hold the trim ring in place. Don't forget to write down the bulb change in your SUV's service records. For more,
check out all of the
2013-2021 Ford EcoSport DIY Repair & Maintenance Guides. |
||
| If you found this guide to be helpful,
please consider making a small donation by clicking on the PayPal.com
"Donate" button located to the right of this paragraph. Thank you!
(Note: I am not a registered charity. Donations are not tax deductible.) |