
Ford EcoSport
IAT Sensor Replacement Guide
How to change a failing or faulty intake
air temperature sensor in a 2nd generation 2013 to 2021 Ford EcoSport SUV.

By Paul B. Michaels Author & Photographer Auto Mechanic Since 1989 |
||
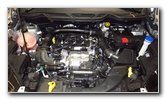
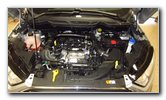 2020 EcoSport 1.0L I3 |
 Engine Air Filter Housing |
 Air Charge Temp. Sensor |
| This automotive
maintenance tutorial was specifically written to assist owners of the second
generation 2013, 2014, 2015, 2016, 2017, 2018, 2019, 2020 and 2021 Ford
EcoSport compact SUV equipped with the EcoBoost turbocharged 1.0 liter
inline three cylinder engine in changing a failing or faulty intake air
temperature (IAT) sensor (also known as the "air charge temperature sensor")
attached to the engine air filter housing. (The procedure should be the same
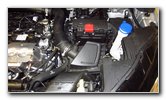
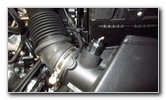
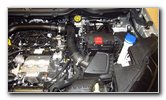
or very similar for the 2.0L I4 and 1.5L I3 engines.) Owners of other Ford or Lincoln vehicles such as the Fiesta, B-Max, Escape, Edge, Bronco Sport, Explorer, Expedition, Transit, Focus, Mondeo, S-Max, Puma, Kuga, Endura, Everest, Ka, Figo, Endeavour, Aviator, Corsair, Nautilus and Navigator may also find these DIY instructions to be helpful. The OEM (original equipment manufacturer) intake air temperature sensor in this 2020 Ford EcoSport Titanium was part number Motorcraft DY1267 (also known as FoMoCo DS7Z12A697A, DS7Z-12A697-A or DS7A 12A697-AA). Two compatible replacement aftermarket IAT sensors include the Delphi TS10542 and WVE 5S16761. Please check the part number on your old sensor before you buy a new one. You can verify the correct part number for your vehicle by using the Amazon Part Finder website. No tools are needed to remove and replace the sensor. If you would like to try cleaning the old sensor before buying a new one, I recommend using CRC Electronic Cleaner spray or a similar cleaning product that is safe for electric components. The first two steps are to open the hood and then move to the right (driver) side of the engine bay. The intake air temperature sensor is located on the top of the engine air filter box attached to the plastic tube near the rubber air hose. |
||
|
|
||
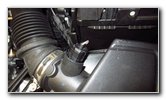
 Push In Release Tab |
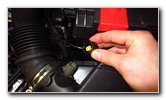 Disconnect Power Plug |
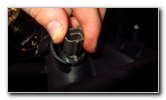 Lift Up & Rotate CC |
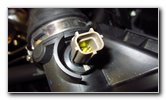
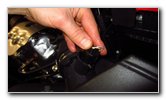
| Gently push in the
release button on the electrical connector before sliding it straight off
the top of the old sensor. There is a small plastic tab on the side of the sensor and a black plastic peg on the top of the air box that secure the sensor in place. Carefully pull the sensor up and rotate it 1/4 turn in the counterclockwise direction to get the gray plastic tab over the black plastic hump. If necessary, you can gently use a small flat head screwdriver to get the tab over the bump. |
||
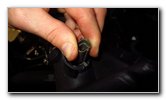 1/4 Turn Counterclockwise |
 Old Sensor Removed |
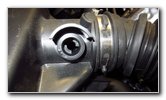 Sensor Port In Air Intake |
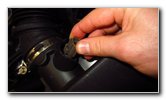
| Once the sensor has
been turned 1/4 turn in the counterclockwise, lift it straight out of the
port in the air box. Inspect the old sensor for any damage, soot or oil deposits. If you'd like to try cleaning the old sensor, you should use a cleaning spray such as CRC Electronic Cleaner that is specifically made for cleaning electrical sensors. Be sure to let the sensor air dry or very gently touch it with a clean paper towel. Don't use compressed air, shake it or wipe it with a towel to avoid damaging the sensor. If possible, buy the original OEM sensor which is Ford (FoMoCo - Ford Motor Company) part number Motorcraft DY1267. |
||
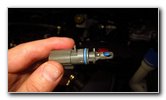
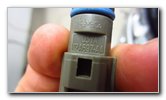 OEM Part Number |
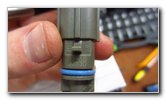 Rubber O-Ring |
 Install New Sensor |
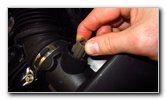
| Insert the new
sensor into the opening in the air box and carefully rotate it 1/4 turn in
the clockwise direction to secure it into place.
You may need to pull up on the sensor in order for the tab to clear the plastic bump or use a small flat head screwdriver. If you have an OBDII scanner (also known as an OBD2 scan tool), some of the IAT related DTC (diagnostic trouble codes) you might see include P0110, P0111, P0112, P0113 and P0114. |
||
 1/4 Turn Clockwise |
 Secure Retaining Tab |
 Push On Power Plug |
| Make sure the new
sensor is securely installed. Push the electrical connector straight on to the top of the new sensor. You should feel or hear the power plug "click" securely into place. |
||
 New Sensor Installed |
 Clear OBDII Codes |
 Start Engine - Test Sensor |
| Clear any IAT
sensor related DTCs with an OBDII scanner or it may be possible to clear
them by disconnecting the negative terminal of the 12V battery for at least
10 to 15 minutes. To test the new sensor, start the engine and see if the CEL / SES warning lights re-appear. Carefully take the car for a test drive to verify that the sensor is working properly. Just a few of the possible symptoms of a dirty, failing or faulty IAT sensor include hard starting, rough idling, reduced fuel economy (lower MPG), stalling, surging, misfiring, stumbling and poor acceleration. Don't forget to write down the sensor change in your car's service records. For more,
check out all of the
2013-2021 Ford EcoSport DIY Repair & Maintenance Guides. |
||
| If you found this guide to be helpful,
please consider making a small donation by clicking on the PayPal.com
"Donate" button located to the right of this paragraph. Thank you!
(Note: I am not a registered charity. Donations are not tax deductible.) |