
Ford Explorer
12V Automotive Battery Replacement Guide
How to change the 12 volt car battery in
the engine bay of a fifth generation 2011 to 2015 Ford Explorer SUV with
pictures.

By Paul B. Michaels Author & Photographer Auto Mechanic Since 1989 |
||
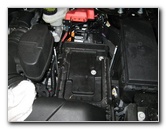
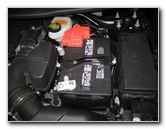 2014 Explorer 12V Battery |
 Loosen 10mm Nut |
 Pull Off Negative Terminal |
| This
automotive maintenance tutorial was specifically written to assist
owners of the fifth generation (2011, 2012, 2013, 2014 & 2015) Ford
Explorer SUV in changing a dead 12V car battery in the engine bay. Owners of other Ford or Lincoln vehicles such as the Fusion, Mustang, Taurus, Escape, Edge, Flex, Expedition, F-150, Focus, C-MAX, MKC, MKZ, MKX, MKS, MKT and Navigator may also find these DIY instructions to be helpful. A few compatible replacement "Group Size 65" batteries with their part numbers include the following: ACDelco 65AGM, EverStart Plus 65-3, EverStart MAXX-65N, Bosch 65-850B, AutoCraft 65-1 or AutoCraft 65-2, Duralast 65-AGM, and Valucraft 65-VL. The tools needed to complete this procedure include a deep well 10mm socket with a 1/4" drive ratchet or a standard 10mm wrench. |
||
|
|
||
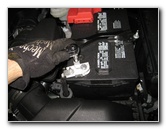
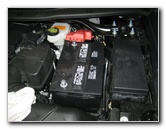
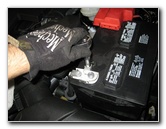
 Loosen Battery Clamp Nut |
 Loosen 2nd 10mm Nut |
 Battery Hold Down Bar |
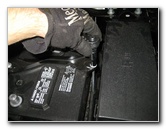
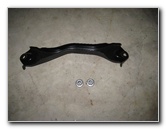
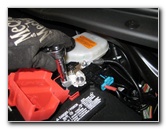
| I'd recommend
putting on gloves and protective eye wear before beginning this procedure. Loosen the nut on the "-" negative terminal (closer to the front of the vehicle) by turning it counterclockwise with a 10mm socket and ratcheting wrench. Pull the terminal straight off the negative battery post, wrap it in a towel to prevent accidental contact and tuck it away on the side of the battery. Loosen the two nuts on the top of the black metal battery clamp or "hold down bar" by turning them counterclockwise with a deep well 10mm socket and 1/4" drive ratcheting wrench or use a standard 10mm wrench. Spin off the two nuts and lift the clamp off the top of the battery. Set the two 10mm nuts and bar aside in a safe place. The two silver metal "J" hook bars should remain attached to the battery tray. |
||
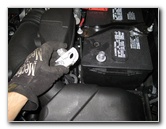
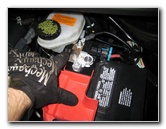
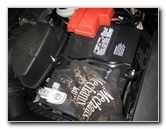
 Battery Clamp Removed |
 Pull Off Plastic Cover |
 Loosen 10mm "+" Nut |
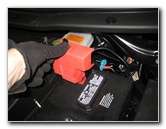
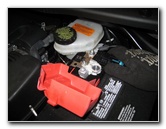
| Lift the red
plastic cover off the "+" positive battery terminal.
Loosen the nut on the positive terminal by turning it counterclockwise with the 10mm socket and ratcheting wrench. |
||
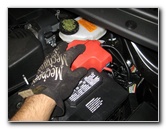
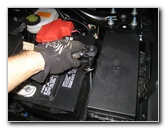
 Loosened Counterclockwise |
 Pull Off Positive Terminal |
 Remove Old 12V Battery |
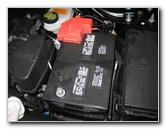
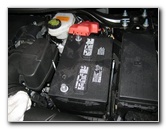
| Pull the positive
terminal straight off the battery post, close the plastic cover and tuck it
away on the side of the battery. Lift the old battery off the plastic tray and straight out of the engine bay. Try to avoid tipping the battery at an angle or having it collide with other components. The OEM 12V car battery in this 2014 Explorer is Motorcraft part number BXT-65-650. I recommend buying the ACDelco 65AGM since it has excellent reviews on Amazon. |
||
|
|
||
 Clean Plastic Battery Tray |
 Lower In New Battery |
 Push On Positive Terminal |
| Make sure the
plastic battery tray is clear of any debris that might cause the battery to
not rest evenly. Carefully lower the new battery down in to the engine bay with the "-" negative side located closer to the front of the SUV. If you've had a problem with corrosion (white or blue powder) building up on the battery terminals or the battery posts, I'd recommend installing some felt anti-corrosion washers over the battery posts. Push the "+" positive terminal (red cable) down on to the positive battery post, which should be located closer to the rear of the engine bay. Tighten the battery terminal by turning the 10mm nut clockwise until it is snug. Avoid over tightening the terminal nut to prevent from damaging the battery post. |
||
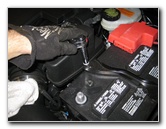
 Tighten & Close Cover |
 Push On Negative Terminal |
 Tighten 10mm Clockwise |
| Close the red
plastic cover over the positive terminal. Push the "-" terminal on to the negative battery post (located closer to the front of the vehicle) and tighten the 10mm nut in the clockwise direction until it is snug. Avoid over tightening the terminal nut to prevent from damaging the negative battery post. |
||
 Battery Hold Down Bar |
 Tighten 10mm Nut |
 Tighten 2nd Clamp Nut |
| Lower the black
metal hold down clamp over the tops of the two "J" hook bars. Spin on the two nuts by hand a few turns in the clockwise direction to prevent them from becoming cross threaded. Tighten the two 10mm nuts in the clockwise direction until they are snug. Check that the battery is securely held in place. If the battery can be moved in any direction, tighten the two nuts on the "J" hook bars a few extra turns. Test the new battery by starting the engine and turning on the headlights. Be sure to adjust the time on the clock and record the battery change in your vehicle's service records. For more, check out my other
Ford Explorer DIY Repair & Maintenance Guides. |
||
| If you found this guide to be helpful,
please consider making a small donation by clicking on the PayPal.com
"Donate" button located to the right of this paragraph. Thank you!
(Note: I am not a registered charity. Donations are not tax deductible.) |