
Ford Flex 12V
Automotive Battery Replacement Guide
How to change a weak or dead 12 volt car
battery in a 1st generation 2009 to 2019 Ford Flex with the 3.5L V6.

By Paul B. Michaels Author & Photographer Auto Mechanic Since 1989 |
||
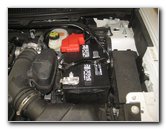
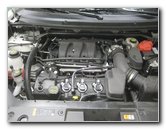 2019 Flex 3.5L V6 Engine |
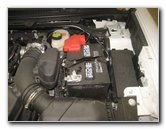 12 Volt Car Battery |
 Loosen Negative Terminal |
| This automotive
maintenance tutorial was specifically written to assist owners of the first
generation (2009, 2010, 2011, 2012, 2013, 2014, 2015, 2016, 2017, 2018 &
2019) Ford Flex crossover SUV in changing a weak or dead 12V automotive
battery for the Duratec 35 3.6 liter V6 engine. Owners of other Ford or Lincoln vehicle such as the Explorer, Fiesta, Focus, Fusion, C-Max, Mustang, Taurus, EcoSport, Escape, Edge, Expedition, Transit Connect, F-150, Ranger, MKZ, MKC, Navigator, MKX and Continental may also find these DIY instructions to be helpful. The procedure should be the same or very similar for the EcoBoost 3.5L V6 engine. The OEM battery "Group Size" is 65 and the genuine Ford part number is Motorcraft BXT-65-650. A few compatible replacement group size 65 batteries with their part numbers include the following: Odyssey 65-PC1750T, ACDelco 65AGMHR and EverStart MAXX-65N (at Walmart). The tools needed to complete this procedure include a 10mm socket with a 1/4" drive ratchet and a 10mm wrench or a deep well 10mm socket. You may also need a plastic pry bar tool or a flathead screwdriver to disconnect the large blue plastic electrical connector on the positive terminal. |
||
|
|
||
 Cover & Tuck Away |
 Loosen Clamp Nuts |
 Loosen Counterclockwise |
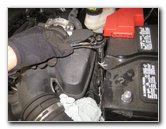
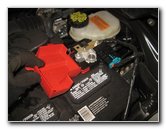
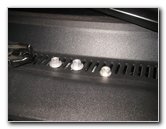
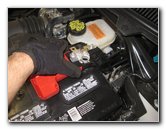
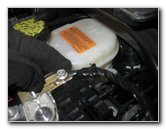
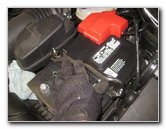
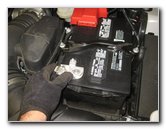
| The first two steps
are to open the hood and then move to the right (driver) side of the engine
bay. The 12 volt car battery is located just behind the engine air filter box and to the left of the electrical fuse box. Loosen the nut on the negative "-" terminal a few turns in the counterclockwise direction with a 10mm socket and a 1/4" drive ratchet. Carefully pull the negative terminal off the "-" battery post. Wrap the terminal in a small towel and tuck it away on the left side of the battery to help prevent accidental electrical contact. Then loosen the two nuts on the top of the battery hold down bar or "clamp" with the deep well 10mm socket and a 1/4" or 3/8" drive ratchet. |
||
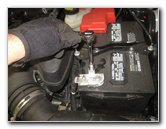
 Two Nuts Removed |
 Lift Off Hold Down Bar |
 Open Red Plastic Cover |
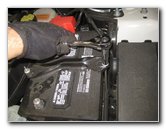
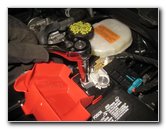
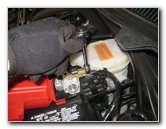
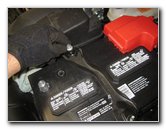
| Set the two nuts
aside in a safe place. Carefully lift the hold down bar off the top of the old battery. Avoid making contact with the battery terminals or posts. Set the hold down clamp aside in a safe place. Pull open the red plastic cover on the positive "+" terminal. |
||
 Loosen Counterclockwise |
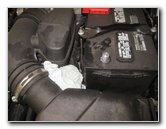
 Push In Release Tab |
 Slide Out Connector |
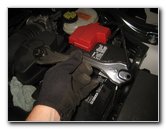
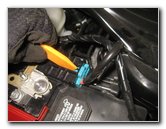
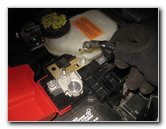
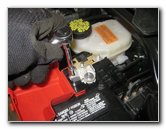
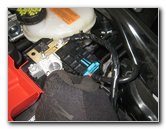
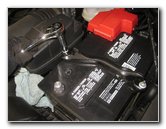
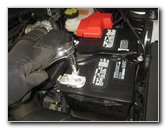
| Loosen the nut on
the positive terminal by turning it in the counterclockwise direction with a
10mm socket and a 1/4" drive ratchet. Then use a plastic pry bar tool or a flathead screwdriver to push down the release button on the aqua blue electrical connector. Slide the blue power plug straight out of its socket. |
||
 Remove Cable Connector |
 Three Nuts Removed |
 Pull Off Ring Terminal |
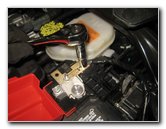
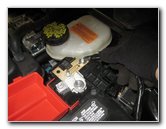
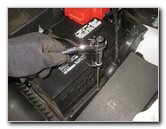
| There is also a
black cable with a ring connector attached to the positive terminal. Remove the 10mm nut on the ring connector by turning it in the counterclockwise direction. Set the 10mm nut aside in a safe place. Pull the black cable off the positive terminal. |
||
 Pull Off Positive Terminal |
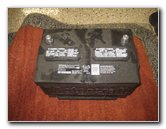 Remove Old 12V Battery |
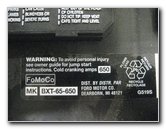 FoMoCo BXT-65-650 |
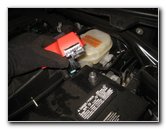
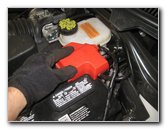
| Pull the positive
terminal off the battery post. Close the red cover and tuck the terminal away on the left side of the old battery. Carefully lift the old battery out of the engine bay. Gently set the old battery down on the ground. Avoid dropping it or tipping it over to prevent from having acid leak out. The original OEM battery in this 2019 Flex was the FoMoCo (Ford Motor Company) Motorcraft BXT-65-650. If you can wait a few days for delivery, I recommend buying the Odyssey 65-PC1750T battery since it has excellent reviews on Amazon and can last up to 10 years. Be sure to take the old battery to an auto parts store or Walmart to have it properly recycled. If you purchase a battery at a store, you can also avoid having to pay a "core", recycling or an environmental disposal fee. |
||
|
|
||
 Clean Off Plastic Tray |
 Lower In New Battery |
 Replace Positive Terminal |
| Clean off any
debris on the black plastic battery tray so that the new battery will rest
evenly on it. Gently lower the new battery into the engine bay. The positive post should be situated at the back of the engine bay and the negative post should be located closer to the front of the SUV. If you've had a problem with corrosion (white or blue powder) building up on the terminals and battery posts, consider installing some felt anti-corrosion washers over the posts. Lower the positive terminal over the "+" battery post. Tighten the terminal nut in the clockwise direction with the 10mm socket and a ratchet until it is snug. |
||
 Replace Black Cable |
 Spin On 10mm Nut |
 Tighten Clockwise |
| Lower the ring
terminal at the end of the black cable over the threaded post.
Spin on the 10mm nut in the clockwise direction. Tighten the nut with the socket and ratchet until it is snug. |
||
 Push In Blue Connector |
 Close Red Plastic Cover |
 Replace Hold Down Bar |
| Push the light blue
electrical connector straight into it's socket until it "clicks" securely in
place. Swing the hinged red plastic cover over the positive terminal. Lower the hold down bar over the new battery. Avoid making contact with the terminals or posts. |
||
 Spin On 10mm Nuts |
 Deep Well Socket |
 Tighten Nuts Clockwise |
| Spin on the two
10mm nuts in the clockwise direction and tighten them until they are snug. Check to make sure the new battery can not be rocked, slid or moved around on the tray. If the new battery does move, tighten the two nuts on the clamp an extra turn or two. |
||
 Push On Negative Terminal |
 Tighten Terminal Nut |
 12V Battery Replaced |
| Carefully push the
negative terminal on to the "-" battery post. Tighten the nut in the clockwise direction with the 10mm socket and a 1/4" drive ratchet until it is snug. Try to avoid over tightening the terminal nut to prevent from cracking or damaging the battery post which could lead to an acid leak. To test the new battery, start the engine and flash the high beam headlights. Please remember to adjust the time on the clock and program your favorite radio stations before you start driving. Be sure to record the battery change in your vehicle's service records. If you often leave your vehicle parked for weeks at a time or only make short trips on a daily basis, I highly recommend using a Battery Tender Junior trickle charger. If you have to park outside, you can use a solar trickle charger. The best way to prolong the life of lead-acid car batteries is to keep them fully charged on a float charger and prevent deep discharges below 80% of capacity. Please
check out all of my
Ford Flex DIY Repair & Maintenance Guides. |
||
| If you found this guide to be helpful,
please consider making a small donation by clicking on the PayPal.com
"Donate" button located to the right of this paragraph. Thank you!
(Note: I am not a registered charity. Donations are not tax deductible.) |