
Chevrolet
Equinox Door Panel Removal Guide
How to remove the front door panels of a
2nd generation 2010-2016 GM Chevy Equinox with photo illustrated steps.

By Paul B. Michaels Author & Photographer Auto Mechanic Since 1989 |
||
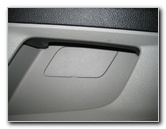
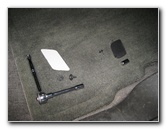
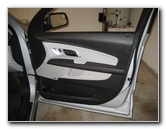 2012 Equinox Door Panel |
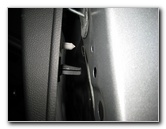
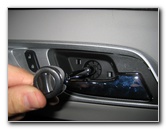
 Door Handle Trim Panel |
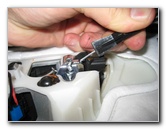
 Pry Out - Small Flathead |
| This
automotive "how-to" guide was specifically written to assist owners
of the second generation (2010, 2011, 2012, 2013, 2014, 2015 & 2016) GM Chevy Equinox
in removing the interior door panels in order to upgrade the OEM
speakers, add soundproofing material, replace a power window motor
or fix a faulty switch. Owners of other GM vehicles such as the Spark, Sonic, Cruze, Volt, Malibu, Impala, Camaro, Corvette, Traverse, Tahoe, Suburban, Colorado, Avalanche, Silverado, Verano, Encore, Regal, LaCrosse, Encore, Enclave, Canyon, Sierra, Terrain, Acadia, Yukon, Savana, ATS, XTS, CTS, SRX and Escalade may also find these DIY instructions to be helpful. The tools needed to take off the door panel include a 7mm socket, 8mm socket, extension bar, a 1/4" drive ratchet, a small flathead screwdriver and a large flathead screwdriver or an automotive panel removal pry bar tool. The OEM door speaker screws are 7mm and the power window motor bolts are 10mm. |
||
|
|
||
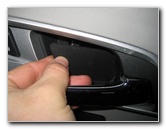
 Trim Piece Removed |
 Door Pull / Arm Rest Trim |
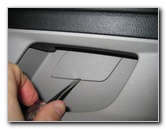 Pry Out Trim Panel |
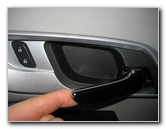
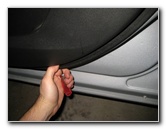
| In order to take
off the door panel, you'll need to remove two trim panels and three screws. The first screw is behind the door opener handle and under a rectangular cover. Pry off the trim piece with the small flathead screwdriver and set it aside in a safe place. Remove the single screw behind the door opener handle with the 7mm socket attached to an extension bar and ratcheting wrench by turning it counter clockwise. |
||
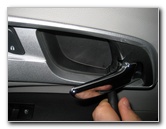
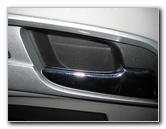
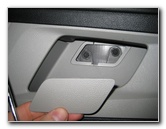 Screw Cover Removed |
 Remove 7mm Screw |
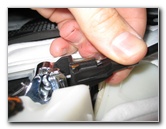
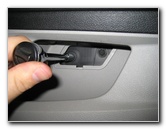 Remove Two 8mm Screws |
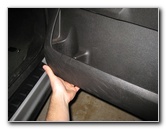
| The last two screws
are located behind a rectangular trim piece just behind the door pull handle
and below the arm rest. Pry off the trim panel with the flathead screwdriver and set it aside. Remove the two screws with the 8mm socket attached to the extension bar and ratcheting wrench by turning them counter clockwise. Set them aside with the other screw and trim pieces. |
||
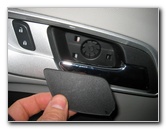
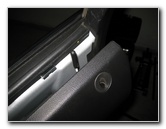
 2 Covers, 3 Screws |
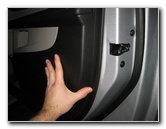
 Pry Off Bottom of Panel |
 Pull Out Friction Fasteners |
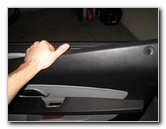
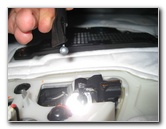
| Move to the bottom
edge of the door panel, carefully insert a small flathead screwdriver
underneath it, and pull it away from the door frame.
If you have trouble pulling out the bottom of the panel, you might need to use an automotive panel removal tool. Continue pulling the door panel away from the frame all along the bottom and two sides to disengage the friction or "pop rivet" fasteners |
||
 Pop Rivets Removed |
 Lift Door Panel Off Frame |
 Power & Door Cable |
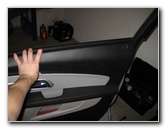
| Lift the door panel up and off the door frame. Angle the top of the door panel towards yourself and support the bottom with your thighs. | ||
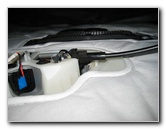
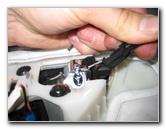
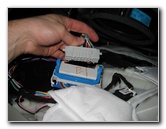
 Flip Up Blue Latch |
 Disconnect Power Plug |
 Pry Up Black Plastic Clip |
| Flip the blue bar
on the power connector plug up and towards yourself to unlock it. Pull the
power connector straight out of the socket. Pry the black plastic clip on the collar of the door opener cable and pull it off the bracket. |
||
|
|
||
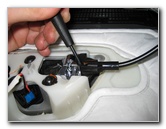
 Door Opener Cable Released |
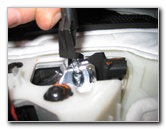 Swing Out Cable |
 Lift Metal Ball Out Socket |
| Swing the cable out towards the front of the vehicle and lift the metal ball at the end out of its socket. | ||
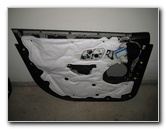 Front Door Panel Removed |
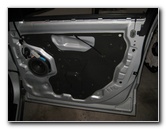 Metal Door Frame |
 OEM Door Speaker |
| Pull the door panel away from the door frame and set it aside in a safe place. | ||
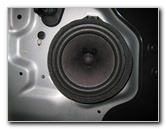
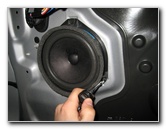 Remove 7mm Screws |
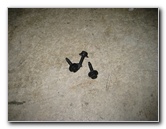 3 - 7mm Speaker Screws |
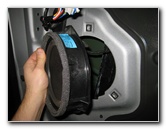 Pull Off Speaker |
| To take off the OEM
door speaker, remove the three 7mm screws with the socket and ratcheting
wrench. Pull the speaker out of the door frame and press the release button on the power connector plug before sliding it straight out. Check out the aftermarket speaker options at Amazon. To help reduce road noise and make your new speakers sound better, apply some Dynamat Sound Deadener to the metal door frame. It will stop vibrations and rattles when you crank up the volume. |
||
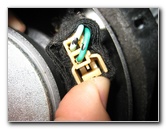 Power Plug Release Button |
 Lift Insulation - Window Motor |
 Re-Connect Power Plug |
| The power window motor is located below the rubber insulation and is held in place by three 10mm bolts. | ||
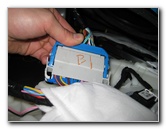 Snap Closed Blue Latch |
 Insert Metal Ball In Socket |
 Snap Clip On Bracket |
| To replace the door
panel, hold it near the door frame and push in the light grey power
connector for the door lock and window switch. Flip the blue latch down to lock the power plug in place. Insert the metal ball at the end of the door opener cable in to its socket. Swing the cable towards the door panel and attach the black plastic clip to the bracket. |
||
 Insert Door Lock Stalk |
 Hang Door Panel On Frame |
 Line Up Friction Fasteners |
| Lower the door
panel down to the door frame while inserting the door lock stalk in to its
hole. Line up the friction fasteners on the rear of the door panel with their corresponding holes in the metal door frame. |
||
 Push On Door Panel |
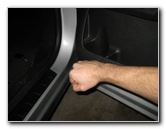 Tap Edges To Secure |
 Tighten Two 8mm Screws |
| Gently push the pop rivets in place and then tap all around the edges of the panel to secure them. | ||
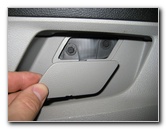 Line Up Screw Cover |
 Snap Trim Piece In Place |
 Replace 7mm Screw |
| Tighten the two 8mm
screws behind the door pull handle and pop the trim piece back in place. Replace the single 7mm screw behind the door opener handle and snap in the plastic cover. |
||
 Line Up Screw Cover |
 Snap Trim Piece In Place |
 Door Panel Replaced |
| Check that the door
opener handle, door lock stalk, power door lock switch, and power window
switch all work properly. For more,
check out my other
GM
Chevrolet Equinox DIY Repair Guides. |
||
| If you found this guide to be helpful,
please consider making a small donation by clicking on the PayPal.com
"Donate" button located to the right of this paragraph. Thank you!
(Note: I am not a registered charity. Donations are not tax deductible.) |