
Chevrolet
Equinox LFW V6 Engine Oil Change Guide
How to change the motor oil and replace
the oil filter in a 2011 to 2012 Chevy Equinox with the LFW 3.0L V6 engine.

By Paul B. Michaels Author & Photographer Auto Mechanic Since 1989 |
||
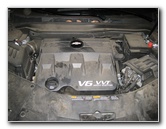 2012 Equinox LFW V6 |
 SAE 5W-30 Oil |
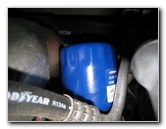
 Twist Off Oil Filler Cap |
| This
automotive "how-to" guide was specifically written to assist owners
of the 2011 and 2012 GM Chevy Equinox with the LFW 3.0 liter V6
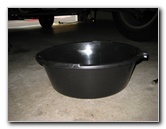
engine in changing the motor oil and replacing the oil filter. Owners of other GM vehicles with the LFW engine such as the GMC Terrain, Cadillac STS and Captiva Sport may also find these instructions to be helpful. The procedure should be similar for vehicles with the LF1 or LFX engines such as the Camaro, LaCrosse, CTS, ATS, XTS, SRX, Malibu and Impala. The tools and other items needed to complete this oil change include a floor jack, jack stands, a 15mm socket with ratcheting wrench or a 15mm wrench, a used oil catch container an automotive funnel, a new oil filter and 6 quarts of new SAE 5W-30 oil. A few compatible oil filters include the following with their part numbers: Mobil 1 M1-212, Fram PH10575, Wix 57060, Purolator L22500, K&N PS-2011, Royal Purple 20-500 and Pennzoil PZ-173. |
||
|
|
||
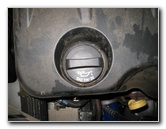
 Pull Up Yellow Dipstick |
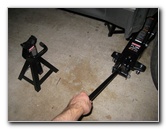
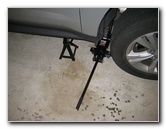 Raise Front of Vehicle |
 Engine Oil Pan |
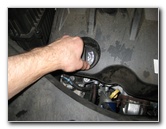
| The first two steps
are to warm up the engine for a few minutes and then park it on a level
surface. Warming up the engine helps suspend any contaminants within the old
oil and allow it to drain out more quickly. Then engage the emergency / parking brake and chock the rear wheels to prevent the vehicle from moving. Pop open the hood, twist off the oil filler cap in the counter clockwise direction and lift up the yellow handled oil level dipstick. Removing the oil cap and partially removing the dipstick will help prevent a vacuum from forming and allow the old oil to drain out more quickly. Raise the front of the vehicle and securely support it with at least two jack stands. |
||
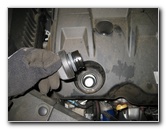
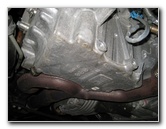
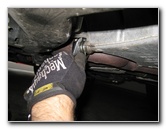
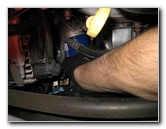
 15mm Oil Drain Bolt |
 Obstructed By Exhaust |
 Use 15mm Wrench |
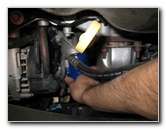
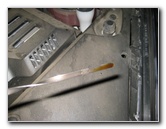
| Slide under the
front passenger side of the engine with the used oil catch basin, a 15mm
socket and a ratcheting wrench. The oil drain bolt is located on the back of the silver metal oil pan facing the rear of the vehicle. Move the used oil catch container to just below the oil drain bolt. Since an exhaust pipe was in the way, I had trouble getting my 15mm socket on the oil drain bolt. I had to use an adjustable crescent wrench. It would be best to use a standard 15mm metric wrench to avoid stripping the bolt. Loosen the oil drain bolt by turning it counter clockwise and then spin it out by hand.
|
||
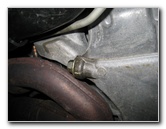
 Drain Old Oil |
 Replace Oil Drain Bolt |
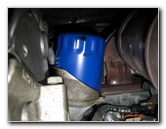 Old Oil Filter |
| Allow the old oil
to drain out for at least a few minutes or until it slows to an occasional
drip. Replace the oil drain bolt and thread it in by hand a few turns to prevent it from becoming cross threaded. The oil filter is located just in front of the oil pan. It can be accessed either from underneath the engine or above the engine. |
||
|
|
||
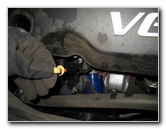
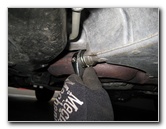
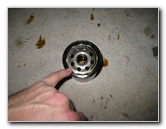
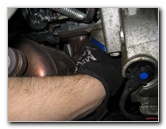 Twist Off Old Oil Filter |
 From Below Engine |
 Remove From Above Engine |
| Slide the used oil
catch catch container forward to underneath the old oil filter. I found it easier to twist off the old oil filter by reaching in from above through the engine bay. Spin off the old oil filter in the counter clockwise direction. If you have trouble turning the oil filter, you may need an oil filter wrench such as the Lisle 63600. I recommend buying the Mobil 1 M1-212 oil filter since it has excellent reviews on Amazon. A inexpensive option is the Fram PH10575 which also has great reviews. |
||
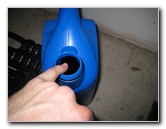 Dip Pinky Finger In Oil |
 Lubricate Rubber O-Ring |
 Oil Draining From Filter |
| Dip your pinky
finger in some new SAE 5W-30 oil and lubricate the rubber o-ring on the new
oil filter.
Lubricating the o-ring will allow it to form a better seal and make it easier to remove the filter at the next oil change. Double check that the rubber o-ring from the old oil filter is not still attached to the engine. |
||
 Twist On New Oil Filter |
 Lower Vehicle From Stands |
 Insert Automotive Funnel |
| Spin on the new oil
filter by hand in the clockwise direction to about 1/2 to 3/4 turn past hand
tight. Do not over tighten the new oil filter or use the oil filter wrench to tighten it. Over tightening the oil filter may damage the o-ring and cause a leak to develop. Double check that the oil drain bolt and new oil filter are tight before moving on to the next steps. |
||
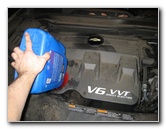 Pour In New 5W-30 Oil |
 Twist On Oil Cap |
 Check Dipstick Oil Level |
| Lower the vehicle
from the jack stands using the floor jack. Insert an automotive funnel in to the oil filler hole and pour in about 5 quarts of the LFW 3.0L V6 engine's 6 quart total capacity for an oil change with filter replacement. Temporarily replace the oil filler cap, run the engine for a minute, shut it off, and allow the oil to drain back to the oil pan for at least 5 minutes. Pull out the yellow handled dipstick and check the oil level. If necessary, slowly add more oil until the level on the dipstick reaches at or just below the upper hole in the dipstick. You may not need to pour in the entire 6 quarts of new SAE 5W-30 oil depending on how long you allowed the old oil to drain out. It is much better to have a little less than enough oil in an engine rather than too much. Once the oil level is correct, twist on the oil filler cap. The steps to reset the engine oil life system are as follows: 1. Turn the iginition to the "On" position but don't start the engine. 2. Press the DIC Menu button to display the vehicle info menu. 3. Press the up or down arrows until the remaining oil life is displayed. 4. Press and hold the "SET/CLR" button until it resets to 100%. 5. Turn the ignition key to "Off". Be sure to record the oil change in your vehicle's service records. It's also a good idea to watch your driveway or parking spot for drops of oil and check the oil level on the dipstick during the next few days. For more,
check out my other
GM
Chevrolet Equinox DIY Repair Guides. |
||
| If you found this guide to be helpful,
please consider making a small donation by clicking on the PayPal.com
"Donate" button located to the right of this paragraph. Thank you!
(Note: I am not a registered charity. Donations are not tax deductible.) |