
Mazda CX-9
Tail Light Bulbs Replacement Guide
How to replace the rear turn signal,
side marker & reverse bulbs in the tail light assembly of a 2007-2015 Mazda CX-9.

By Paul B. Michaels Author & Photographer Auto Mechanic Since 1989 |
||
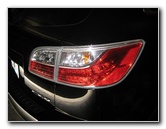 Mazda CX-9 Tail Light |
 Turn Signal & Sidemarker |
 Reverse / Back Up Lamp |
| This
automotive "how-to" guide was specifically written to assist owners
of the 2007, 2008, 2009, 2010, 2011, 2012, 2013, 2014 & 2015 Mazda CX-9 SUV in replacing any of the bulbs in the
tail light assemblies. Owners of other Mazda vehicles such as the MAZDA2, MAZDA3, MAZDA6, MX-5 Miata, RX-8, MAZDASPEED3, MAZDA5, Tribute SUV, and CX-7 crossover may also find this guide to be helpful. The tail light assembly of a '07-'15 Mazda CX-9 contains the following light bulbs with their respective part numbers: Rear Turn Signal # 7440A (or # 992), Reverse / Back Up # 7440 and Rear Side Marker / Parking Light # 2825. The only tool needed to replace the bulbs is a standard Phillips head screwdriver. The bulbs are available from a variety of manufacturers such as Sylvania, GE, PIAA, Philips, Eiko, and Nokya. |
||
|
|
||
 Open Cargo Liftgate |
 Remove 2 Phillips Screws |
 Pull Off Tail Light Assembly |
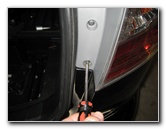
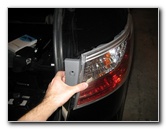
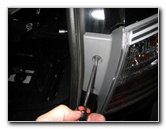
| The first step is
to open the rear cargo lift gate to expose the two Phillips head screws that
secure each of the tail light assemblies to the rear of corners of the
vehicle.
Use a standard sized Phillips head screwdriver to remove the two screws before carefully pulling the tail light assembly away from the car. |
||
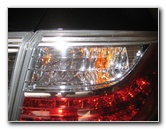
 Turn Over Assembly |
 1/4 Turn Counter Clockwise |
 Remove Turn Signal Bulb |
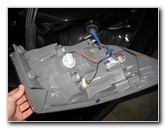
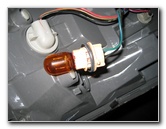
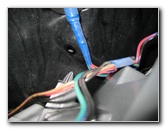
| Flip over the tail
light assembly and set it down on the bumper. Put a towel or shop rag in
between the tail light assembly and the bumper to protect the paint.
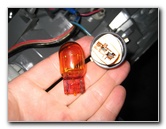
The brake or "stop" lights (largest light grey power connector) are LED bulbs that last a very long time and will likely never need to be replaced. To access the rear turn signal light bulb, rotate the medium sized light tan bulb socket 1/4 turn counter clockwise and pull it straight out of the tail light. Remove the old # 7440A (or # 992) amber colored bulb straight out of the socket and replace it with a new one. Insert the turn signal bulb and socket back into the assembly before turning the base 1/4 turn clockwise to secure it in place. |
||
 Pull Out Old # 7440A Bulb |
 1/4 Turn Counter Clockwise |
 Remove Parking / Sidemarker |
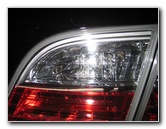
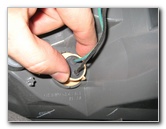
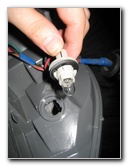
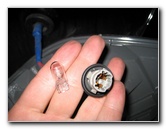
| The small light
grey bulb socket on the rear of the tail light assembly contains the rear
side marker or "parking" light. Rotate the base 1/4 turn counter clockwise
and pull it straight out of the assembly.
Pull the old # 2825 light bulb straight out of the socket and push in a new one. Re-insert the bulb and socket back into the tail light assembly and rotate it 1/4 clockwise to secure it in place. |
||
 Pull Out Old # 2825 Bulb |
 "Spike" & Metal Hole |
 Replace Two Phillips Screws |
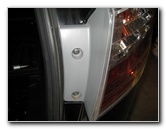
| Once the turn
signal and/or side marker light bulbs have been replaced, line up the grey
plastic "spike" fastener on the rear of the tail light assembly with the
hole in the metal body work on the vehicle before pushing the tail light
back into place.
Replace the two Phillips head screws and tighten them to secure the tail light to the rear of the vehicle. |
||
 Access Panel On Lift Gate |
 Pull Off Plastic Panel |
 1/4 Turn Counter Clockwise |
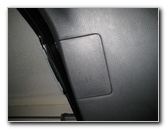
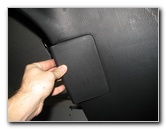
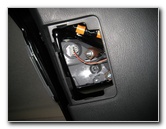
| The reverse or
"back up" light is hidden behind a rectangular plastic access panel on the
rear of the cargo lift gate.
Pry off the plastic access panel with your fingers to reveal the light grey reverse light bulb socket. |
||
 Remove Reverse Light |
 Pull Out Old # 7440 Bulb |
 Test New Tail Light Bulb(s) |
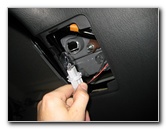
| Rotate the reverse
light bulb socket 1/4 turn counter clockwise and pull it straight out of the
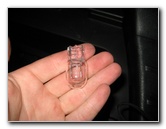
cargo lift gate. Remove the old # 7440
bulb by pulling it straight out of
the socket.
Push in a new # 7440 bulb, insert the bulb and socket back into the rear of the lift gate and rotate it 1/4 turn clockwise to secure it in place. Test the new tail light bulbs by activating the hazard signals, turning on the parking lights, and having someone put the transmission in reverse while holding the brake pedal down. For more,
check out my
Mazda CX-9 Repair & Maintenance Guides page. |
||
| If you found this guide to be helpful,
please consider making a small donation by clicking on the PayPal.com
"Donate" button located to the right of this paragraph. Thank you!
(Note: I am not a registered charity. Donations are not tax deductible.) |