
MINI Cooper
MAF Sensor Replacement Guide
How to clean or change the Mass Air Flow
sensor in a 3rd generation 2014 to 2020 MINI Cooper Hatch convertible.

By Paul B. Michaels Author & Photographer Auto Mechanic Since 1989 |
||
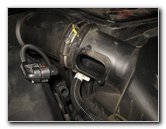
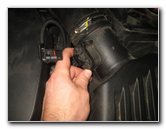
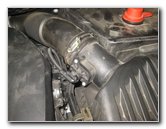
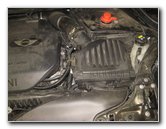 2019 MINI Engine Air Box |
 MAF Sensor Location |
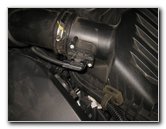
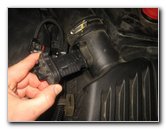
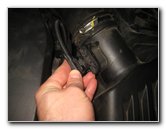
 Loosen Counterclockwise |
| This automotive
maintenance tutorial was specifically written to assist owners of the 3rd
generation (2014, 2015, 2016, 2017, 2018, 2019 and 2020) MINI Cooper in
checking, cleaning or changing the MAF (mass air flow or "airflow") sensor
in the air box for the TwinPower Turbo 1.5L three cylinder engine. Owners of other MINI models or some smaller BMW vehicles such as the Cooper S, "JCW" John Cooper Works, Convertible, Hatch, Clubman, One, One First, One D, Coupe, Roadster, Countryman, Paceman, 3 Series, 318i, 328i, 320i, 323i, 325i, 330i, 340i, 230i, M240i, M2, M3, M4, i3, 228i, 230i, 128i, 135i, Z3, Z4 and Z8 may also find these DIY instructions to be helpful. The original OEM compatible replacement mass air flow sensor is part number Bosch 0280218266 (also known as # 0 280 218 266 or 0-280-218-266). A few symptoms of a dirty or faulty MAF sensor include stalling, hesitation, jerking or if the engine has a rough idle. If you have an OBDII Code Scan Tool, you may see some MAF related DTC (diagnostic trouble codes) such as P0100, P0101 and P0102. The only tool needed to remove and replace the MAF sensor is a Torx T20 star bit screwdriver. If you would like to try cleaning the old sensor before buying a new one, use some CRC Mass Air Flow Sensor Cleaner spray. |
||
|
|
||
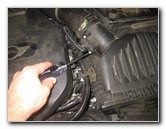
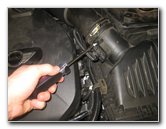
 Remove Second Screw |
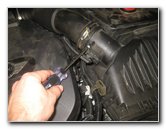
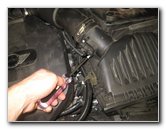
 Slide Out of Air Intake |
 MAF Sensor Removed |
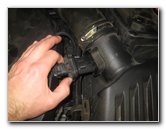
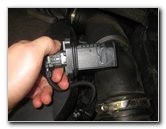
| The first two steps
are to open the hood and then move to the right side of the engine bay
(close to the driver side of the vehicle). Locate the MAF sensor attached to the left side of the air intake tube. Remove the two screws that secure the MAF sensor to the air intake hose by turning them in the counterclockwise direction with a Torx T-20 star bit screwdriver. Set the two screws aside in a safe place. Then carefully slide the old sensor straight out of the air intake. |
||
 Pry Out White Lock Tab |
 Locking Tab Released |
 Push In Tab - Disconnect |
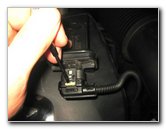
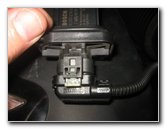
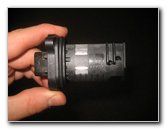
| Turn over the MAF
sensor and rest it on the engine cover. Use a small flathead screwdriver to gently slide out the white plastic lock tab on the electrical connector. Then push in the release button and slide the power plug straight out of its socket on the old sensor. |
||
 Inspect Old Sensor |
 |
 |
| Inspect the old
sensor for any contamination with soot from driving in heavy traffic. If you would like to try cleaning the old sensor before buying a new one, clean it with some CRC Mass Air Flow Sensor Cleaner spray. |
||
|
|
||
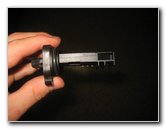
 OEM Bosch MAF Part |
 Opening In Air Intake Tube |
 Slide Into Air Intake Hose |
| The original part
number in this 2019 MINI Cooper Hatch convertible is
Bosch 0280218266. Orientate the new sensor with the screw holes in the correct position. Slide the new sensor into the port in the air intake assembly. |
||
 New Sensor Installed |
 Push In Power Plug |
 Slide In White Lock Tab |
| Push the electrical
connector straight into the socket on the new sensor. You should hear or feel the connector "click" securely into place. Slide the white plastic locking tab towards the sensor to secure the power plug. |
||
 Replace Two Screws |
 Tighten Clockwise |
 MAF Sensor Replaced |
| Replace the two
screws by turning them in the clockwise direction with a
Torx T-20 screwdriver until they
are snug. Try to avoid over tightening the screws to prevent from cracking the plastic sensor housing. If you previously had a SES (service engine soon) or CEL (check engine light) displayed on the dashboard, clear the error code with your OBD2 Code Scanner. Be sure to record the sensor change in your vehicle's service records. For more,
check out all of my
MINI Cooper DIY Repair & Maintenance Guides. |
||
| If you found this guide to be helpful,
please consider making a small donation by clicking on the PayPal.com
"Donate" button located to the right of this paragraph. Thank you!
(Note: I am not a registered charity. Donations are not tax deductible.) |