
MINI Cooper
Rear Fog Light Bulb Replacement Guide
How to change a burnt out rear fog light
bulb in the bumper cover of a 3rd generation 2014 to 2020 MINI Cooper.

By Paul B. Michaels Author & Photographer Auto Mechanic Since 1989 |
||
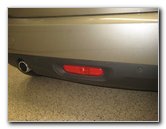 2019 MINI Rear Fog |
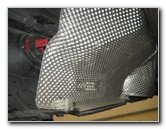 Exhaust Heat Shield |
|
| This automotive
maintenance tutorial was specifically written to assist owners of the 3rd
generation (2014, 2015, 2016, 2017, 2018, 2019 and 2020) MINI Cooper in
changing a burnt out rear fog light bulb in the back bumper cover. Owners of other MINI models or some smaller BMW vehicles such as the Cooper S, "JCW" John Cooper Works, Convertible, Hatch, Clubman, One, One First, One D, Coupe, Roadster, Countryman, Paceman, 3 Series, 318i, 328i, 320i, 323i, 325i, 330i, 340i, 230i, M240i, M2, M3, M4, i3, 228i, 230i, 128i, 135i, Z3, Z4 and Z8 may also find these DIY instructions to be helpful. The replacement miniature wedge base light bulb part number is 921 also known as a W16W. If you would like to have a brighter rear fog light, install a compatible 921 LED bulb. No tools are needed to access and replace the bulb. (Please note, some MINI models in the USA are not equipped with the switch hardware and wiring to activate the rear fog light even though the light housing and bulb are installed in the rear bumper cover.) |
||
|
|
||
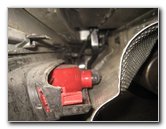 Red Plastic Retaining Clip |
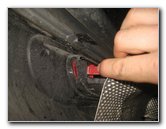 Gently Push In Red Tab |
|
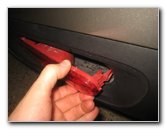
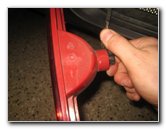
| Please allow the
car too cool off for at least an hour after driving it.
The rear fog light housing is right behind a heat shield for the exhaust pipes which could be very hot and burn your fingers. Look under the rear bumper cover and locate the red plastic retaining clips for the rear fog light housing. Gently push one or both of the red tabs in towards the center of the light housing to release them. |
||
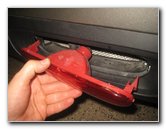
 Pull Out Light Housing |
 Black Bulb Socket |
|
| Then gently pull the light housing straight out of the opening in the rear bumper cover. | ||
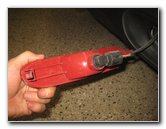
 1/4 Turn Counterclockwise |
 Bulb Socket Removed |
|
| Rotate the black
plastic bulb socket 1/4 turn in the counterclockwise direction before
pulling it straight out of the housing. Set the light housing aside in a safe place such as on top of a towel to prevent the lens cover from being scratched. |
||
|
|
||
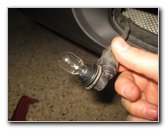
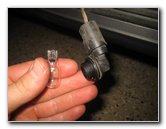 Pull Out Old Light Bulb |
 Old Light Bulb Removed |
|
| Carefully pull the old light bulb straight out of the socket. | ||
 Push In New Light Bulb |
 1/4 Turn Clockwise - Lock |
|
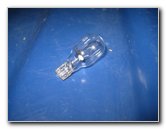
| Push a new number
921 light bulb straight into
the socket. If you would like to have a brighter rear fog light, install a compatible replacement 921 LED bulb. Re-insert the bulb socket into the housing and rotate it 1/4 turn in the clockwise direction to secure it into place. |
||
 Gently Pop In Housing |
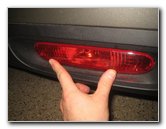 Light Housing Secured |
|
| Line up the light
housing with the opening in the back bumper cover. Gently snap in the light housing. You should feel or hear the two retaining clips "click" securely into place. Be sure to record the bulb change in your vehicle's service records. For more,
check out all of my
MINI Cooper DIY Repair & Maintenance Guides. |
||
| If you found this guide to be helpful,
please consider making a small donation by clicking on the PayPal.com
"Donate" button located to the right of this paragraph. Thank you!
(Note: I am not a registered charity. Donations are not tax deductible.) |