
Nissan Altima Overhead Map
Light Bulbs Replacement Guide
How to replace the overhead map light
bulbs in a fourth generation 2007 to 2012 Nissan Altima coupe or sedan.

By Paul B. Michaels Author & Photographer Auto Mechanic Since 1989 |
||
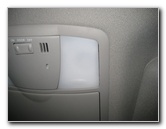
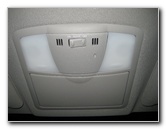 Overhead Map Lights |
 |
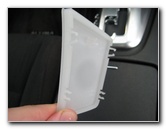
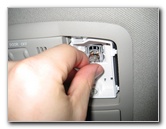
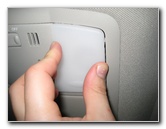
 Gently Pry Off Cover |
| This
automotive "how-to" guide was specifically written to assist owners
of the 4th generation 2007 to 2012 Nissan Altima in replacing a
burnt out overhead map light bulb. Owners of other Nissan or Infiniti vehicles such as the Altima Coupe, Versa, Maxima, Juke, Rogue, Murano, Xterra, Pathfinder, Sentra, Cube, Armada, Quest, Frontier, Titan, 370Z, GT-R, G25, G35, G37, M35 and M37 may also find this guide to be helpful. A replacement overhead map light bulb for the 07-12 Nissan Altima is part 168 from Sylvania and other automotive parts manufacturers. You can also use a # 168 LED, 194 or W5W bulb. The only tool needed to replace either of the two overhead map light bulbs is a small flathead screwdriver. You may also be able to use a key, coin, or pocket knife to remove the cover. |
||
|
|
||
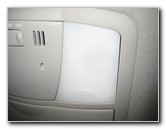
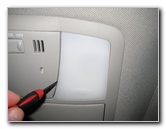
 Remove Bulb Cover |
 Cover Snap Fasteners |
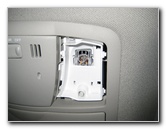
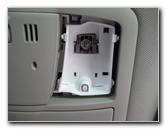 Bulb & Switch |
| Carefully insert the blade of the flathead screwdriver in between the side of the white plastic bulb cover and the overhead console. Gently pry the cover until it starts to come off the overhead console and remove it with your hand. | ||
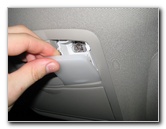
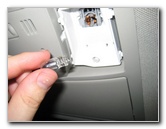 Pull Out Old Bulb |
 Old Bulb Removed |
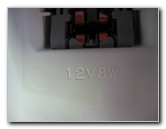 12V 8W Bulb # 175 |
| To remove the old bulb, grasp it between your thumb and forefinger. Pull the bulb straight out from the socket. | ||
|
|
||
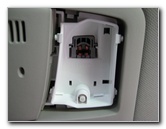
 Push In New # 175 Bulb |
 New Bulb Installed |
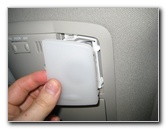 Gently Snap Cover In Place |
| Install a new # 175
bulb by pushing it straight into the socket. If you'd like, you can test the
new bulb by pushing the small circular white switch located towards the
front of the car. (Any other wedge base 5 watt bulb such as the # 168, 194
or W5W will also work.) I'd recommend using the Sylvania 168 LL long life light bulbs. |
||
 |
 |
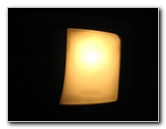 Test New Map Light Bulb |
| To finish the job,
gently push the white plastic bulb cover back into place. Test the new bulb
by pushing on the switch indicated by a raised button molded into the lens
cover near the front of the car. For more of my
maintenance instructions, click on the following links:
2007-2012 Nissan Altima 2.5 S Maintenance Guides, and
2002-2006 Nissan Altima 2.5 S Maintenance Guides. |
||
| If you found this guide to be helpful,
please consider making a small donation by clicking on the PayPal.com
"Donate" button located to the right of this paragraph. Thank you!
(Note: I am not a registered charity. Donations are not tax deductible.) |