
VW Tiguan
Serpentine Belt Replacement Guide
How to change the 2.0L TSI engine's
serpentine accessory belt in a 1st generation 2009 to 2017 Volkswagen Tiguan.

By Paul B. Michaels Author & Photographer Auto Mechanic Since 1989 |
||
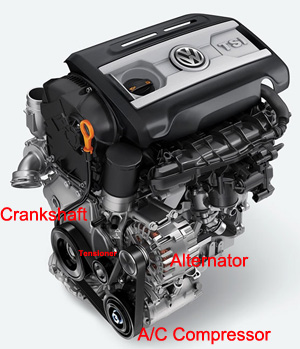
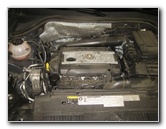 2016 Tiguan Engine Bay |
 Left (Passenger) Side |
 Serpentine Accessory Belt |
| This
automotive maintenance tutorial was specifically written to assist
owners of the first generation (2009, 2010, 2011, 2012, 2013, 2014,
2015, 2016 and 2017) Volkswagen Tiguan SUV in changing the
serpentine accessory belt on the 2.0 liter TSI turbocharged inline
four cylinder engine. Owners of other VW or Audi vehicles such as the Jetta, Passat, CC, Atlas, Touareg, Golf, Beetle, A3, S3, RS 3, A4, S4, A5, A6, S6, A7, S7, RS 7, A8, Q3, Q5, TT and Q7 may also find these DIY instructions to be helpful.' The OEM serpentine accessory belt part number was genuine Volkswagen 06J 260 849 D (also known as 06J-260-849-D or 06J260849D). A few other compatible replacement belts with their part numbers are as follows: Bando 6PK1115, Gates K060439, ContiTech PK060441, ACDelco 6K439, Dayco 5060440 and Continental Elite 4060440. The tools needed to complete this procedure include a 17mm socket with a 3/8" or a 1/2" drive ratchet. |
||
|
|
||
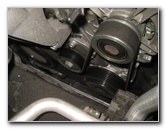
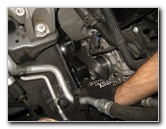
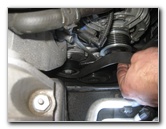
 Tensioner Pulley |
 17mm Tensioner Pulley Bolt |
 Use Wrench For Leverage |
| The first two steps
are to open the hood and then move to the left (passenger) side of the
engine bay. Take a moment to study how the OEM belt is routed around the pulleys including the alternator, tensioner pulley, crankshaft and the A/C (air conditioning system) compressor. Locate the oil filter at the top of the engine and look directly below it. The ribbed tensioner pulley and the tensioner assembly are located in between the crankshaft pulley and the alternator pulley. Attach the 17mm socket to a long 3/8" or 1/2" drive ratchet. Or you can use a long 17mm wrench. Place the 17mm socket over the bolt end on the tensioner pulley. Pull the ratchet towards yourself and the front of the SUV to rotate the tensioner arm. |
||
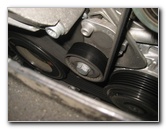
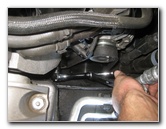
 Rotate Ratchet Forward |
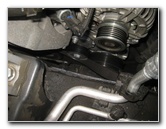 Slip Belt Off Alternator |
 Pull Belt Out of Engine Bay |
| Hold the ratchet
down with one hand and carefully slip the old belt off the alternator pulley
with your other hand. Continue pulling the old belt off the other pulleys. Lift the old belt out of the engine bay. Inspect the old belt for any fraying, chunks of missing rubber or other signs of damage. If the old belt appeared to be loose or the tensioner arm was very easy to rotate, you should consider replacing the entire tensioner assembly. Two compatible replacement tensioner assemblies with their part numbers are the Dayco 89653 and ACDelco 39087. |
||
|
|
||
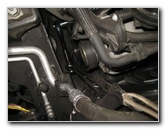
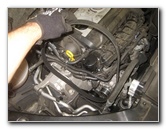
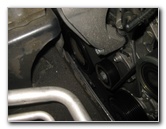
 Old Belt Removed |
 Lower In New Belt |
 Route Belt Over Pulleys |
| If the old belt is
in relatively good condition, you can keep it as an emergency spare backup
just in case the new belt fails prematurely.
I recommend buying the Bando 6PK1115 since it has excellent reviews on Amazon. If you prefer to have the OEM (original equipment manufacturer) belt, the part number is Volkswagen 06J 260 849 D (also known as part number 06J-260-849-D or 06J260849D). Lower the new belt down into the left side of the engine bay.
The ribbed side of the belt should be wrapped around the ribbed pulleys. The smooth part of the belt should be against the smooth tensioner pulley. Start by wrapping the ribbed side of the new belt around the large crankshaft pulley at the bottom rear of the engine. Then wrap the belt around the bottom of the A/C (HVAC system) compressor and under the smooth tensioner pulley. Hold the final loop of the new belt close to the alternator pulley. |
||
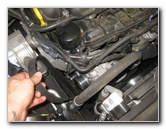
 Release Tensioner |
 New Belt Installed |
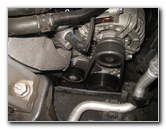 Start Engine - Check Belt |
| Place the 17mm
socket over the bolt end on the tensioner pulley. Pull the ratchet forward and down towards the front of the engine bay to release the tensioner arm. Carefully slip the last loop of the new belt over alternator pulley at the top front corner of the engine. Double check that the new belt is properly routed on the pulleys. Start the engine and listen closely for any strange sounds or odd noises that might indicate an improperly routed belt or a seized or worn out pulley. If you do hear any loud chirping, screeching or squealing sounds, immediately turn off the ignition and check the belt routing again. If the belt seems too loose, the tensioner assembly may need to be replaced. For more, please check out my other
2009-2017 VW Tiguan DIY Repair & Maintenance Guides. |
||
| If you found this guide to be helpful,
please consider making a small donation by clicking on the PayPal.com
"Donate" button located to the right of this paragraph. Thank you!
(Note: I am not a registered charity. Donations are not tax deductible.) |