
Chevrolet
Camaro Hood Support Struts Replacement Guide
How to change weak or failing hood lift
support struts on a sixth generation 2016 to 2021 GM Chevrolet Camaro.

By Paul B. Michaels Author & Photographer Auto Mechanic Since 1989 |
||
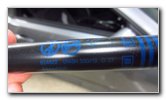
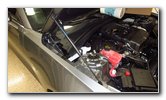 2020 Camaro Hood Strut |
 Wedge Open Hood - Box |
 Ball Socket & Mount |
| This automotive
maintenance tutorial was specifically written to assist owners of the sixth
generation (2016, 2017, 2018, 2019, 2020 and 2021) GM Chevrolet Camaro in
changing weak, failing or faulty hood lift support struts (also known as the
gas charged shocks, springs or "prop rods"). The development and release of the 7th generation Camaro has been delayed, so the current sixth generation will probably continue into the 2022 and 2023 model years. Owners of other General Motors vehicles from Chevrolet, Buick, GMC and Cadillac such as the Malibu, Impala, Bolt, Corvette, Trailblazer, Trax, Equinox, Blazer, Traverse, Tahoe, Suburban, Colorado, Silverado, Express, Encore, Envision, Enclave, Regal, Sierra, Terrain, Acadia, Yukon, Canyon, Savana, XT4, XT5, XT6, Escalade, CT4, CT5, CTS and CT6 may also find these DIY instructions to be helpful. The OEM (original equipment manufacturer) hood support struts on this 2020 Camaro were marked as part number GM 824822 0145N 330/19 C 27 84444305. Two compatible replacement sets of new hood support struts with their part numbers are as follows: Tuff Support 612346 and Lift Supports Depot # PM3357. The only tool needed to detach the old struts and install the new struts is a small flat head screwdriver. I highly recommend that you have an assistant with you during this procedure to hold the hood open for safety. You can also wedge some items on the other side of the engine bay in between the hood and the cowl near the windshield. I used a paper towel roll and an old Amazon cardboard box to keep the hood open while I changed out the passenger side support strut. |
||
|
|
||
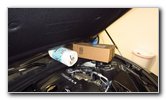
 Pry Out "C" Clip |
 Pull Socket Off Mount |
 Top Mount On Hood |
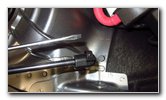
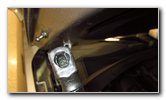
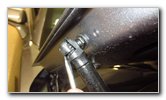
| Locate the small
"C" shaped black metal retaining clip on the bottom of the strut. Make sure your assistant is holding up the hood. Insert the small flat head screwdriver into the notch at the center of the "C" clip and gently pry it out away from the strut. You do not need to fully remove the "C" clip. Just hold it out far enough so that you can slip the ball socket off the ball mount attached to the side of the engine bay. |
||
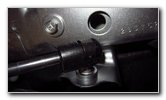
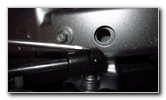
 Pry Back Retaining Clip |
 Pop Strut Off Ball Mount |
 OEM Part Number |
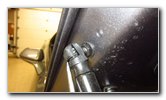
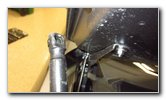
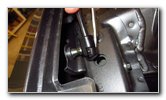
| Repeat the process
to release the top of the strut from the mount attached to the hood. The OEM part number on these struts was GM 824822 0145N 330/19 C 27 84444305. |
||
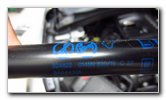
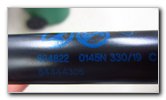 824822 0145N 330/19 |
 84444305 |
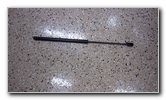 Old Strut Removed |
| Two compatible replacement sets of new hood support struts with their part numbers are as follows: Tuff Support 612346 and Lift Supports Depot # PM3357. | ||
 Grease In Ball Socket |
 Pry Back "C" Clip |
 Attach Bottom Mount |
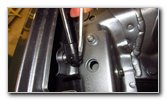
| Check to make sure
there is some grease in the ball socket of the new strut or at least some of
the old grease is still remaining on the ball mount. If the socket and the ball mount appear dry, apply a small amount of grease to help keep the struts from creaking, squeaking or groaning when you open and close the hood. Line up the new strut with the gas charged shock body at the top near the hood and the smaller shaft at the bottom by the engine bay. Carefully pry out the "C" shaped metal retaining clip about a 1/4" and pop the ball socket over the ball mount attached to the hood. Repeat the process to attach the lower end of the strut to the ball mount by the engine bay. |
||
 Push In Bottom Clip |
 Push In Top "C" Clip |
 New Hood Strut Installed |
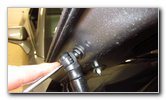
| Use the blade of
the screwdriver to firmly push in the "C" clips on the top and bottom of the
strut. Make sure the "C" clips are fully seated in place. Double check that the strut is securely attached to the hood and engine bay mounts. Repeat the process to replace the strut on the driver side. To test the new struts, open and close the hood several times. If the new struts are working properly, the hood should open by itself in a slow controlled manner and easily remain in the raised position by itself. Be sure to write down the procedure in your car's service records. Please
check out all of the
2016-2021 GM Chevrolet Camaro DIY Repair & Maintenance Guides. |
||
| If you found this guide to be helpful,
please consider making a small donation by clicking on the PayPal.com
"Donate" button located to the right of this paragraph. Thank you!
(Note: I am not a registered charity. Donations are not tax deductible.) |