
Chevrolet Camaro Serpentine
Accessory Belt Replacement Guide
How to change the serpentine accessory
belt on the Ecotec LTG 2.0L turbo I4 engine in a 2016 to 2021 Chevy Camaro.

By Paul B. Michaels Author & Photographer Auto Mechanic Since 1989 |
||
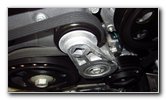
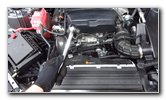
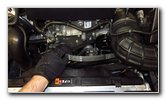
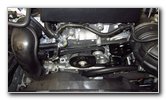
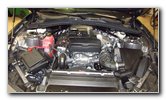 2020 LTG 2.0L I4 |
 Front of Ecotec Engine |
 Study Belt Routing |
| This automotive
maintenance tutorial was specifically written to assist owners of the sixth
generation (2016, 2017, 2018, 2019, 2020 and 2021) GM Chevrolet Camaro in
changing the serpentine accessory belt on the Ecotec LTG 2.0L turbocharged
I4 engine. (The steps should be similar for the LGX 3.6L V6, LT1 6.2L V8 and
6.2L LT4 supercharged V8.) The development and release of the 7th generation Camaro has been delayed, so the current sixth generation will probably continue into the 2022 and 2023 model years. Owners of other General Motors vehicles from Chevrolet, Buick, GMC and Cadillac such as the Malibu, Impala, Bolt, Corvette, Trailblazer, Trax, Equinox, Blazer, Traverse, Tahoe, Suburban, Colorado, Silverado, Express, Encore, Envision, Enclave, Regal, Sierra, Terrain, Acadia, Yukon, Canyon, Savana, XT4, XT5, XT6, Escalade, CT4, CT5, CTS and CT6 may also find these DIY instructions to be helpful. The OEM (original equipment manufacturer) belt part number on this 2020 Camaro was GM 12664598. Two other compatible replacement belts with their part numbers are as follows: Dayco 5050689 and Gates K050689. Please verify the correct part number for your vehicle by using the Amazon Part Finder website. The only tool needed to remove and replace the belt is a 1/2" drive breaker bar or a 1/2" drive ratchet. The first two steps are to open the hood and locate the serpentine belt on the front of the engine (also known as the "v-belt" or "fan belt"). |
||
|
|
||
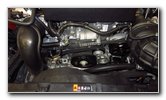
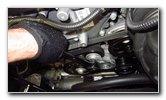
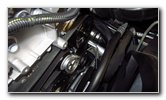
 Alternator - Far Left |
 Tensioner Pulley & Arm |
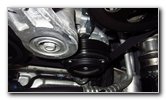 A/C Compressor |
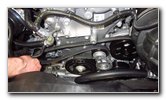
| Take a minute to
study how the old belt is routed around the various pulleys including the
alternator, tensioner, water pump (coolant pump), air conditioning system
compressor and the crankshaft pulley. If the engine is hot, allow it to cool off for an hour or two before continuing with the procedure. |
||
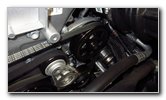
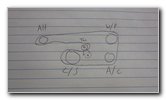 Belt Routing Diagram |
 Pulleys Labeled |
 1/2" Drive Ratchet |
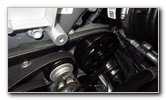
| There are belt
routing diagrams included in the owner's manual for the 2.0L I4, 3.6L V6 and
6.2L V8 engines. Locate the square shaped opening in the tensioner assembly close to the center of the black pulley. |
||
 Breaker Bar On Tensioner |
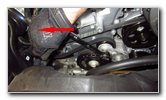 Release Belt Tension |
 Slip Belt Off Pulleys |
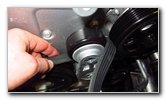
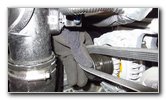
| Attach the 1/2"
drive breaker bar or a 1/2" drive ratchet to the tensioner arm. Firmly push the breaker bar handle to the left (passenger side) and down towards the floor to move the tensioner arm away from the belt. Hold the tensioner arm in the released position with one hand. Carefully use your other hand to slip the old belt off the old pulleys.
Once the old belt has been slipped off one or more of the pulleys, very slowly release the tensioner assembly back towards the right side of the engine. Detach the breaker bar from the tensioner. |
||
 Removing Old Belt |
 Slip Belt Behind Tensioner |
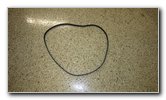 Old Belt Removed |
| Continue pulling
the old belt off the other pulleys. Slip the old belt behind the back side of the tensioner pulley in between the engine. Inspect the old belt for any damage or signs of wear such as chunks of missing rubber, exposed metal cables or melting. If the old belt appears to be in good condition, consider keeping it in your garage or trunk as an emergency backup part just in case the new belt fails unexpectedly. |
||
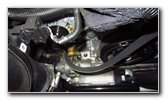
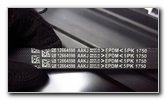 OEM Part Number |
 Lower In New Belt |
 Slip Behind Tensioner |
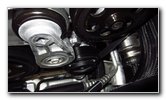
| The OEM (original
equipment manufacturer) serpentine accessory belt on this 2020 Camaro was
marked with the part number GM 12664598 (AAKJ Made In Mexico EPDM 5PK 1750). If the old belt seemed very loose or the tensioner arm was very easy to rotate, you may need to replace the tensioner assembly. The OEM part number for the belt tensioner assembly is ACDelco 12627119. It would also be a good idea to replace the tensioner assembly if the pulley does not spin freely, wobbles or makes a grinding noise indicating that the bearing is worn out. |
||
 Route Belt Around Pulleys |
 A/C & Coolant Pump |
 Smooth Side - Tensioner |
| Lower the new belt
down into the front of the engine bay. A good rule to remember is that the ribbed side of the belt should be wrapped around ribbed pulleys and the smooth side should be routed against any smooth pulleys. Slip the belt behind the tensioner arm and wrap the smooth side against the tensioner pulley. Wrap the ribbed side of the belt over the water pump, under the A/C compressor and around the crankshaft. |
||
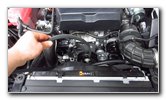
 Last Loop - Alternator |
 Attach 1/2" Breaker Bar |
 New Belt Installed |
| Hold the final loop
of the belt near the alternator pulley on the far left (passenger) side of
the engine. With your other hand, attach the 1/2" drive breaker bar to the tensioner arm. Firmly push the breaker bar handle to the left (passenger side) and down towards the floor to move the tensioner arm to the fully released position. Very carefully slip the last loop of the new belt over the alternator pulley.
Once the last loop of the new belt is properly seated on the ribbed alternator pulley, slowly release the tensioner arm. |
||
 Double Check Routing |
 Belt Seated Properly |
 Belt Change Complete |
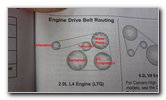
| Use the belt
routing diagram in the owner's manual or on this page to double check that
the belt is properly routed around the pulleys.
Make sure the belt is fully seated on the ribbed pulleys and centered on the smooth tensioner pulley. To test the new belt, start the engine and listen closely for any strange sounds. If you do hear an odd noise, immediately turn off the ignition. If you hear a "chirp, chirp, chirp" sound, the belt might be too loose and the tensioner should be replaced. If you hear a screeching or loud squealing sound, the belt might be improperly routed, too tight, or a pulley bearing may be failing. Be sure to write down the belt change in your vehicle's service records. According to the service and maintenance schedule in the owner's manual the serpentine accessory belt should be replaced every 150,000 miles. Please
check out all of the
2016-2021 GM Chevrolet Camaro DIY Repair & Maintenance Guides. |
||
| If you found this guide to be helpful,
please consider making a small donation by clicking on the PayPal.com
"Donate" button located to the right of this paragraph. Thank you!
(Note: I am not a registered charity. Donations are not tax deductible.) |