
Ford
Expedition Tail Light Bulbs Replacement Guide
How to replace the brake, reverse, and
rear turn signal / parking light bulbs in a 2003 to 2006 Ford Expedition SUV.

By Paul B. Michaels Author & Photographer Auto Mechanic Since 1989 |
||
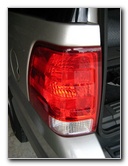 Ford Expedition Tail Light |
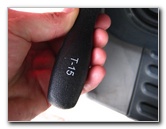 Torx T-15 Screwdriver |
|
| This
automotive how-to guide was specifically written to assist owners of
the 2003 to 2006 Ford Expedition SUV in replacing a burnt out brake
/ turn signal or reverse / back up light bulb in the tail light assembly. Owners of other similar Ford vehicle models such as the Explorer, Lincoln Navigator, F-150, Lightning, Excursion, Escape, Bronco, and Sport Trac may also find these instructions to be useful. Replacement light bulbs from Sylvania and other manufacturers have the following part numbers: Brake / Turn Signal # 3157, and the Reverse / Back Up # 3156. The only tool needed to complete this procedure is a star bit Torx T-15 screwdriver. |
||
|
|
||
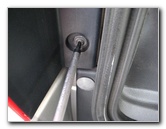 Removing Torx T-15 Screw |
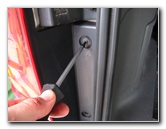 2nd Torx T-15 Screw |
|
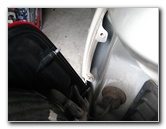
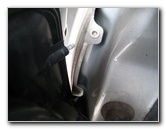
| To access the two
Torx T-15 screws that hold the Ford Expedition tail light assembly in place,
raise the rear lift gate.
Unscrew the two screws and then gently pull the tail light assembly away from the corner of the vehicle. |
||
 Pull Off Tail Light Assembly |
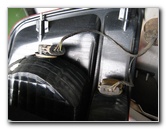 Stop/Signal & Reverse Bulbs |
|
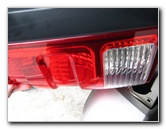
| At the rear of the
tail light assembly, you'll see two light bulb sockets.
The one at the top of the assembly is the # 3157 combination brake, parking and turn signal bulb. The lower bulb is the # 3156 reverse or "back up" light. |
||
|
|
||
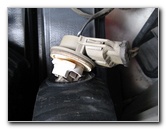 Reverse / Back Up Bulb |
 Brake / Turn Signal Bulb |
|
| To remove either
socket and bulb from the tail light assembly, turn it 1/4 turn counter
clockwise and pull it straight out.
To separate the light bulb from the socket, just pull it straight out. If it won't come out easily, try wiggling it while pulling. Push in a new # 3157 bulb in the upper stop/signal socket and a new # 3156 bulb in the lower reverse/back-up socket. Test the new bulbs by having someone step on the brakes, activate the turn signal and put the SUV in reverse. |
||
 |
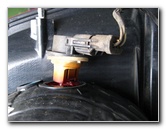
 Re-Insert Tail Light Assembly |
|
| Re-insert the bulb
sockets in to the housing and rotate them 1/4 turn clockwise to secure them
in place. Line up the two pegs or "spikes" on the back of the housing near the outer edge with their corresponding grommets on the rear corner of the SUV. Push the tail light housing back in to place. Tighten the two Torx T-15 screws in the clockwise direction until they are snug. Try to avoid over tightening the screws to prevent from cracking the plastic inner edge of the tail light assembly. For more of my
related automotive guides or reviews, click on the following links:
Ford
Expedition 5.4L V8 Engine OIl Change Guide,
Ford Expedition Headlight Bulbs Replacement Guide,
Ford Expedition Overhead Map Light Bulbs Replacement Guide,
Meguiar's Headlight Restoration Kit Review,
WeatherTech FloorLiner Mats Review,
Car Headlight / Tail Light Condensation Repair Guide,
Sunforce Solar Battery Maintainer,
Corroded Car Battery Terminal Replacement Guide,
Garmin Nuvi 260W GPS Review,
Car Interior Carpet Replacement Guide,
Buffing Old Faded Headlights Guide,
K&N Air Filter Cleaning Guide, and
Zaino Bros Show Car Polish Review. |
||
| If you found this guide to be helpful,
please consider making a small donation by clicking on the PayPal.com
"Donate" button located to the right of this paragraph. Thank you!
(Note: I am not a registered charity. Donations are not tax deductible.) |