
Goodman HVAC
Condenser Dual Run Capacitor Replacement Guide
How to replace the dual run/start
capacitor in a Goodman brand A/C condenser unit with picture illustrated
instructions.

By Paul B. Michaels Author & Photographer Auto Mechanic Since 1989 |
||
|
|
||
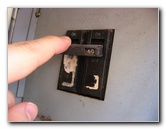
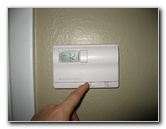 Turn Off A/C Thermostat |
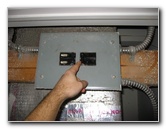 Turn Off HVAC Breakers |
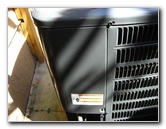
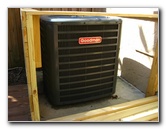 Goodman Condenser |
| This home
maintenance guide was specifically written to assist owners of the
Goodman brand A/C condenser model # GSC130361FA in replacing a
faulty dual run capacitor. Owners of other similar HVAC condenser units from manufacturers such as Gibson, Rheem, Trane, GE (General Electric), Mars, Carrier, York, Lennox, Frigidaire, Kenmore, Mitsubishi, Maytag, and Whirlpool may also find this guide to be helpful. The most obvious sign of a dual run capacitor that needs to be replaced is that the A/C air handler inside your home will only blow room temperature air out of the vents or "registers". Another symptom of a faulty dual run capacitor is that both the condenser's fan and compressor components will not start working. You may instead just hear a faint electrical humming sound. Usually, the condenser fan motor can be manually started up by spinning it with a small stick. |
||
|
|
||
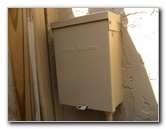 Condenser Power Box |
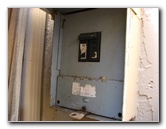 Condenser Power Breaker |
 Turn Off Breaker Switch |
| The first steps are
to turn off the A/C system at the thermostat, turn off the breaker switches
for the system in the home's breaker box, and turn off the power breaker
switches at both the indoor air handler and outside by the condenser unit. If you have a GE Mars or Rheem A/C system, you may be better served by my capacitor replacement guides for those two specific manufacturers. Click on the blue links in the previous sentence to visit the pages. |
||
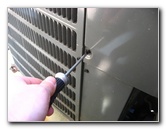
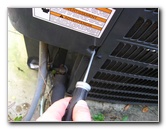
 Capacitor & Relay Access |
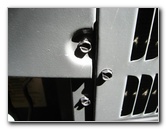 Flathead Screw |
 Remove 1st Screw |
| To access the dual
run capacitor and relay of a Goodman GSC130361FA condenser unit,
locate the small corner panel on the unit.
The panel is located on the only corner of the condenser unit that does not contain vent holes and there is a large wire loom coming out of the bottom of the panel. |
||
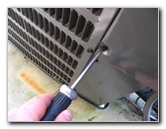
 Remove 2nd Flathead Screw |
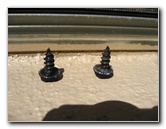 Two Screws Removed |
 Pull Access Panel Off |
| There are only two
small flathead screws at each lower corner of the access panel holding it in
place.
Remove them with a flathead screw driver and set them aside in a safe place. Pull the panel down and away from the corner of the condenser unit. |
||
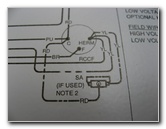
 Access Panel Removed |
 Electrical Schematics |
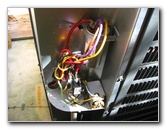 Capacitor & Relay |
| Below the access
panel, you'll be able to see the relay unit and the round dual run
capacitor, which appears similar to a large battery.
Be careful!
There are several common methods for discharging the dangerous voltage stored in a dual run capacitor. They include using a rubber handled screwdriver to short all of the terminals (possibly dangerous), using a resistor attached to insulated wire leads (safest), and using a motor/bulb or other electrical device attached to wires. |
||
|
|
||
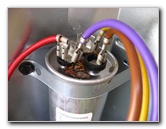 Round Dual Run Cap |
 |
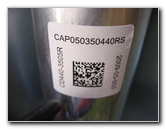 CAP050350440RS |
| However you choose
to discharge the capacitor, be sure to double check it with a
multimeter
tester to ensure that there is no longer any power stored in it before
touching the capacitor with your hands. It's also a good idea to wear thick
rubber gloves when handling an A/C capacitor and always avoid touching the
terminals at the top. If your dual run capacitor is bulging, has swollen sides or is leaking a greasy and/or oily substance, it may already be discharged and definitely needs to be replaced. Avoid touching the greasy gel or oily liquid leaking from the capacitor since some older capacitors were manufactured with carcinogenic (cancer causing) chemicals known as PCBs. Once the capacitor is discharged, you can safely pull off the wires from the terminals using rubber handled needle nose pliers or rubber glove covered hands. Take note of which colored wires attach to which terminal. There are three terminals on a dual run capacitor. The terminals are usually marked with the following symbols - "C" (common), "F" (fan), and "HERM" (hermetic compressor). You can also sometimes differentiate the terminals by the number of connection points they have. The "C" (common) terminal usually has four, the "HERM" (compressor) usually has three, and the "F" (fan) terminal has only one or two. On this Goodman GSC130361FA condenser, the "C" Common terminal of the dual run capacitor was attached to the red (RD) and purple (PU) wire. The "F" FAN terminal was connected to the brown (BR) wire and the HERM compressor terminal was attached to the yellow (YL) wire. |
||
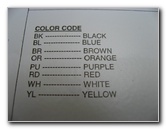 Goodman Wire Color Codes |
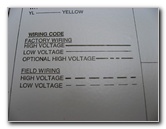 Goodman Wiring Codes |
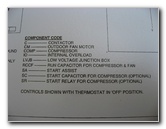 Goodman Component Codes |
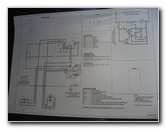
| I took several
close up photos of the information on the back of the condenser's electrical
access panel just in case the electrical schematics, wire color codes,
wiring codes, and component codes paper inside your condenser is worn away
or missing.
The old capacitor is held in place by a single metal strap secured with a single flathead screw. Hold the base of the capacitor with one hand while loosening the screw until it can easily slipped out of the band. A replacement capacitor can be purchased at a variety of places such as an appliance parts supply warehouse, an HVAC parts wholesale store, online retail websites such as Amazon, or you might be able to buy one at a premium price from your local A/C repair company. It's best to take the old part with you when you guy to buy the new one to ensure that you purchase a replacement capacitor with the correct microfarads and voltage rating. A new capacitor, depending on the type, could range in price from about $10 to around $40 with the most common price being between between $25 and $30. If the only suitable replacement capacitor available is oval instead of round, or round instead of oval, it will still work fine. You may just need to adjust the metal retaining strap or find a different way to securely mount the capacitor. |
||
 Capacitor Wiring Diagram |
 Replace Access Panel |
 Tighten 2 Flathead Screws |
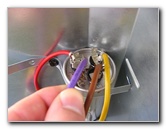
| To finish the job,
slide the new dual run capacitor under the metal retaining band and tighten
the single flathead screw. Then attach the color coded wires onto the proper
terminals by pushing the female wire connectors straight down on to the
metal blades. Double check that all of the wires are securely plugged into the proper places on top of the new dual run capacitor before re-attaching the electrical access panel and tightening the two flathead screws. Turn on the condenser's power breaker switch outside, flip on the HVAC power breaker switches inside the house, turn on the air handler's breaker switch (if you turned it off), and turn on the A/C system at the thermostat. You should hear the condenser's compressor
motor click on and the fan motor start spinning. Then shortly afterward, the
air handler should begin blowing cool air through the home's A/C vents. |
||
| For more of my home
repair and maintenance guides, please click on the following links:
Rheem A/C Capacitor Replacement Guide,
Rheem HVAC Condenser Coils Cleaning Guide,
Refrigerator Freezer Icemaker Replacement Guide,
Bathtub Shower Diverter Valve Replacement Guide,
Home Water Heater Sediment Flushing Guide,
Rheem HVAC Air Handle Coils Cleaning Guide,
A/C Condensate Water Drain Pipe Flushing Guide,
Home Clothes Dryer Lint Vent Cleaning Guide,
Laptop HDMI To HDTV Over CAT6 Connection Guide,
Culligan US-600A Under Sink Water Filter Installation Guide,
Culligan IC-EZ-1 Drinking Water Filter Installation Guide,
Culligan IC-100 Icemaker Water Filter Installation Guide,
Kitchen Sink Drain Leak Repair Guide,
Hunter Just Right Digital Thermostat Installation Guide,
Sticky Door Lock Lubrication Guide,
Honda EU3000is Generator Maintenance Guide,
Kenmore Oven/Range 220V Power Restoration Guide,
Toilet Water Supply Valve Leak Repair Guide,
Refrigerator Water Leak Repair Guide,
GE HVAC Condenser Dual Run Capacitor Replacement Guide,
Delta 75520 Massaging Shower Head Installation Guide, and the
Carpenter Bee Insect Pest Control Guide.
Please check out my full list of
DIY Home Repair &
Maintenance Guides. |
||
| If you found this guide to be helpful,
please consider making a small donation by clicking on the PayPal.com
"Donate" button located to the right of this paragraph. Thank you!
(Note: I am not a registered charity. Donations are not tax deductible.) |