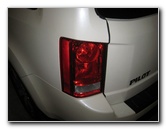
The tail light housings of a second generation (2009, 2010, 2011, 2012, 2013, 2014 & 2015) Honda Pilot SUV contain the brake, rear turn signal and reverse light bulbs. If you need to change a burnt out bulb, check out my DIY tutorial (with the replacement part numbers) by clicking on the text link or thumbnail image below.
2009-2015 Honda Pilot License Plate Light Bulbs Replacement Guide
If you need to change a burnt out license plate light bulb in the tailgate door of your 2nd generation (2009, 2010, 2011, 2012, 2013, 2014 & 2015) Honda Pilot SUV, check out my DIY tutorial for the procedure (with the replacement part number) by clicking on the text link or thumbnail image below.
2009-2015 Honda Pilot License Plate Light Bulbs Replacement Guide
2009-2015 Honda Pilot Cargo Area Light Bulb Replacement Guide
If you need to change a burnt out cargo area (“trunk”) light bulb located in the headliner near the tailgate door of your 2nd generation (2009, 2010, 2011, 2012, 2013, 2014 & 2015) Honda Pilot SUV, check out my DIY tutorial for the procedure (with the replacement part number) by clicking on the text link or thumbnail image below.
2009-2015 Honda Pilot Cargo Area Light Bulb Replacement Guide
2009-2015 Honda Pilot Door Courtesy Step Light Bulb Replacement Guide
If you need to change a burnt out courtesy step light at the bottom of a plastic interior door panel in your second generation (2009, 2010, 2011, 2012, 2013, 2014 & 2015) Honda Pilot SUV, check out my DIY tutorial for the procedure (with the replacement part numbers) by clicking on the text link or thumbnail image below.
2009-2015 Honda Pilot Door Courtesy Step Light Bulb Replacement Guide
2009-2015 Honda Pilot Dome / Rear Passenger Reading Light Bulbs Replacement Guide
The second generation (2009, 2010, 2011, 2012, 2013, 2014 & 2015) Honda Pilot is equipped with two sets of dome (or rear passenger reading lights) located above the 2nd row and third row of seats. Take a look at my DIY tutorial for replacing a burnt out dome light bulb by clicking on the text link or thumbnail image below.
2009-2015 Honda Pilot Sun Visor Vanity Mirror Light Bulbs Replacement Guide
If you need to change a burnt out vanity mirror light bulb in the sun visors of your second generation (2009, 2010, 2011, 2012, 2013, 2014 & 2015) Honda Pilot SUV, or you’d like to upgrade them both to brighter LED bulbs, check out my DIY tutorial for the procedure with the replacement part numbers by clicking on the text link or thumbnail image below.
2009-2015 Honda Pilot Vanity Mirror Light Bulbs Replacement Guide
2009-2015 Honda Pilot SUV Map Light Bulbs Replacement Guide
If you need to change a burnt out map light bulb in the overhead console of your second generation (2009, 2010, 2011, 2012, 2013, 2014 & 2015) Honda Pilot SUV, check out my DIY tutorial for the procedure (including the replacement part number) by clicking on the text link or thumbnail image below.
2009-2015 Honda Pilot Key Fob Battery Replacement Guide
If the key fob remote control for the keyless entry system of your second generation (2009, 2010, 2011, 2012, 2013, 2014 & 2015) Honda Pilot SUV hasn’t been working very well recently, you probably need to change the battery. Check out my DIY tutorial for the procedure (including the replacement part number) by clicking on the text link or thumbnail image below.
2005-2015 Toyota Tacoma SR5 4WD Front Disc Brake Pads Replacement Guide
If you need to change the front brake pads on your 2nd generation (2005, 2006, 2007, 2008, 2009, 2010, 2011, 2012, 2013, 2014 & 2015) Toyota Tacoma, check out my DIY guide (with the part numbers) by clicking on the text link or thumbnail image below.
2005-2015 Toyota Tacoma 1GR-FE 4.0L V6 Engine Serpentine Accessory Drive Belt Replacement Guide
If you’ve been hearing a squealing, chirping, screeching or squealing sound coming from the OEM serpentine (A.K.A. accessory or “drive”) belt on the 1GR-FE 4.0 liter V6 engine in your 2nd generation (2005, 2006, 2007, 2008, 2009, 2010, 2011, 2012, 2013, 2014 & 2015) Toyota Tacoma pickup truck, you probably need to replace the rubber belt. Check out my DIY instructions for the procedure (including the replacement part numbers) by clicking on the text link or thumbnail image below.


