
Hyundai
Accent Headlight Bulb Replacement Guide
A pictures illustrated "how-to" guide for
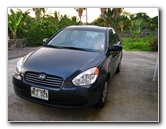
replacing the headlight bulb in a 2010 Hyundai Accent GLS 4 door sedan.

| This automotive "how to" instruction guide was specifically written to assist owners of the 2010 Hyundai Accent GLS 4 door compact sedan. Owners of other third generation Hyundai Accent cars (2005, 2006, 2007, 2008, 2009, 2010) in the Blue, GS, SE and GLS trim levels may also find this guide to be useful. Please proceed with caution at your own risk! | ||
 |
 |
 |
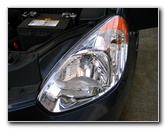
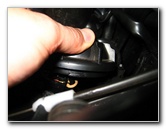
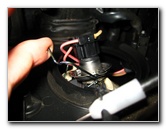
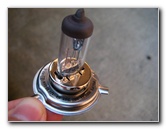
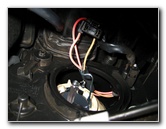
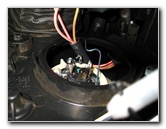
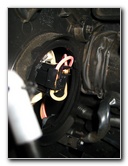
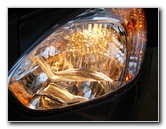
| This 2010
Hyundai Accent GLS 4 door compact car is equipped with a dual low beam
and high beam headlight bulb. The OEM (original) part is a Philips 9003 LL HB2 DOT H4 12V 60 / 55 W. A variety of replacement headlight bulbs from Sylvania all begin with "9003" in the part number. A new bulb costs anywhere from about $6 to $10 or more for specialty bulbs. No tools of any kind are needed to replace the headlight bulb in the 2010 Hyundai Accent. Start off by opening the hood and examining the rear of the headlight assembly. Grab the round black plastic headlight bulb cover and twist clockwise a quarter turn. Lift the cover out of the way. Then you'll see a black power connector, a few wires, and a metal retaining bar. |
||
 |
 |
 |
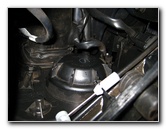
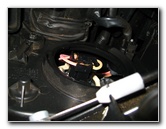
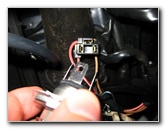
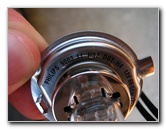
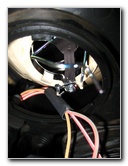
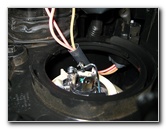
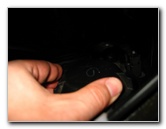
| The lower part of the headlight bulb retaining arm is secured by a small metal hook. | ||
 |
 |
 Metal Retaining Arm Released |
| To release the
retaining arm, push down on the bend and move the arm over to your left to
unhook it. This should require only minimal effort.
Do not use excessive force. |
||
 |
 |
 |
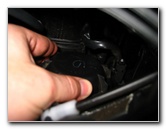
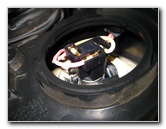
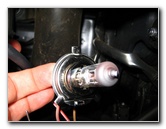
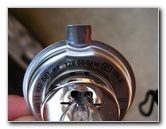
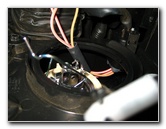
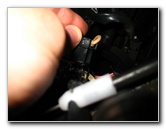
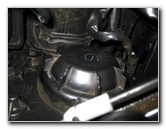
| Once the retaining
arm is free, move it up and out of the way.
Then the headlight bulb, black power connector and wires can be pulled out of the headlight housing. |
||
 |
 |
 |
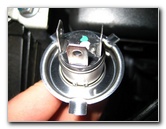
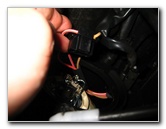
| To separate the headlight bulb from the power connector, just pull and wiggle on the connector until it slides off the three power prongs on the headlight bulb. | ||
 |
 |
 |
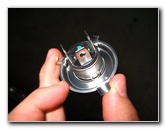
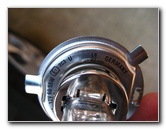
| The new headlight
bulb can only be inserted into the housing one way due to its three metal
tabs.
If you examine the tan plastic inside the headlight assembly, you'll see how the bulb needs to be rotated to fit into the assembly. The two metal tabs should be facing down and the one sole metal tab should be facing towards the sky. |
||
 |
 |
 |
|
After the new 9003 headlight bulb is securely inserted into the headlight assembly, gently lower the retaining arm over it. |
||
 |
 |
 |
| With the retaining arm almost all the way down, push it down slightly to the left and then to the right to catch it in the metal hook. | ||
 |
 |
 |
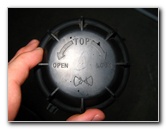
| Now reattach the
black plastic power connector by sliding it onto the three power prongs on
the back of the headlight bulb.
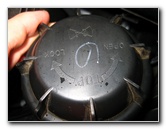
Finally, place the black plastic bulb cover over the opening in the assembly with the "Top" mark at the top and rotate it counter clockwise a quarter turn. That's it! Verify that the new bulb works and if it doesn't, check for a burnt headlight fuse. |
||
 |
 |
 |
| For more of my
related automotive updates, click on the following links:
Hyundai Accent
Tail Light Bulbs Replacement Guide,
Hyundai Accent Cabin Air Filter Replacement Guide,
Zaino Show Car Polish Review,
WeatherTech FloorLiner Review,
Headlight & Tail Light Condensation Solution Guide,
Corroded Car Battery Terminal Replacement Guide,
Garmin Nuvi 260W GPS Review,
Car Interior Carper Replacement Guide,
Faded Headlights Buffing Guide, and
K&N Air Filter Cleaning Guide. |
||
| If you found this guide to be helpful,
please consider making a small donation by clicking on the PayPal.com
"Donate" button located to the right of this paragraph. Thank you!
(Note: I am not a registered charity. Donations are not tax deductible.) |